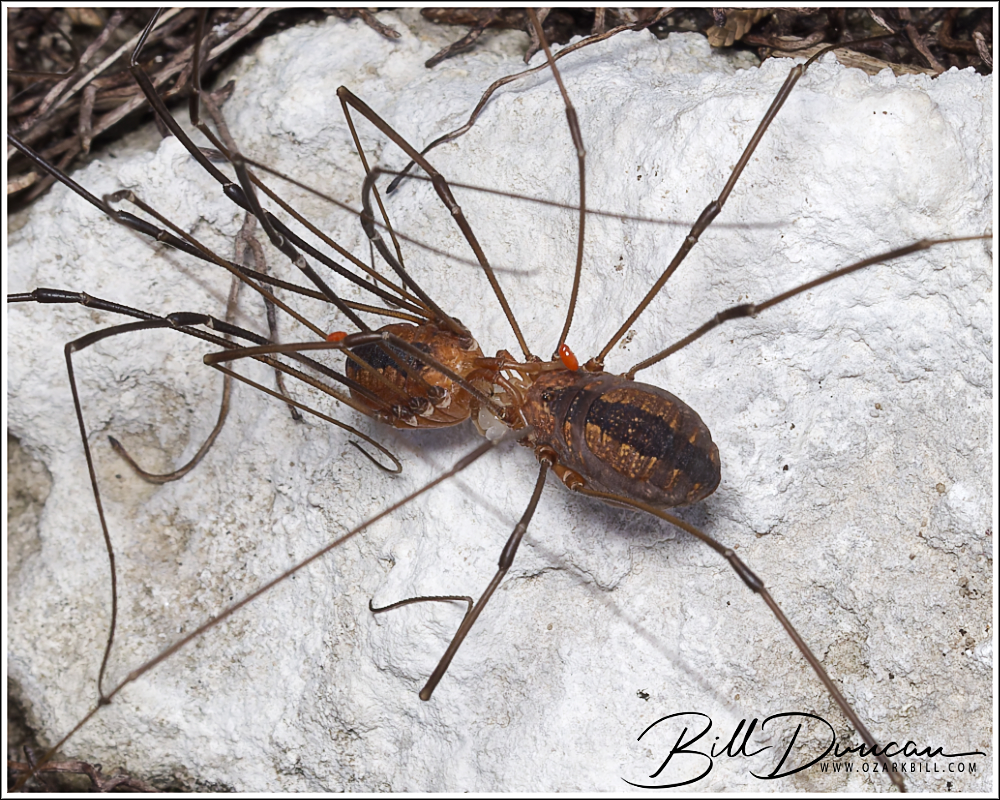
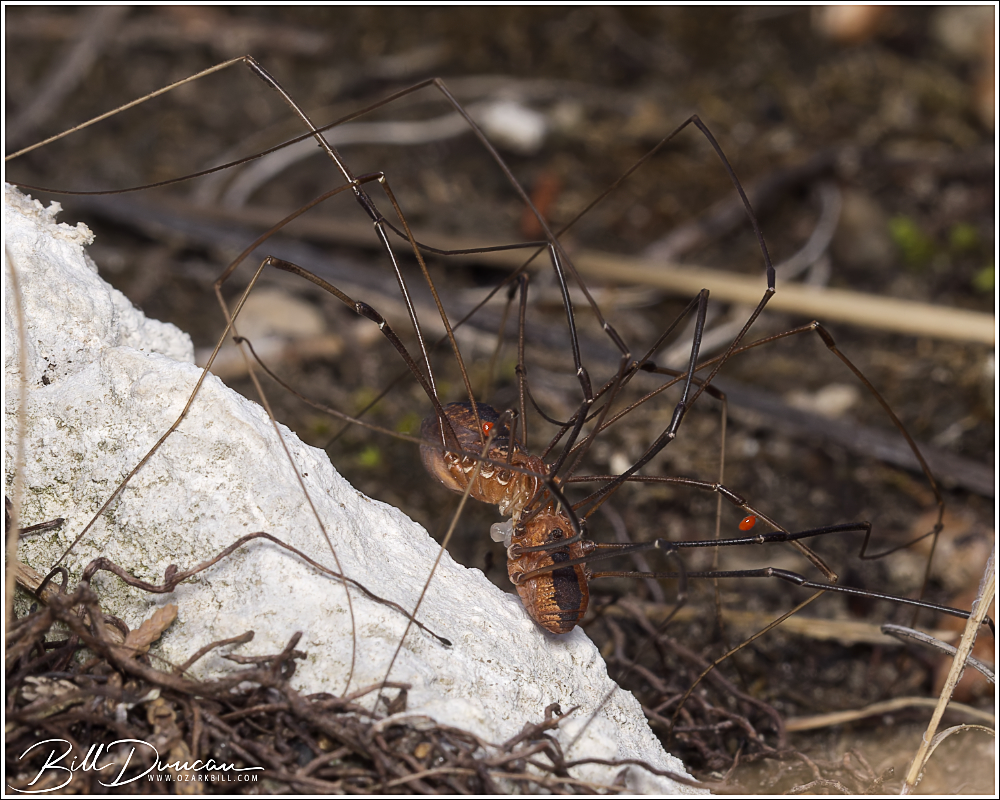
Big Spring Country – Autumn 2022

A few pics from a trip Sarah and I took in late October to see some of the big springs in southern Missouri.

The large effluence boil of the aptly named, Big Spring.
A bit of a different angle, this shows the water shooting down the effluent stream just past the primary boil, on its way to the Current River.
Nearly a two-hour drive west of Big Spring is Hodgson Spring and Mill. Always one of my favorites of the many spectacular Missouri springs.

Leps from the Prairie Garden Trust

I’m finally getting around to posting photos of some Leps that were taken during the WGNSS Nature Photography Group’s quite enjoyable visit to Prairie Garden Trust located in Calloway County, MO. I can’t express how much I appreciate this location and the people that manage it. Lorna and Henry Domke gave our group a personal walking tour around much of their fabulously managed naturescapes – in my opinion the perfect exemplar of how and why to manage natural areas. I thought I would have been back by now, but time has a way of moving too fast and there’s only so many weekends in the year.

Delaware Skipper (Anatrytone logan)

Text from their website:

Vision

What the PGT will become

The PGT is a gem of a nature garden in central Missouri where people enjoy strolling by woods with large old trees, prairies filled with a mix of native wildflowers, and ponds and streams rich in native aquatic life. It is free of exotic, invasive plants and animals. Visitors are inspired there to learn about and take better care of nature.

Zebra Swallowtail (Protographium marcellus)

Mission

What we do

The Mission of the PGT is to inspire people by letting them experience the beauty of nature found in a variety of enhanced native habitats on the PGT property.

Values

What we believe

Native plants are good for healthy habitats, while invasive, non-native plants are detrimental and should be removed.

We believe that knowing what plants and animals exist here and how they change over time is valuable. We want to avoid harvesting natural resources on the property for income so mature habitats can develop here.

We support removing plants (using fire, herbicides and mechanical means) and animals (by trapping or hunting) as needed for the management of a beautiful habitat and to maintain the balance of nature, but not as a source of income or recreation.

We believe that quiet personal experiences in nature enhance well-being and that crowds detract from that.

Hummingbird Clearwing (Hemaris thysbe)

We believe that unmanaged habitats tend to be messy, but they can be made more visually appealing by following an artistic landscape design. By having some areas of the PGT less tended and other areas along trails more tended, we offer a nature garden within a natural area.

We believe that knowing the natural, geologic and cultural history of the PGT property is of value. It’s where a coral reef developed 360 million years ago, where the Ozark hills meet the glaciated plains, where native Americans hunted 2000 years ago and where settlers built a thriving pottery almost 200 years ago.

Clouded Sulphur (Colias philodice)
Northern Broken-Dash (Wallengrenia egeremet)
Wild Indigo Duskywing (Erynnis baptisiae)

From the Garden – Skippers and Bees

As the wildflower bed in the front yard begins to mature, the pollinators have come in droves. I really enjoyed getting to know the members of the Hesperiidae (skipper butterflies) this year. Although suburbia seems to support only a few species, their numbers were great in my yard. Most of these are considered “grass skippers” due to their host plant needs. It makes sense that these species would do well in a suburban area with plenty of flowering natives. Most grass skippers will use zoysia and Bermuda grass as host plants. I hate to think how many larvae get destroyed in the neighborhood each season with the relentless lawn mowing.

These first three photos are the sachem (Atalopedes campestris). This is a very common species in the yard and they seem to have a very long flight season. I noticed they come in a variety of shades and patterns that can make identifying them a bit troublesome.

Next up is the overlooked beauty but common Peck’s skipper (Polites peckius). Along with the sachem, this guy was common for most of the flowering season.

The final skipper from the yard is a favorite among anyone who cares to notice skippers. The brilliant fiery skipper (Hylephila phyleus). Although I found a scattered few in May, June and July, they seem to have a little later season than the others. I found them in the tens in August and September.

If you want to have lots of skippers, I highly recommend planting asters in the genus Symphyotrichum. This will attract skippers and many other insect pollinators who need these plants.

Finally, I found a very interesting solitary bee that was feeding on the Asclepias tuberosa that was blooming in the glade garden that installed around our mailbox this past May. This is a male carpenter-mimic leafcutter bee (Megachile xylocopoides).

M45 – Subaru! (November 2022)

My first attempt at the Pleiades Star Cluster (M45)

The Pleiades Star Cluster (M45)
The Pleiades, or as it is called in Japan – Subaru, has been near the top of my list of deep sky objects since I began to play in astrophotography. This star cluster is one of the most prominent objects in the night sky and can be easily seen with the naked eye, although it is a stunner through binoculars or a scope. Folks with very good vision under dark skies have been reported to be able to see seven stars, giving this cluster another of its names – the Seven Sisters. Whatever you want to call it, M45 is a relatively young cluster of approximately 1500 young stars (the cluster is thought to have formed around 100 million years ago). The majority of these stars are bright-burning blue stars and, as this cluster passes through a dust cloud in the Milky Way, the blue light from the brightest stars reflects off this foreground dust creating the blue nebulosity that surrounds them. M45 is potentially the closest star cluster to earth at about 444 light years away and is the nearest Messier object to earth.

Collecting the data
Along with the Orion Nebula (M42), M45 is considered to be one of the hard easy targets for astrophotographers. It is relatively bright with a magnitude of 1.6, so that helps with not needing particularly long exposures that many dim DSO’s require. However, there is a lot of dynamic range in the light coming from the cluster, with bright stars, a nice nebula and much dimmer dust clouds that are not well lit by the stars. In my image presented here, you can see some of this dimly illuminated dust throughout the image. To really capture this dust well, a lot of integration and/or longer sub-exposures are required. I am happy to have pulled enough of the detail in these areas with heavy processing without too much injury to the photo quality.

Me waiting for night and the wind gusts to die down. Did I mention it was cold! Photo by Miguel Acosta.

To account for the high dynamic range presented with this target, I had planned on taking two sets of “lights/subs” so that I could capture the fainter dust and nebula without overexposing the bright primary stars of the cluster. Then, I could process these two sets in a way to blend the two exposures, hence capturing the total dynamic range presented. This is pretty easily said, but at my level of experience, it was harder to put this plan into place. I knew that I would have to experiment a little and make the decisions on my camera settings on the scene.

As usual, Miguel and I imaged M45 at the Bortle 4 sky location at Danville Conservation Area. Other than a few late hunters leaving with the sun, we had the place to ourselves except for the owls, coyotes, deer and armadillos. The forecasts were true and we had clear skies with mediocre seeing and transparency. It was a cold night! Temperatures ranged from the low 20s to about 14 degrees Fahrenheit over the course of the night. The heat packs on my lens and Miguel’s battery powered heat bands on his scope really did the trick with preventing dew and frost from forming on our optics.

Equipment
For this target, I used the unmodified Canon 7D mkii and a 300 mm f/2.8 is lens. As usual, I reviewed my options at Telescopius and found that this was a good focal range (480 mm focal length equivalent). However, this choice would give me some problems.

I used the Skywatcher Star Adventurer without guiding mounted on the William Optics vixen style base. Although this is a great tracker and platform, I knew I would be pushing the boundaries of what this unguided setup could handle. At first, I could not get good tracking results with this heavy payload at 30 second sub-exposure lengths. With most photographers imaging this at 1-2 minutes, I knew I was really going to be pushing to get the signal to noise ratio where I needed it to be. But, the 30 sec subs where just unusable, so I took the first set at 20 seconds and ISO 1600. This would turn out to be a nice exposure for the brightest stars.

As I sat in the car thinking between outings to check battery life and focus, I knew I needed to find a way to increase my sub-exposure/signal if I wanted the image to be close to what I was envisioning. Around 11:00pm I decided to redo my polar alignment, rebalance and tighten down the rig to see if I could get to 30 second subs. I tried a few shots and although it wasn’t perfect, it looked like this could work. I checked the histogram on the back of my camera and it still wasn’t where I needed it to be. Although I was hesitant, I decided to increase the ISO to 3200. After doing this and checking the histogram, I knew I hit the sweet spot for the individual sub-exposures. Hopefully my calibration frames and the total integration time would keep the signal to noise ratio where I needed it to be. I shot another couple of hours at these settings to get the exposure I needed for the nebulosity and dust.

Imaging details
Lights: 465 light images taken at 20 sec/ISO 1600 (manually removed obvious bad subs and used 408 subs for a total of 136 minutes of integration).
338 light images taken at 30 sec/ISO 3200 (manually removed obvious bad subs and used 216 subs for a total of 108 minutes of integration).  
Darks: 32 taken at each ISO
Bias and Flats: Not taken. Removed most vignetting and chromatic aberration while converting RAW images to TIF

Processing
I tried this two different ways. First, I created two different stacks in Deep Sky Stacker (DSS) from the two different sets of light data I had collected. I also stacked everything together in two different groups within DSS and used their “Entropy Weighted Average” (HDR) stacking mode. I then stretched and processed. For the first option, I used masking in Photoshop to blend the two “exposures” together to create the HDR effect. It was most likely due to the differences in how I processed following the stacking (this is not something I cannot do by recipe yet), but I found I like the image better when I started from the HDR stack by DSS, which is presented here.

Problems and learnings
I already went into some detail about the struggle to get sub-exposure lengths where I needed them, pushing the boundaries on ISO and the need to redo PA and balancing to get to the sweet spot. There was also the time where I walked away for an hour without the shutter release button on the cable being engaged. Overall, I see the need to increase my efficiency. Not including the time it took to take the dark calibration frames and breakdown for the night, I estimate that we had about eight hours of good night skies to take our light frames. I was only able to capture about 5.5 hours of data in this time. Part of this is due to the time it takes to stop the process to check battery life and focus – this will always be the case. But I also lost time with the other things I mentioned. If things had gone perfectly, I could have had about two more hours of light frames. Ah well, I should get better with experience.

Conclusion
This was a long and cold night but I think Miguel and I both think it was well worth the time and effort. I remember getting into bed a little after 6:00am, wondering if I had collected the data that I would need to make the image I had envisioned. It definitely isn’t perfect. I had to toss a lot of the 30 second sub-exposures due to pushing the boundaries of unguided tracking with that heavy payload and focal length. Even after that, a close look will reveal some ugly and mishappen stars due to imperfect tracking and shooting with the lens wide open. I’m not too concerned with the star quality, however. As long as the target looks good, I am happy. Maybe some day I’ll revisit M45 and use the 200mm lens. I should easily get 30-60 second subs with that lighter rig and hopefully have more of the prominent dust in a wider field of view.


M31 – The Andromeda Galaxy – Redux (October, 2022)

My second attempt at the Andromeda Galaxy (M31)

I originally photographed M31 in August of 2020 as my first serious attempt in photographing a deep space object (DSO). I did not make many other attempts in DSO photography until the past couple of months where Miguel and I have had hard times thinking about anything else. There are multiple sides to this type of photography and so many ways to improve and learn. This is definitely the most technically challenging photography I have ever done. I’ll say this new attempt at M31 is a significant improvement over my first, mainly due to increased integration time and learning better processing techniques.

The Andromeda Galaxy (M31)
You can learn a little about this section of sky by visiting my first post. In addition, here are a couple other factoids about this galaxy. One of the coolest things I’ve learned since getting into astronomy and DSO imaging is the size of a lot of these objects relative to other things that we all routinely see in the night sky. Sure, stars are small in our vision and there are a lot of very small objects that need very large focal lengths to see. But, many DSOs are actually very large. We don’t notice them due to their low magnitude of brightness. Many nebulas cover large parts of our sky, for example. For M31, it’s apparent size on the long axis is ~ 3.167 degrees. The size of the full moon is ~ 1/2 a degree, so M31 covers an area a little more than six full moons!

Andromeda was first formally described by Persian astronomer Abd al-Rahman al-Sufi in the year 964. Did you know that many of the first astronomers were living in the middle east? It’s true – many of the stars still carry their original Arabic names. Andromeda and other similar galaxies were originally thought to be groups of gas and stars within our Milky Way. The discovery and proof that Andromeda was its own “island universe,” like our own, did not occur until the 1920s. Over the last century, M31 has been extensively studied and is now thought to contain ~ one trillion stars.

Collecting the data
The new moon period, which allows for the best low-light conditions for astrophotography, in October is troublesome. Miguel and I checked and double checked the forecast and found the best potential night was on October 22/23. We are finally getting some rain in eastern Missouri and most of this period is forecast for significant clouds. The night we chose was mostly cloudless but was not perfect. Winds were 10-13 mph with regular gusts up to 20 mph. In addition, seeing and transparency were on the poor side due to the winds and high humidity. This was not optimal, but it was still the best apparent night to try, so we did. To aid with the winds, we setup on the downwind side of a couple of hay bales and they did a pretty good job of acting as wind breaks. We imaged at my favorite site – Danville Glades C.A. 

Here I am during one of my every 30 minute checks of focus and battery power. Doing AP with a DSLR and regular lenses is quite a chore! Photo by Miguel Acosta.

Equipment 
I had originally planned to shoot with my Canon R5 and the Canon ef 400 mm f/4 do ii lens. This framed M31 very nicely in Telescopius and I was eager to see how this lens performed in astrophotography purposes. However, with the winds forecasted, I decided to use a smaller lens that would be less likely to be affected. I wound up using the Canon 7D mk ii and the Canon 200 mm f/2.8 lens instead. This put M31 slightly smaller in the frame, but I thought it would still stand out well enough after a marginal crop. 

I used the Skywatcher Star Adventurer without guiding and used my new William Optics vixen style base to mount the tracker on. This mount in combination of using a green laser pointer allowed for very good and easily obtained polar alignment. I’m happy to say that I need not dread getting PA any longer and I can make this step just part of the routine. 

Imaging 
We had some clouds early on in the night. This wasn’t too much of a problem because they cleared out by about 9:30 pm and Andromeda was still in low latitude sky glow until about 10:00 pm. Imaging went pretty well. I did not have to throw out many lights due to wind or tracking errors. One problem that did become apparent was the quality of the stars. When wide open, this lens produces fat stars with pretty bad chromatic aberration. This was probably exasperated by the poor seeing and transparency. I knew this could potentially be an issue but wasn’t too concerned as I was mostly concerned about the galaxy. Anyway, next time I will stop this lens down by 2/3rds of a stop to try and improve this. The settings I used were f/2.8, 30 second exposures at ISO 1600. 

Lights: 492 light images taken (manually removed obvious bad subs and used 447 subs for a total of 223.5 minutes of integration). 
Darks: 36 
Bias: 50 
Flats: Since flats are a pain to take and since I am using a camera lens that can be corrected for vignetting when processing the raw light files to tif format, I did not take or use flats for calibration. This was the first time I tried this and it seemed to work very well. This will be my new strategy going forward. 

Processing 
Deep Sky Stacker worked! This was the first time I had good enough quality subs that DSS would register and process everything. After about one and a half hours of processing, DSO had processed my linear image. Processing was the biggest learning revelation I had from this project. Pieces finally came together. After stacking in DSS, I used various manual techniques in Photoshop along with StarNet for star removal, GraXpert for gradient removal and Astronomy Tools action set. I finally have a big picture of my step-wise work flow and this should get easier and better going forward. 

Conclusions 
Including driving time, setup time, imaging time and processing time, I estimate it took about 20 hours of concentrated work to produce this one image seen here. When compared to my previous attempt of this object, I am quite satisfied by the results and the time spent was well worth it to me. The increase in integration time along with my improvements in post processing really paid dividends. Maybe I’ll try this target again in a couple of years if I have made improvements in equipment, techniques and processing. 

Clear skies! 

-OZB 

Forked Blue Curls (Trichostema dichotomum) and an Explanation of Focus Stacking

I know I posted some similar pics last year, but I can’t get enough of these flowers. Although we literally had thousands of these flowers blooming in the yard this year from seed I collected last fall, I didn’t get around to photographing them until on a WGNSS Nature Photo Group trip to Don Robinson State Park in early September.

Forked Blue Curls (Trichostema dichotomum)

These flowers are both tiny and deep in multidimensions. Because of this, a narrow aperture is typically required to photograph with enough depth of field to get all parts of the flower in reasonably sharp focus. However, stopping down the aperture needed for this greater DOF comes with a couple of problems. First, adjusting the aperture too much above f/14 or so begins to dramatically lower sharpness due to the diffraction of the incoming light. Second, and probably more importantly, a small aperture will also bring more of your background into focus. Depending on the closeness and business of the background, this can simply ruin a nice composition.

So, what’s another alternative to stopping down? This flower is a perfect example of when it is a good idea to use focus stacking. In focus stacking, the photographer takes several images at a lower aperture to get “slices” of the subject in focus. Depending on the size of the subject, the focal length of the lens you are using and the magnification you are shooting it at will determine how many of these slices are required to get the entire subject covered. Then, you combine the individual images, or slices, in the computer to hopefully get a perfectly sharp subject with the creamy out-of-focus background that makes a nice image.

Forked Blue Curls (Trichostema dichotomum)

For my macro focus stacking, I typically use a 180mm macro lens and shoot at f/8. Depending on the criteria mentioned above, I will typically need 10-50 images to cover a subject. There are a few ways you can go about taking the images needed for a focus stack. You can shoot them manually, typically taken on a tripod and moving the focus ring a little at a time, or by using a macro focusing rail, which you move your rig closer to the subject for each image. If you are using an autofocusing lens, there are also automated ways to collect the images needed for a focus stack. The one I use is a specialized extension tube that has a computer chip inside. I let the extension tube know what the focal length is of the lens and the aperture I have the camera set to, make sure my focus is just before the first part of the subject I want to focus on and then hit the shutter release. The camera will then take image after image, changing to a deeper focus with each one until either I feel I have covered the entire subject or the lens hits infinity. Finally, newer cameras allow you to focus stack using controls built into the camera’s software. These typically provide a wide range of options for the photographer to control. I imagine using this has somewhat of a learning curve. I have not used this in my Canon R5, partly because I like the simplicity of what I use and partly because you cannot use flash when using this feature in Canon cameras to date.

If you’re having troubles getting the types of images you want of small subjects under high magnification, give focus stacking a try. But, remember, your subjects need to be stationary!

-OZB

From the Garden – Filipendula rubra (Queen of the Prairie)

This was sort of an impulse purchase. I couldn’t believe I found this at a local nursery, and loving this species, I had to try it at home. I installed this in the front wildflower bed of our yard. I know that I’ll definitely have to keep this one sprayed for its protection as it is literal deer candy. The deer ate half of this inflorescence shortly after I took this photo.

Filipendula rubra (queen of the prairie)

Post Oak (Quercus stellata) at Victoria Glades C.A.

I can’t help but to marvel at this grand post oak every time I visit Victoria Glades in Jefferson County, MO. I’m always hoping to be there in good light and skies to take a worthy photograph of it. On a morning of a WGNSS Nature Photo Group field trip, I arrived a little early with this in mind. Not an interesting sky, but I used the bright sun to my advantage to create a starburst.

Regal Fritillary (Speyeria idalia) at the Cole Camp Prairie Complex

A regal fritillary (Speyeria idalia), photographed at Friendly Prairie, feeding on Asclepias tuberosa, one of the only species in bloom at the time of our visit.

Back in late June, Miguel and I took a trip to the “Cole Camp Prairies” near Sedalia MO. Here, we were after a target I had long wanted to photograph, the regal fritillary butterfly (Speyeria idalia). Once abundant across the ancient prairies, lands that are now mostly used to grow the crops feeding us, the regal fritillary are now listed as a G3/S3 species, meaning they are vulnerable to extinction. The reason for this is that the regal fritillary host plants are violet species that only grow in the scarce remnants of the once vast ocean of prairies that covered much of the central United States. Fewer acres of prairie means fewer prairie violets that leads to fewer butterflies. Fortunately, the pitiful amount of prairie remnants left in the Show-Me State do still support this fantastic butterfly and Miguel and I did our best to find and photograph some.

The Cole Camp Prairie complex is a list of approximately eight mostly postage-stamp sized publicly accessible prairies located north of the small town of Cole Camp in Benton County. I did some research to find out which prairies had confirmed sightings in the previous years and which were more likely to have a sizeable population. I knew we would focus on these, but because these prairies are pretty close to one another, we wound up visiting seven locations just to see the differences between them and to give the entire area a good scouting for the regals.

Photographing a butterfly on the wing is no easy task! A regal fritillary (Speyeria idalia) male searches for one of the first females to emerge at Paint Brush Prairie.

Our first stop was at Paint Brush Prairie Conservation Area. This is one of the larger of the Cole Camp Prairies and was reported to hold one of the better-sized populations of regals. Our visit coincided with the early portion of the regals flight period and this would hold ramifications that would complicate the achievement of our goals. Here, we did find an estimated two dozen regals. However, these were all most likely males that typically emerge earlier than females. Although some plants were in bloom, these males were not interested in feeding. Instead, they were constantly cruising, inches above the vegetation, assumedly waiting for one of the first females to emerge and an opportunity to mate. We tried our best. Once in a while, one would stop to rest for a brief second or two, but it was never long enough to get in position, find focus and take the shot. I then tried to see if it was possible to photograph them in flight. This proved to be about as fruitless as it sounds. After hundreds of shots, I wound up with only a single keeper, pictured here.

A regal fritillary (Speyeria idalia), photographed at Friendly Prairie, feeding on Asclepias tuberosa, one of the only species in bloom at the time of our visit.

Our next stop, just a quick drive west, was at Friendly Prairie C.A. This wound up being our most successful stop. Success in photographing these beasts lies in your visit’s timing with flowering plants. In late June, we missed the prolific blooming of most of the Echinacea and Asclepias and were a tad too early for the blooming period of the native Cirsium that support the energy needs of these butterflies over mid to late summer. Thankfully, we did find a few Asclepias tuberosa at peak bloom and the regals had found them as well. We only found four regals here, but they were cooperative indeed!

Miguel, ready for action at Friendly Prairie C.A.
A Halloween pennant photographed at Hi Lonesome Prairie. Notice the parasitic water mites that dragonflies often carry on the bottom of its thorax.

We continued our tour of the Cole Camp Prairies, visiting the holdings that the Missouri Department of Conservation had to offer as well as one restoration property owned by The Nature Conservancy. Towards the end of our time, we stopped at the largest prairie parcel in the area – Hi Lonesome Prairie C.A. This prairie was very dry and, perhaps consequentially, we found very few plants in bloom. There were, however, still a number of butterflies. Here we found monarchs and a diversity of swallowtail species as well as five regals. Almost all of these were flitting around the bushes that spotted the prairie’s many hillsides. This prairie also held some nice bird diversity. In addition to the ubiquitous Dickcissel, we found Grasshopper Sparrows, Henslow Sparrows, and Bell’s Vireos. Around a couple of this area’s large ponds, dragonflies were in abundance as well. I took some time to hop the electric fence around the larger pond, finding out the hard way that it was indeed working to keep out the cattle that graze the prairie, and spent some time working with gorgeous Halloween pennant’s (Celithmis eponina). See attached photo.

A regal fritillary (Speyeria idalia), photographed at Friendly Prairie, feeding on Asclepias tuberosa, one of the only species in bloom at the time of our visit.

I had wanted to give the Cole Camp Prairies a good tour for quite a while. I’m happy that we spent the day doing this although I know it was but a snapshot over the course of the seasons. Finding the number of regals we did was thrilling and I’m happy to have gotten a few worthwhile photos from the day. Although these prairies are a good hoof from the StL, at a little less than a three-hour drive, they are still much easier than getting to other prairies in different parts of the state. Hopefully my next visit comes soon.

-OZB