"What a thousand acres of Silphiums looked like when they tickled the bellies of the buffalo is a question never again to be answered, and perhaps not even asked." -Aldo Leopold
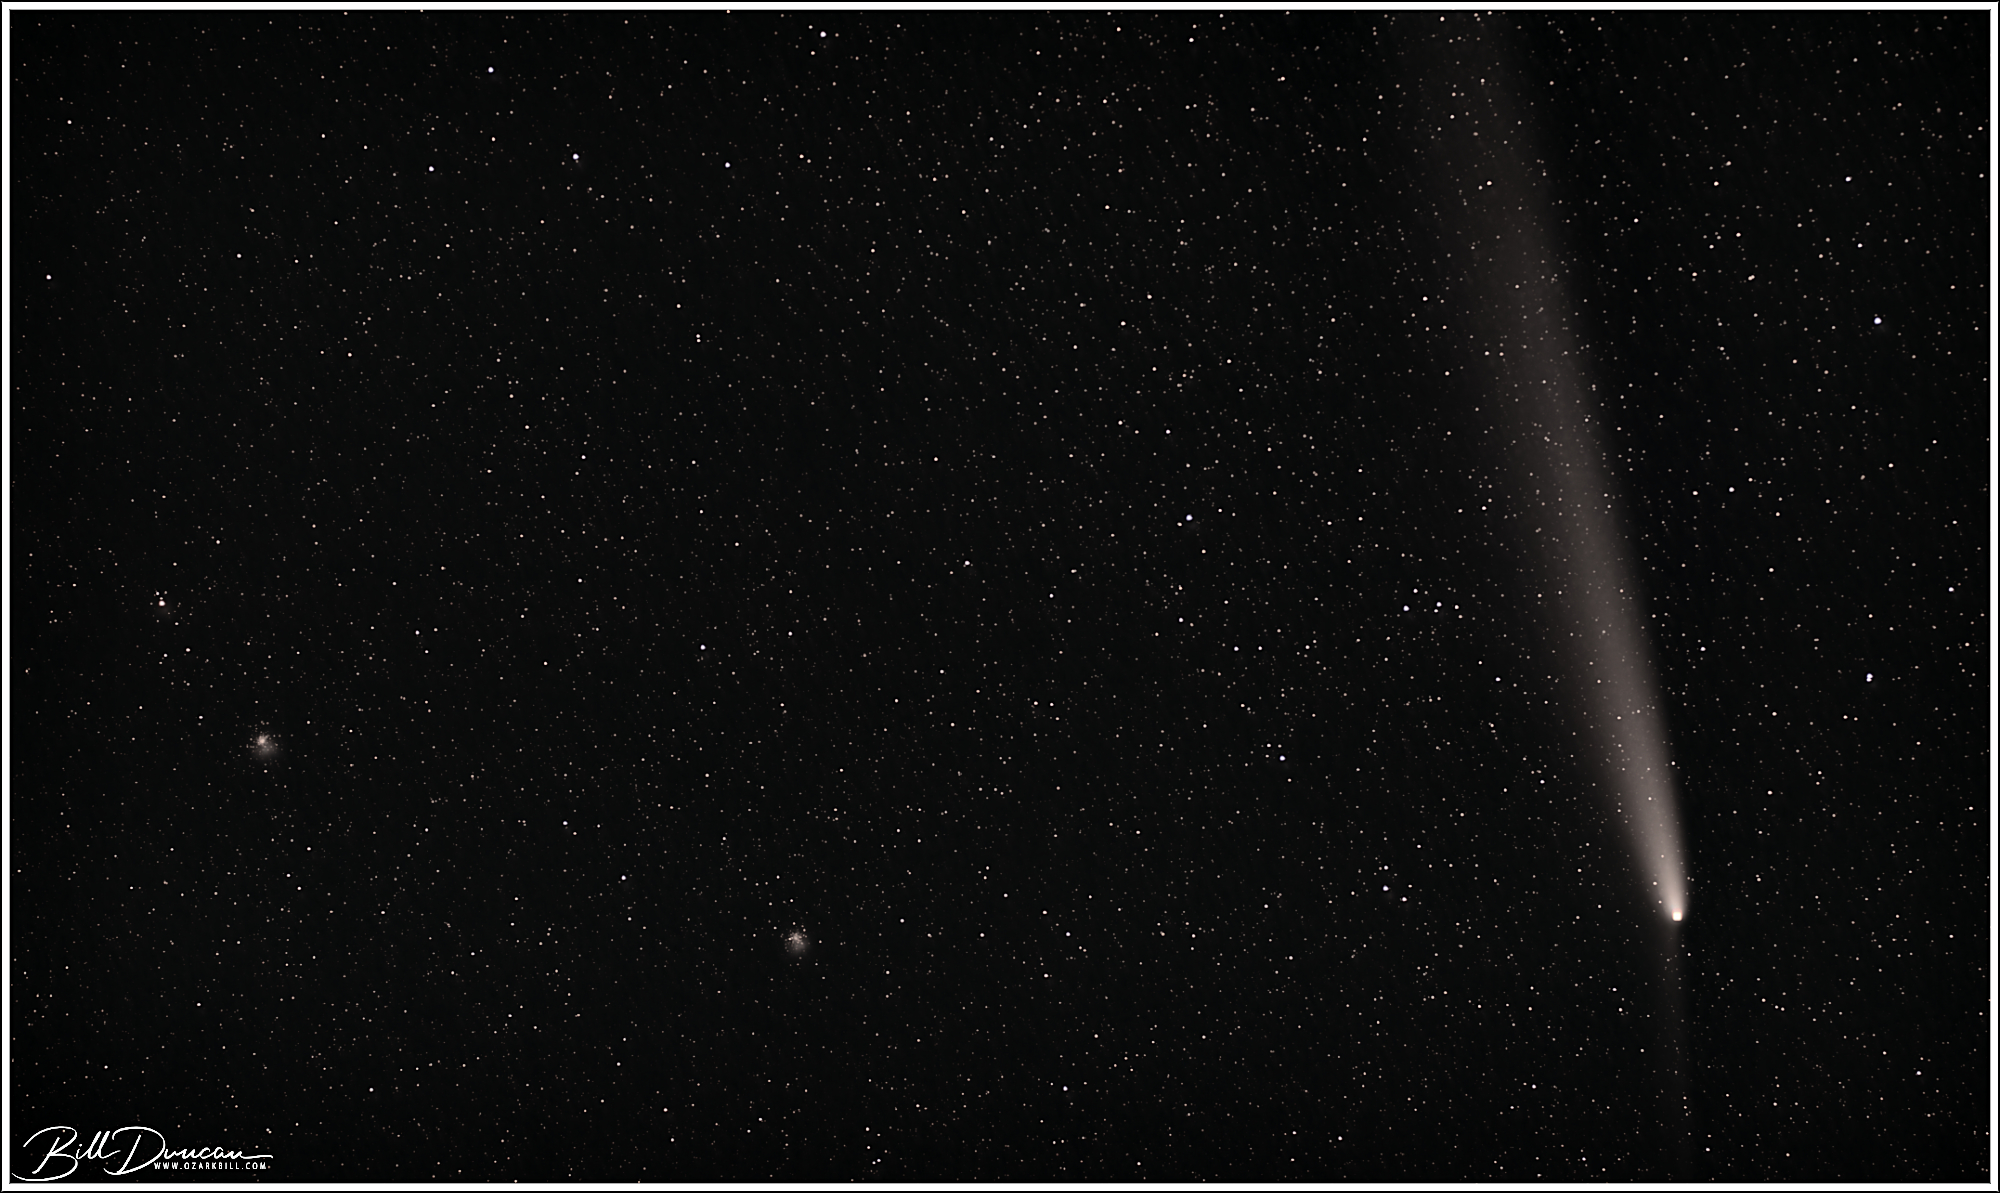
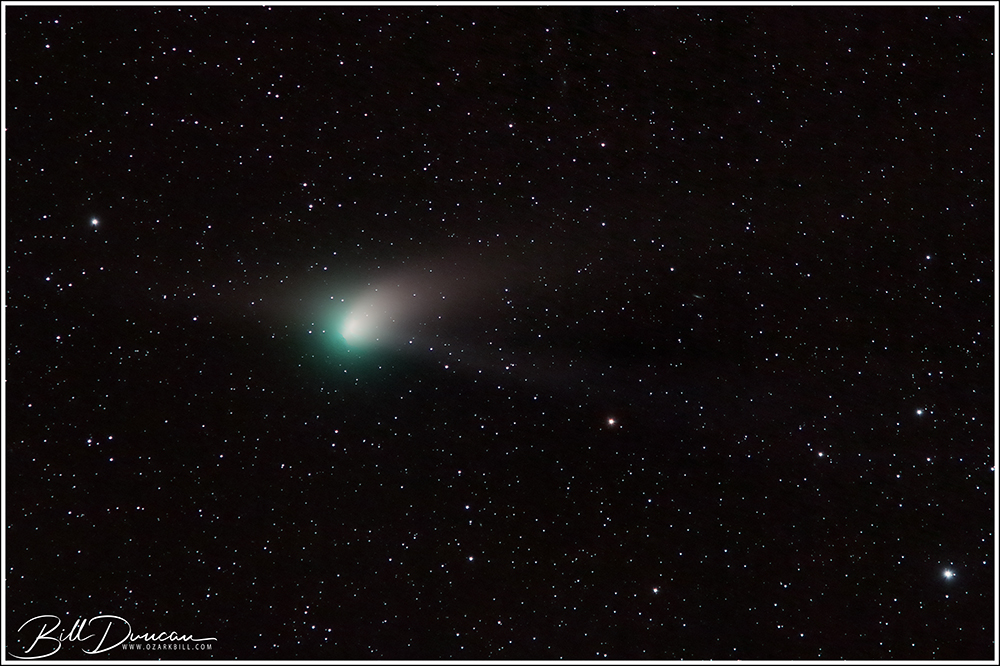
Comet background Hopefully you were aware that the astronomy gods gifted us with another incredible wonder in 2024–a bright comet that was naked-eye visible for several weeks. To date, this has been the brightest comet of the century.
The long-period comet, named C/2023 A3 (Tsuchinshan-ATLAS) (from hereon referred to as Comet A3), last visited this close to earth around 80,000 years ago, during a period of heavy glaciation in North America and when Homo sapiens were first beginning their epic migration from Africa. First discovered in January 2023, Comet A3 made its closest approach to earth on October 12th, 2024, at a distance of 0.275 AU, or 41.1 million km, where it reached a magnitude of -4.9. During the month of October, astronomy enthusiasts and astrophotographers found themselves at their favorite dark sky sites to observe the comet. Above the western horizon, it was naked-eye visible for short periods of time after sunset. Following its closest orbital intersection with earth, it then began to grow fainter as it climbed the sky night after night.
Perihelion, the point in which the comet was closest to the sun, occurred on September 27th, 2024 at a distance of 0.391 AU. Current projections are that, due to Comet A3’s hyperbolic trajectory, it will likely be ejected from the solar system after this pass.
Being an amateur astrophotographer and a comet enthusiast, I made a few attempts at photographing Comet A3 during its relatively close pass to earth. We were fortunate in having mostly clear skies during this period of time but unfortunate in that this period coincided with the a full moon, providing plenty of unwelcome light that hindered clear observation and photography of the comet.
Photography details
Dates and location Comet A3 was photographed on 15-October (composition 1) and 20-October (composition 2). Data for both images were collected at Danville Conservation Area in Montgomery County, MO.
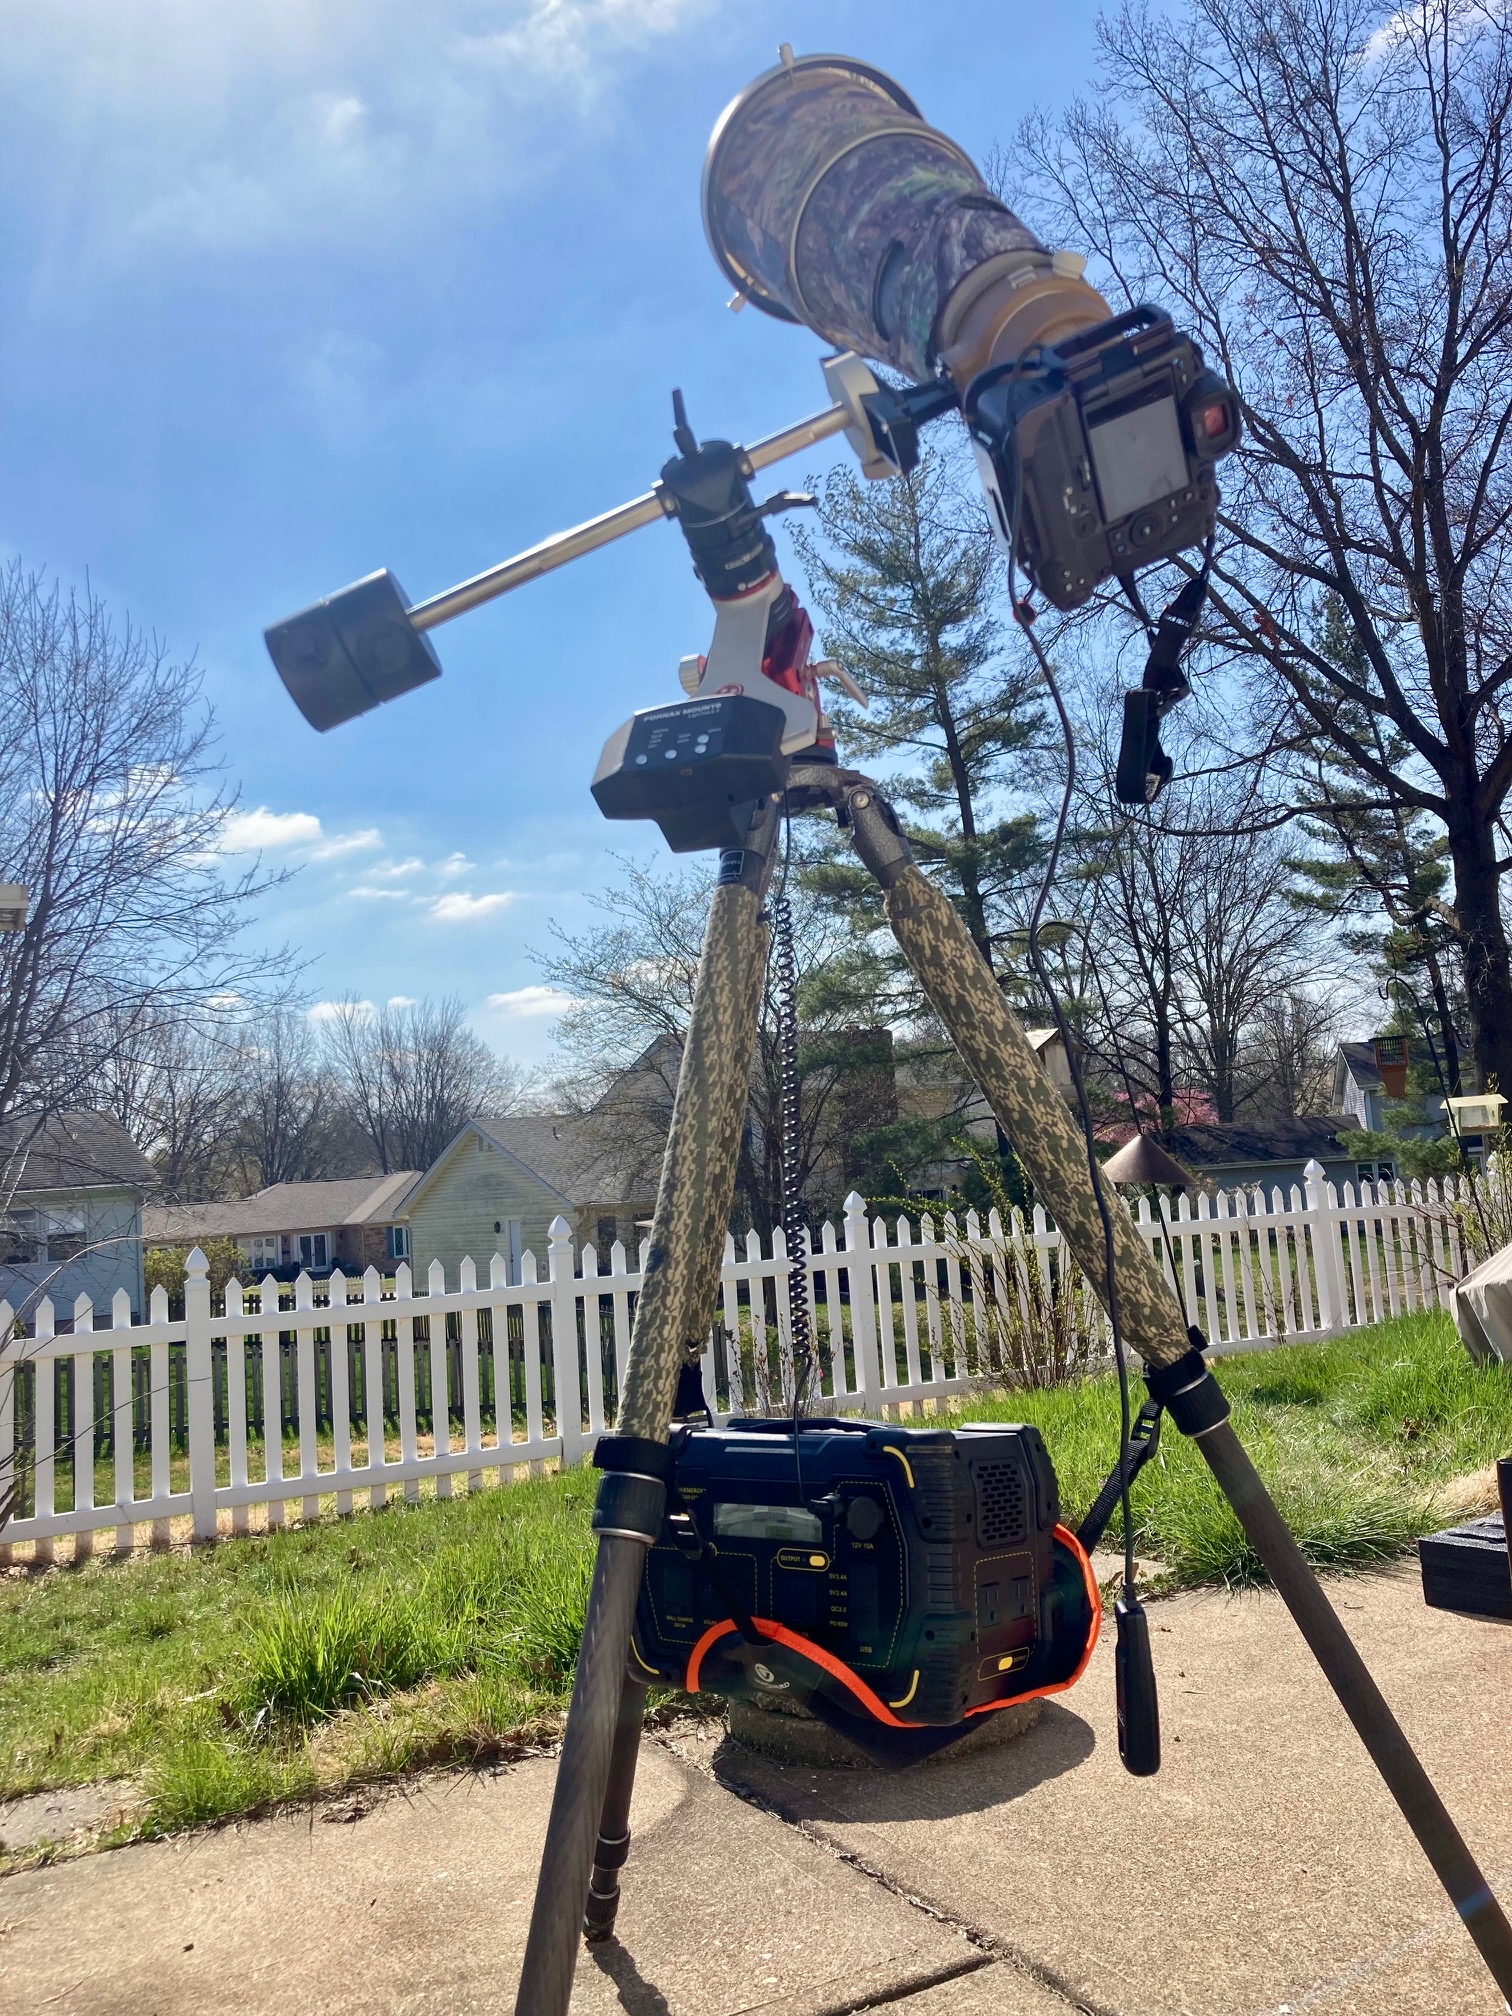
Equipment For these images I used a Canon 7D mkii camera connected to the specific lenses described below. In order to compensate for the earth’s rotation and keep stars as pinpoint as possible, I used a Fornax LighTrack II tracking mount set on a William Optics Vixen Wedge Mount. A QHYCCD Polemaster was used to assist with obtaining polar alignment. This equipment sat on a Gitzo carbon fiber tripod. I also utilized a shutter release cable, a laser pointer to help find Polaris and sky targets, a lens warmer to prevent dew and frost on lens, and a dummy battery connected to an external power source to power the camera. A lithium battery generator was used to provide power to the camera, dew heater and the laptop computer.
Composition 1 was taken with an Askar ACL200 200mm f/4 lens (260mm focal length equivalent). Composition 2 was taken with a Canon 90mm f/2.8 macro tilt-shift lens (144mm focal length equivalent).
Imaging Details Composition 1: Sub-exposures taken (ISO 640, f/4, 25 second exposure): 73 Sub-exposures after cull due to tracker error, wind, bumps, clouds, etc.: 73 Used best 90% of remaining sub-exposures based on scores from stacking software in stack for a total of 66 subs (27 min. 30 sec.) used for integration Calibration frames: none
Composition 2: Sub-exposures taken (ISO 1600, f/2.8, 30 second exposure): 80 Sub-exposures after cull due to tracker error, wind, bumps, clouds, etc.: 79 Used best 90% of remaining sub-exposures based on scores from stacking software in stack for a total of 72 subs (36 min.) used for integration Calibration frames: none
Processing RAW files stacked in Deep Sky Stacker using comet stacking mode, GraXpert for gradient removal, Affinity Photo 2 for stretching and other cosmetic adjustments.
C/2023 A3 (Tsuchinshan-ATLAS)–Composition 1. Comet, including anti-tail, alongside extrasolar neighbor–Messier 5 globular star cluster, to the right (north) of comet.
C/2023 A3 (Tsuchinshan-ATLAS)–Composition 2. Comet alongside extrasolar neighbors–Messier 12 and Messier 10 star clusters, to the left (south) of comet.
IC 1396 Approximately 2400 light years from earth, just outside the constellation Cepheus in a rich region of the milky way of our northern sky, lies a dense emission nebula catalogued as IC 1396. A birth place for stars, this huge and roughly spherical grouping of nebulosity is approximately 3° wide. The interior of this sphere houses a cluster of stars formed from the internal condensing gases. With most of these gases used up in the production of these bright young stars, the interior now contains minimal nebulosity. These new stars now provide the energy that excites the remaining hydrogen gas in the nebulosity shell, and is responsible for the magenta-red appearance.
This region contains numerous catalogued points of interest, including quite a few dark nebulae that thread their way around the shell’s perimeter. These dark nebulae lie between us and the radiating stars of the shell’s interior.
The most famous feature of this deep sky object is IC 1396A, commonly known as the Elephant’s Trunk Nebula. In my image, it appears at approximately 9:00. This nodule of nebulosity is also a site of star formation. Recent infrared images have shown stars less than 100,000 years old within this pinnacle of dust and gas. The bright orange supergiant star known as Herschel’s Garnet Star lies to the north at 6:00. You can find an annotated version of my image by clicking here.
Collecting the data It had been about 10 months since I had an astrophotography outing. This was mostly due to life interfering during periods when the new moon met up with conducive weather. I guess I also wasn’t too excited about trying during warmer months with my astrocamera that has been plagued with the dreaded Canon sensor banding. For an October session, we would find unseasonably warm conditions that had me worried about this issues as well. Thankfully, this turned out to be a non-factor.
For the most part, weather and other conditions were near-perfect. Winds were a little higher than we would like to see them but were not a significant problem. Miguel and I travelled to our usual site at Whetstone Conservation Area. I was a bit surprised to see that the secret of this location was out – as several astronomers (seemingly all visual on this night) joined us. This was a hearty crowd but respectful and did not interfere with our activities.
Date and location Imaged on the night of 05/06 October 2024 at Whetstone Creek Conservation Area in Callaway County, Missouri (Bortle 3). Dark period: 20:09 – 05:37 Target period: 15:31 – 03:58
Conditions You gotta love a forecast for such a clear sky night so close to the new moon. Skies were forecast to be completely clear and they were. Temperature bottomed out in the mid sixties and winds were high, with some gusts peaking to 10 mph or more. This is not ideal, but I only threw out one sub that was blurred due to either wind or me bumping something during the exposure.
Equipment Astro-modified Canon 7D mkii camera, Askar ACL200 200mm f/4 lens (260mm focal length equivalent), Fornax LighTrack II tracking mount without guiding on a William Optics Vixen Wedge Mount. QHYCCD Polemaster. Gitzo CF tripod, Canon shutter release cable, laser pointer to help find Polaris and sky targets, lens warmer to prevent dew and frost on lens, dummy battery to power camera, lithium battery generator to provide power to camera, dew heater and laptop computer.
Imaging Details Lights taken (ISO 3200, f/4, 120 second exposure): 165 Lights after cull due to tracker error, wind, bumps, clouds, etc.: 164 Used best 90% of remaining frames for stack for a total of 147 subs used for integration (4h 54m) Calibration frames: none
Processing RAW files stacked in Astro Pixel Processor, GraXpert for gradient removal, Affinity Photo 2 with JR Astrophotography Macros v18 for stretching and other cosmetic adjustments.
Problems and learnings
Acquiring data Considering I took nearly a year off from astrophotography, I have to say that I was pleased with how well this night and the subsequent image turned out. Polar alignment was quick and easy and I had no problems getting the two-minute individual subs with my tracking. As the star scores suggest from APP, my initial focusing was off a bit, but I corrected for this approximately halfway through the night.
As usual, I struggled a bit more than I should have with finding and framing the target. I have a need to learn something here that I feel I would greatly benefit from. Typically, I don’t have much of an issue finding my target, using tools like star hopping and the oh-so-nice astronomy apps available on our phones. My issue lies in not knowing the exact orientation of the object when, in cases like these, the object is relatively dim and I cannot make it our very well in an individual sub. In this case, I found the Garnet Star, and could make out enough of the nebula to know that it was in my frame. However, I just wasn’t familiar enough with or confident I knew in which direction the object lied in relation to this indicator star to be able to set my composition. Ultimately, I did my best and crossed my fingers that I wasn’t going to be cutting off anything important in my composition.
To a well-seasoned observer of the night sky, this problem may sound ridiculous, but because of the earth’s rotation, the relationship in direction of the object to the indicator star can change over the course of the night. I don’t know. Maybe this is much easier than I make it out to be. However, this single problem typically costs me 1-2 hours of imaging time each session and I would love to get more efficient at this. Please let me know if you have any tips or tricks.
Keeping the ISO high and exposing a little more to the right seemed to keep the dreaded Canon banding away again. I suppose I can say this is a fruitful strategy and I will keep this up in the future.
Processing During my hiatus in AP, I have ditched all Adobe products and switched to Affinity Photo for my processing needs. I knew this was going to tax my already lacking AP processing abilities and it probably did. Someone who was skilled in the arts could probably do a much better job than I did. In this case, I manually performed the stretch and then finished it off with a few actions I found in a nice little bundle of AP macros made available by James Ritson.
One very surprising outcome for me was the fact that I somehow found a method for stretching that preserved the star colors. Even though I used methods that were supposed to do this in the past, this was never really the case and I was forced to exchange star color for bringing out the details in the DSO. What was the difference here? Beats me. Maybe I didn’t stretch this one as much as I typically would? Or, maybe there is something inherently different between doing these things in Affinity Photo compared to Photoshop?
Conclusion It was nice to be back in the AP saddle again. Longer nights on the cold side of the equinoxes make this a little more fun for me, although there are still a lot of summer objects I hope to get someday. I definitely need to improve my post processing, but so far, I like what I am able to do in Affinity Photo.
This is an area I hope to get back to next year by either attempting a tighter focal length of the elephant’s trunk or by going after other objects that are plentiful in the Cepheus region. As always, if you made it this far, thank you. I appreciate your attention.
At the time I am writing this, a cool new app I have, EclipseOne, tells me the next Great American Eclipse will occur in 12 days, 13 hours, 22 minutes, and 2 seconds at my primary viewing location. There is not much time left to do your planning and practicing!
This past weekend, I put in a practice session – testing out the lens and camera combination, the solar finder and solar filter that will be going over my lens, and most importantly, using my tracker to track the sun as it moves across the sky. If you have an astro-tracking device that you might use for applications like deep-sky imaging or astro landscapes, I highly recommend you consider using this for the upcoming eclipse.
I know the question you might have before you even ask it. But how do we polar align in the daytime? True, you won’t be able to get precise polar alignment without the nighttime stars to guide your efforts, or at least without a lot of extra work. However, precise P.A. is not necessary to enjoy the benefits. I simply did my best to align the tracker facing north using a compass. I then tested the amount of time it took for the sun to move one of its diameter with and without using the tracker. This was easy because in my particular lens/camera combination, the circle that represents the spot-metering option was almost precisely the same size as the sun. Without the tracker it took only one minute and 22 seconds to move one of its diameter across my frame. With the tracker engaged (don’t forget to put your tracker in solar-tracking mode!), it took 22 minutes and seven seconds to move the same distance. Yes, there is a bit of drift due to imperfect PA, but this means I need only reposition the sun to the center of my frame once or twice an hour while using the tracker as opposed to doing this step 10 times or more an hour. Saving this kind of time during the big event will be a great benefit!
My imaging rig as it will look like on April 8th. I had to use both counterweights to balance this!
If you are planning to photograph the eclipse on April 8th, hopefully you have gotten your planning done, dusted off your solar filter and gotten some practice. If not, there’s still time, assuming we have some clear skies between now and then.
Wishing you all the best of luck on the big day and that the only rain we’ll see are Sol’s golden rays coming down from the clearest of skies!
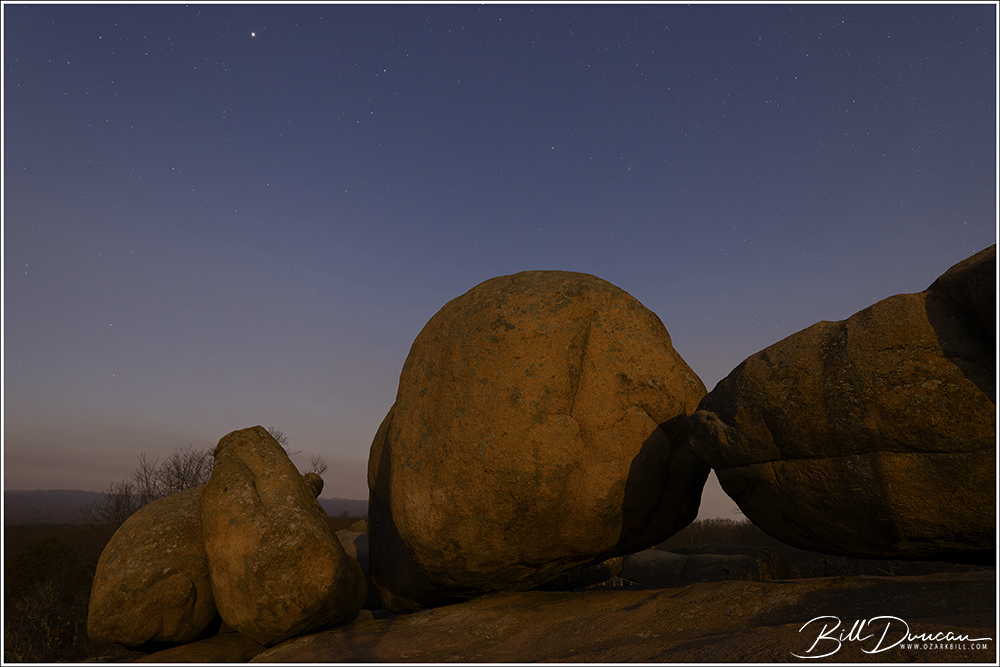
The WGNSS Nature Photography Group, led by the man with the great ideas, Casey Galvin, headed to Elephant Rocks State Park in Iron County, MO, for the group’s February field trip. Our primary target for the evening was to utilize the full moon to light our scene after sundown – images often referred to as “moonscapes.” This was my first real attempt at taking moonscapes; usually I am focused on low to no-moon nights in order to focus on stars and deep sky objects.
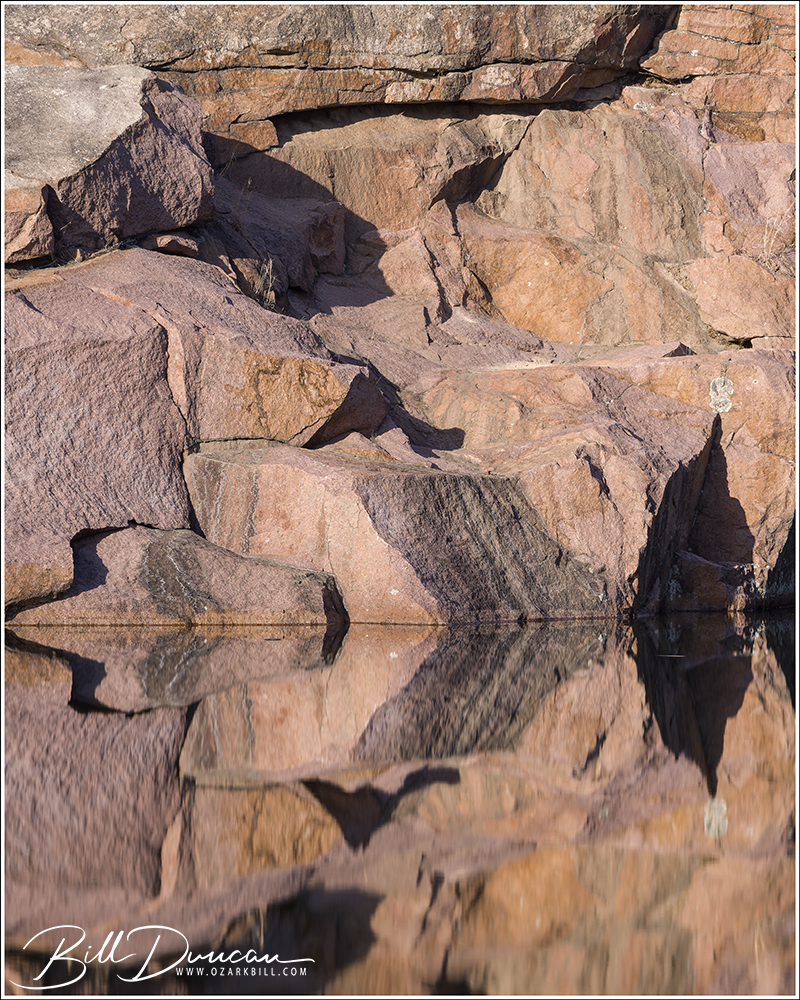
Reflections on Quarry Lake ISO-50, f/11, 3.2 sec. exposure, 140 mm focal length
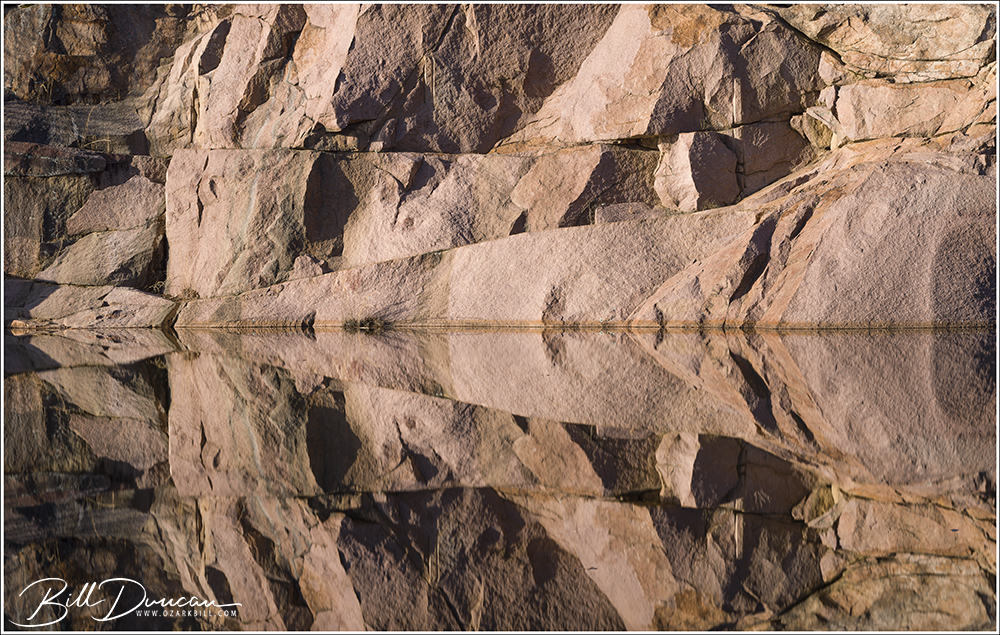
We arrived in time to have a walk around prior to sunset and the park’s official closing time. In order to be in the park after 5:00 pm, special permission must be made ahead of time. During our stroll, we made our way to the backside of the quarry lake – somewhere I had not been in many years. This turned out to be a serendipitous experience. There we encountered some very nice golden light and excellent reflections coming from the lake’s surface. Unfortunately, the winds were just strong enough to create some obnoxious ripples on the water, ruining the mirror effect I was going for. No worries, however; I added a CPL and a pretty strong neutral density filter (in order to increase shutter speed) to my mid-telephoto lens and the ripples magically disappeared.
Several abstract-like faces appeared in tight-compositions with the rock wall mirrored off the lake’s surface ISO-100, f/9, 2.5 sec. exposure, 84 mm focal length
I find capturing enough saturation in lighter colors a challenge with digital cameras. I am finally learning how to recover this in post-processing. The pretty light helped showcase the pink granites that the St. Francois Mountains are known for. ISO-50, f/11, 5 sec. exposure, 118 mm focal length
This one was too good to pass up the opportunity to make the face more obvious by orienting it vertically. ISO-100, f/9, 4 sec. exposure, 73 mm focal length
Shortly before sunset, we headed to the other side of the park to hang out with the rocks that give the park its famous identity. The remaining images were all taken after the sun had set and were exposed using only the light of the February full “snow moon.”
Moon rising over Elephant Rocks ISO-640, f/5.6, 10 sec. exposure, 20 mm focal length
Somewhat surprisingly, care had to be taken when shooting with the full moon at our backs as the shadows were very noticeable! ISO-3200, f/4, 6 sec. exposure, 20 mm focal length
Newer cameras shooting at longer exposures can pick up more stars than can be seen by the naked eye. I was happy to see the Pleiades and the Andromeda Galaxy in several of my moonscape images. ISO-320, f/4, 6 sec. exposure, 19 mm focal length
Can you spot the Pleiades star cluster in this moonscape? ISO-640, f/4.5, 8 sec. exposure, 15 mm focal length
This was certainly a special trip spent with friends. Temperatures and sky conditions were near perfect for photographing moonscapes. I was a bit surprised we did not have more WGNSS members take advantage of this special access. I won’t complain about that too much as I think having too many photographers would have made things more challenging with fighting shadows and finding access to good compositions.
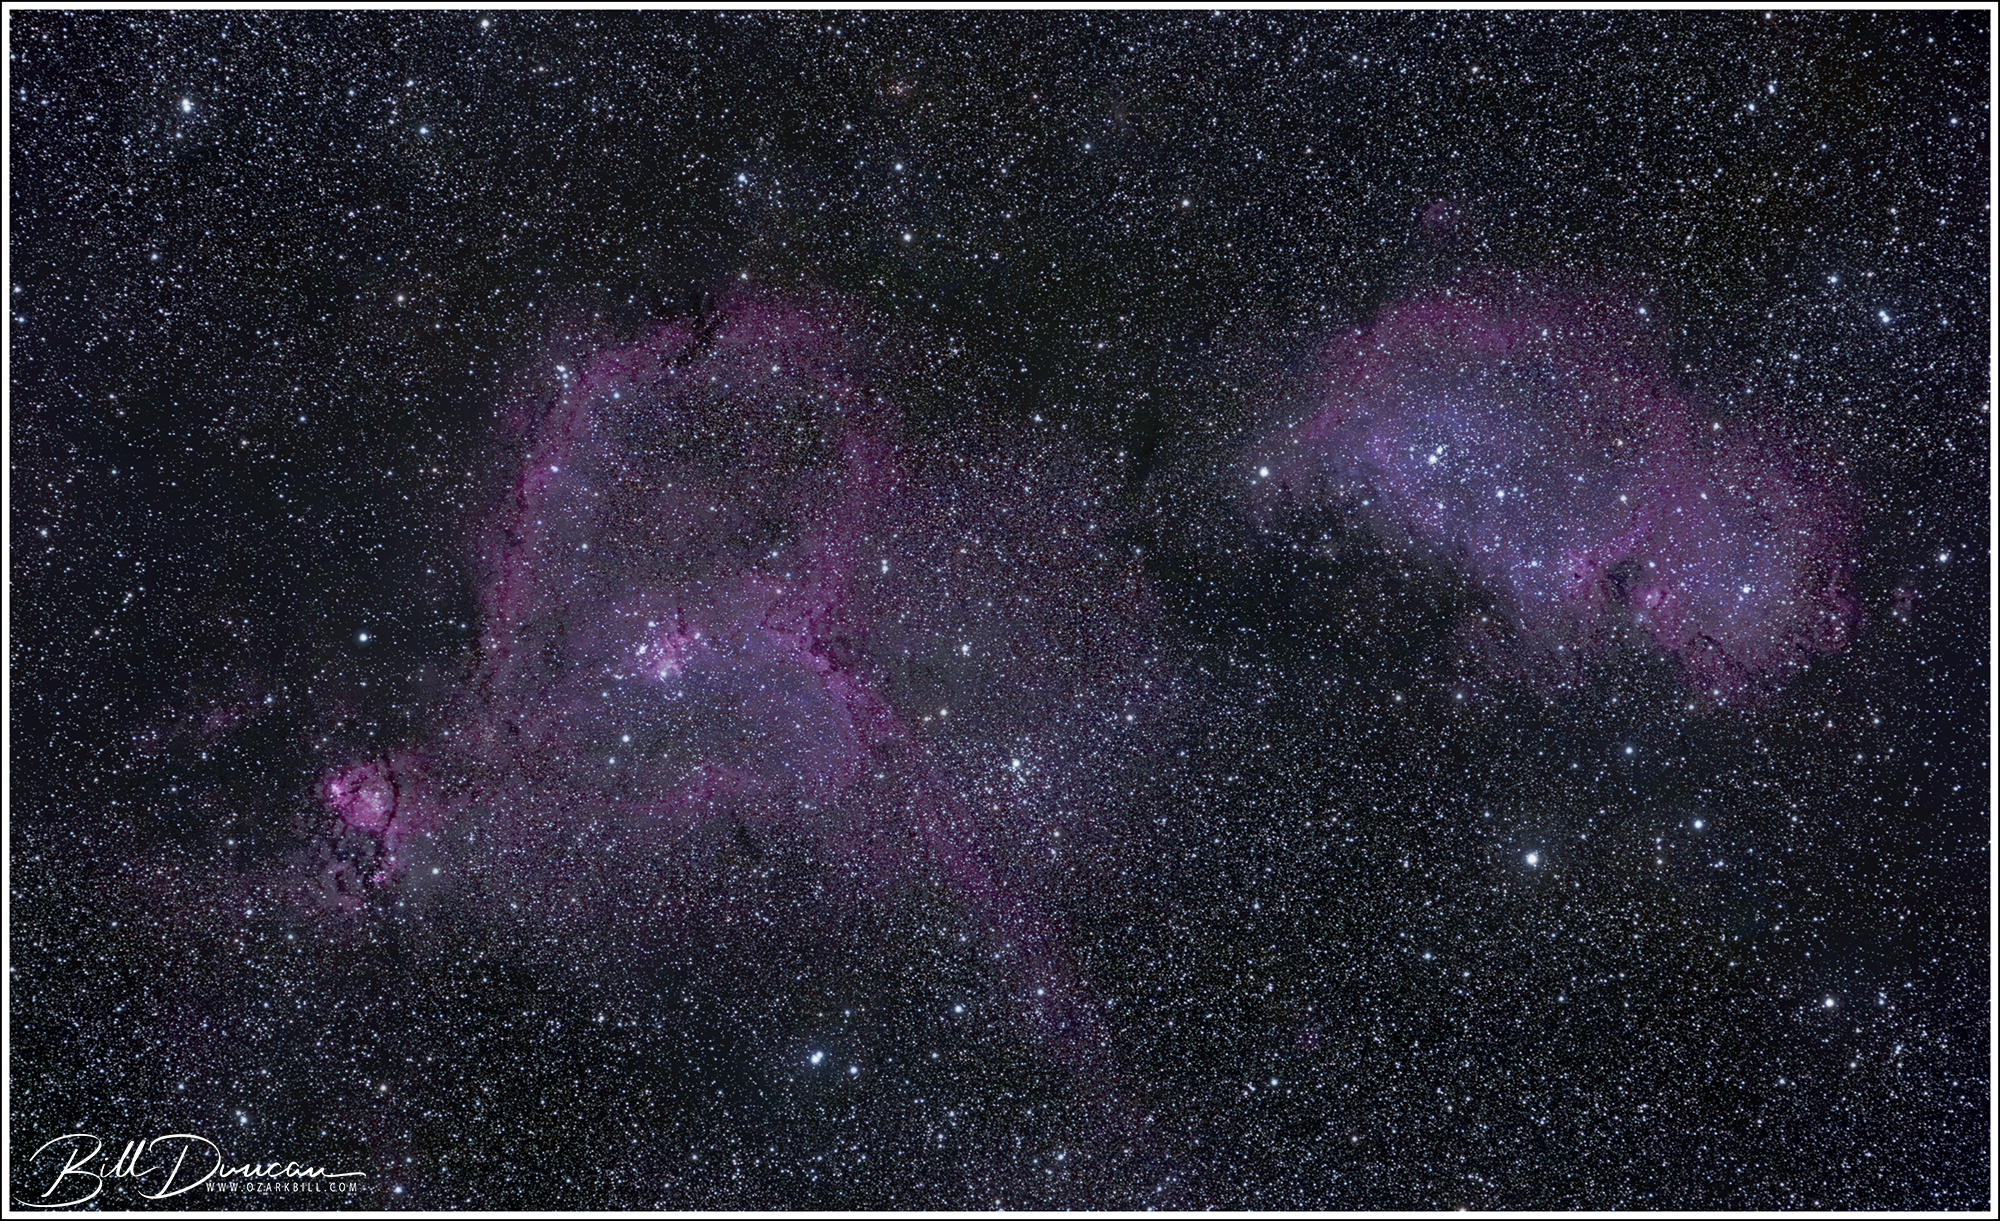
The Heart and Soul Nebulae Located near the constellation Cassiopeia in the Perseus arm of the Milky Way lies a pair of well known nebulae, birthing stars and wonders. The well-named Heart Nebula (Sh2-190, IC 1805) and the less well-named Soul Nebula (Sh2-199, IC 1848) lie approximately 7,500 and 6,500 light years away respectively. Both are made up primarily of hydrogen gas and this condensing gas is the birth process of stars. Near the center of the Heart Nebula is an open star cluster of such newly formed stars known as Melotte 15. These stars have taken up much of the hydrogen and other gases from the nebula center and these young and bright stars light up the surrounding hydrogen gas, causing it to emit light in the red visible colors. Also of note in this image is the “fish head nebula” near the bottom of the heart, catalogued as IC 1795.
I find that the Soul Nebula, although a poetic match for its bigger neighbor, is poorly named. It may be difficult to see in my rendition, but in images with more defining details, I think this one should have been named the “chubby baby nebulae.”
Collecting the data October was another cloudy one around the new-moon period. Luckily we had what looked to be a great night on the new moon. As usual, the forecast let us down a bit. Due to issues Miguel had in one of his previous outings with a Conservation Agent at Whetstone C.A., we decided to go back to our spot at Danville C.A.
Conditions For a November outing the temperatures could have been much worse. We bottomed out at 42° F and winds never rose more than 5 mph. The forecasting apps all suggested a mostly clear night. Unfortunately, we were plagued with narrow bands of cirrus clouds that seemed to park themselves in between us and our target. These were barely perceptible to the naked eye, but they affected at least 25% of my subs over the course of the night.
Equipment Astro-modified Canon 7D mkii camera, Askar ACL200 200mm f/4 lens (260mm focal length equivalent), Fornax LighTrack II tracking mount without guiding on a William Optics Vixen Wedge Mount. QHYCCD Polemaster. Gitzo CF tripod, Canon shutter release cable, laser pointer to help find Polaris and sky targets, lens warmer to prevent dew and frost on lens, dummy battery to power camera, lithium battery generator to provide power to camera, dew heater and laptop computer.
Imaging Details Lights taken (ISO 2000, f/4, 120 second exposure): 153 Lights after cull due to tracker error, wind, bumps, clouds, etc.: 131 Used best 90% of remaining frames for stack for a total of 118 subs used for integration (3h 56m) Calibration frames: none
Processing RAW files converted to TIF in Canon DPP, stacked in Astro Pixel Processor, GraXpert for gradient removal, Starnet++ for separating nebulas from stars, Photoshop CS6 for stretching and other cosmetic adjustments.
Problems and learnings I know this section has just turned into a bitch session and this night was a bit on the rough side as well. First, I was disappointed in myself for the time it took to properly compose the target. Finding the object wasn’t too difficult, but because of the faintness of the targets, I just couldn’t get my mind together to make this tight framing (this image is only slightly cropped). After wasting nearly two hours of dark skies on getting the final composition and then having to do a second polar alignment (I think I must have nudged the tripod while making composition adjustments), I was finally taking images.
Next the periods of clouds. I continued to let the camera go even though I knew I would be tossing some frames. I culled about 20 frames due primarily to clouds but I left another 20 or so in the stack that I thought wouldn’t hamper the final result.
Typically, I can arrange the rig and counterbalance bar so that I do not require a meridian flip. I guess in my frustrations in finding and composing, I neglected to think about this. Yep, somewhere around midnight, I realized the camera was going to be running into the tracking unit if I didn’t perform this flip. Of course, doing this manually, meant I had to go through the process of finding and composing the target again! This time didn’t take me nearly as long and I was back to shooting in about 40 minutes or so.
All of the above explains why I was only able to collect about half of the data that I should have been able to on a night like this. The clouds got bad enough towards the end of the night that I shut down with more than an hour of usable night left.
Conclusion With the challenges on this night, I guess I have to be satisfied that I have something to share. This is another popular target that most astrophotographers get to pretty early. November is by far the best month for this target as it is viewable from the beginning to the end of night. There are a few other compositions to consider here, like shooting each nebula separately, or even focusing in on the heart of the heart – Melotte 15. So, I definitely have reason to revisit this section of the night sky someday.
The Cygnus Veil Complex The Cygnus Veil, also known as the Cygnus Loop, is a large (~ 3° in diameter) emission nebula created by a supernova explosion that occurred ~ 20,000 years ago. It lies an estimated 2400 light years from our solar system within the Cygnus (Swan) constellation.
Due to the large size of this gaseous complex, most astrophotographers choose to separately photograph distinct portions of the loop, or those portions of the loop that can be seen in visible light. The nebula on the left-hand side of this image is known as the Eastern Veil (Sh2-103, NGC6992, NGC6995), and on the far right lies the Western Veil, or the Witch’s Broom (NGC6960). In between these two lies Pickering’s Triangle (NGC6979), which was first discovered by the Scottish-born photographer, Williamina Fleming in 1904.
Somewhere inside this loop is the compact stellar remnant – the remains of the star that went supernova. Depending on the size of the star, this will either be a neutron star or a black hole. Both of these options are very difficult to identify as they do not emit much in the way of detectable radiation. Despite attempts by astronomers, the identity and position of the compact stellar remnant have not yet been discovered.
Collecting the data Due to the interference of clouds and life requirements, I missed the previous two new moon phases and it had been close to three months without an AP session. I was eager to get out there under clear skies in lovely September temperatures. Miguel found us a new imaging location – Whetstone Creek Conservation Area. This location has slightly darker skies (Bortle 3 vs. Bortle 4) and is only about a ten minute longer drive from my front door. To top it off, it is also seems less popular (at least during my first visit). I definitely have a new home for my astrophotography pursuits!
Date and location Imaged on the night of 14/15 September 2023 at Whetstone Creek Conservation Area in Callaway County, Missouri (Bortle 3). Dark period: 20:46 – 05:15 Target period: 15:30 – 05:10
Conditions The forecast was great for the night we chose for this session, but it turned out not to be perfect. We lost two hours of potential imaging time due to clouds that would not clear out until about 22:00 and clouds remained in the lower west that screwed up another hour or so on the late end. Temperatures were great, but seemed quite cold, with lows in the upper 40s F. Winds speeds were perfect with nothing above 4 mph across the night.
Equipment Astro-modified Canon 7D mkii camera, Askar ACL200 200mm f/4 lens (260mm focal length equivalent), Fornax LighTrack II tracking mount without guiding on a William Optics Vixen Wedge Mount. QHYCCD Polemaster. Gitzo CF tripod, Canon shutter release cable, laser pointer to help find Polaris and sky targets, lens warmer to prevent dew and frost on lens, dummy battery to power camera, lithium battery generator to provide power to camera, dew heater and laptop computer.
This was “first-light” for my new Askar 200mm lens – a lens specifically designed for astrophotography purposes. It is excellently built and provides a distortion-free field of view which was a hindrance of my Canon 200mm f/2.8 lens. When perfectly focused (read more of this below), it will definitely shine in comparison to my old 200mm focal length option.
Imaging Details Lights taken (ISO 3200, f/4, 120 second exposure): 178 Lights after cull due to tracker error, wind, bumps, clouds, etc.: 146 Used best 95% of remaining frames for stack for a total of 138 subs used for integration (4h 36m) Calibration frames: none
Processing RAW files converted to TIF in Canon DPP, stacked in Astro Pixel Processor, GraXpert for gradient removal, Starnet++ for separating nebulas from stars, Photoshop CS6 for stretching and other cosmetic adjustments.
Problems and learnings
Canon banding After months of diving into the forums and other online sources of information, I came away with only one strategy to hopefully avoid the terrible “Canon banding” problem I faced in a couple of previous sessions during warmer temperatures. In order to get my target above the sources of noise, I elevated the ISO used. In addition, I increased the sub exposure time. Increasing the sub times was partly in necessity of using a lens with an f/4 widest available aperture. I also moved the peak of the histogram for these exposure further to the right than I typically have. Thankfully, with my new tracker and polar alignment process, two-minute subs were easily accomplished without any issues. I could definitely go longer, but keeping the ISO at or above 3200 would not allow for this in order to keep the histogram where it needed to be.
After reading from a number of trusted sources, suggesting dark frames offer little-to-no benefit using my particular camera, I eliminated taking dark frames and any other calibration frames. This was an experiment. In practice, with enough total integration time to remove noise in the stack, I do conclude that dark frames/calibration are not necessary in my AP process. Additionally, there is some thought that using dark frame calibration can increase the potential for Canon banding and other issues that can show up during the stretch. This is a welcome finding indeed! With taking longer sub-exposures now, taking the required number of dark frames could add well over an hour to my night sessions.
The downside of using such an elevated ISO setting is the reduction in dynamic range. This probably does mean I am losing some tonal gradients and perception of sharpness in the final image. However, this is better than dealing with the banding problem that almost kills the project. I will keep this strategy moving forward.
Focusing The new lens offers great focusing aid. It has two focusing rings – one for coarse and one for fine focus, and each of these has a lock so that you will not inadvertently change these over the course of the evening. But, the tool is only as good as those who yield it. I had a little trouble with the fine adjustment and realized that the majority of my frames were not optimally focused. Overall, the image doesn’t suffer too badly from this oversight. With the focus problem and the never-optimal seeing conditions in Missouri, my FWHM (Full Width at Half Maximum) were in the 6-8 range. An FWHM of two or less is considered optimum for the uber astrophotographers out there. Always learning!
Processing I would really like to improve my processing skills for this work. Although I love the amount of hydrogen-alpha (the reds and magentas) that my sensor collects, the blues and star colors seem to get lost in the stretch. From my knowledge, I am using the correct curves adjustments that are supposed to avoid this, but there should be a lot more of the blues that are emitted from oxygen emission in this target. In addition, the blues are coming out more teal-colored, which I do not find all that attractive.
Conclusion With all the challenges I discussed above, I suppose I am relatively pleased with this one. I think I left some detail on the table, but there is enough there to make it interesting. The image handled the stretch well with no real signs of the dreaded Canon banding. This is an impressive and interesting target. I may try again using the 300mm lens. At that focal length, it is a tight fit. I hesitated to use it this time because of the potential of losing some of the target during cropping to eliminate stacking artifacts around the frame edges.
What do you think? Is this worth the time and effort? After looking at these images for so long, I find myself unable to really give them the critical eye needed to make this judgement. Feel free to leave a comment with your opinion.
Rho Ophiuchi Cloud Complex Within the constellation Ophiuchus (the Serpent Bearer) lies one of the most spectacular scenes in the summer night’s skies. It is arguably one of the most interesting as well. This area holds one of the closest stelar nurseries to our Sol and is composed of six primary bright objects and some dark nebula to boot.
Starting at the bottom point that makes up the pentagon of this object, we find the red supergiant star, Antares, and it’s accompanying cloud of warmly-colored, ionized hydrogen gas. Up and to the left of Antares is the blue reflection nebula, IC 4605, and continuing along the pentagon, we next come to a smaller blue reflection nebula – IC 4603. Outside the pentagon, just to the upper left of IC 4603 is yet another reflection nebula, illuminated by the five-star system known as Rho Ophiuchi. Moving to the next point in the pentagon, the upper right as seen in this image, lies Sh2-9, a combination reflection and emission nebula. Finally, making up the last point of our pentagon is M4, a fantastic globular star cluster comprised of at least 100,000 stars.
But it doesn’t end there! Also visible in this image are several named dark nebula, streaming away from the cloud complex moving towards the core of the milky way, just to the east of my frame. The primary dark nebula is catalogued as B44 and is known by its apt common name of the Dark River.
Collecting the data Miguel and I have had a rough couple of months for our astrophotography goals. We were completed clouded out during the new moon period in April, but we did get a session in in May, where we focused on the Blue Horsehead Nebula (IC 4592). But, due to some issues with working with some new gear (more on this below) and an unexpected processing issue, this one is still in the works for me.
In June, the weather (clouds and smoke from the big Canadian forest fires) was touch and go, but we did get a night that turned out to be about as close to perfect as you can expect for a summer night.
Date and location Imaged on the night of 19/20 June 2023 at Danville Conservation Area in Montgomery County, Missouri (Bortle 4). Dark period: 22:32 – 03:41 Target period: 20:27 – 03:06
Conditions Clear skies over the course of the session. Temperature ranged from 67-62 F. Winds at or below 5 mph.
Equipment Astro-modified Canon 7D mkii camera, Canon 90mm f/2.8 macro tilt-shift lens (144mm focal length equivalent), Fornax LighTrack II tracking mount without guiding on a William Optics Vixen Wedge Mount. QHYCCD Polemaster. Gitzo CF tripod, Canon shutter release cable, laser pointer to help find Polaris and sky targets, lens warmer to prevent dew and frost on lens, dummy battery to power camera, lithium battery generator to provide power to camera, dew heater and laptop computer.
Let’s talk about the new equipment used in the making of this image. First off, the Canon 90mm f/2.8 macro tilt-shift lens got its “first light” in astrophotography use. I suspected this lens could be very good for AP use due to its relatively wide open aperture and its larger imaging circle. This lens has next to no distortion or vignetting on my crop sensor body. I was looking for a good AP lens option around 100mm and am very excited about how this lens performed. I love a multi-trick pony!
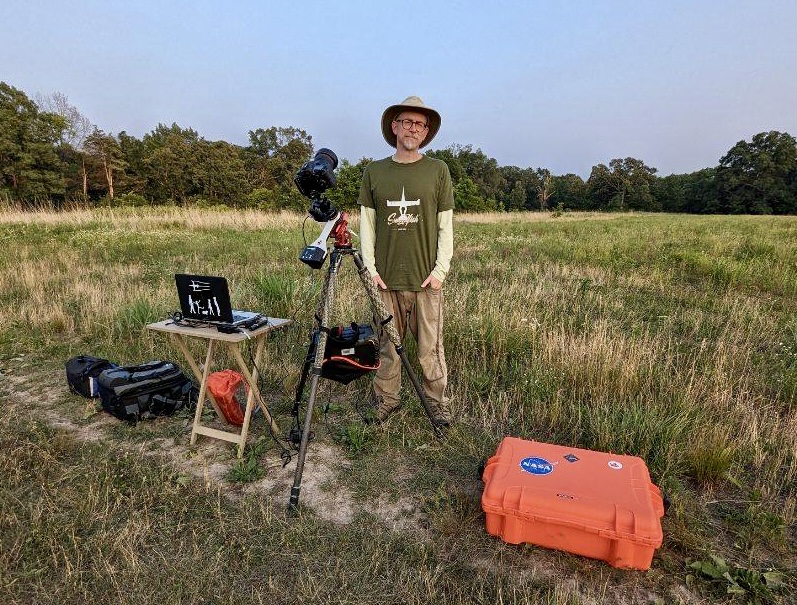
Bill with his new AP rig set up and ready to rock!
The big new toy is the tracker I picked up for my birthday. The Fornax LighTrack II is likely the best portable and “affordable” tracking mount you can buy for optimal star tracking without guiding. I will likely publish a full review of this tracker system here in the future. I had some big issues when using it with the manual polarscope I purchased with it. This was a source of frustration for a while, but was solved by getting some more technology. In order to get the most precise polar alignment possible, which this mount needs to really shine, I picked up the QHYCCD Polemaster. This is basically a small camera that you attach to the mount and uses a computer program to allow you to perfectly align the mount to the north celestial pole. With this, I was able to get as accurate of a polar alignment as possible in less than 15 minutes. To use this, I did have to buy my first ever personal laptop computer – a nice refurb that only set me back $200. The main point here is that this new mount will allow me to get up to 4 times the exposure length for my sub-frames than what I was able to get with the Star Adventurer mount with no star trailing or drifting.
Imaging Details Lights taken (ISO 800, f/2.8, 90 second exposure): 150 Lights after cull due to tracker error, wind, bumps, etc.: 150! Used best 95% of remaining frames for stack for a total of 142 subs used for integration (3.56 hours) Darks: 30 taken at same exposure time and ISO as lights
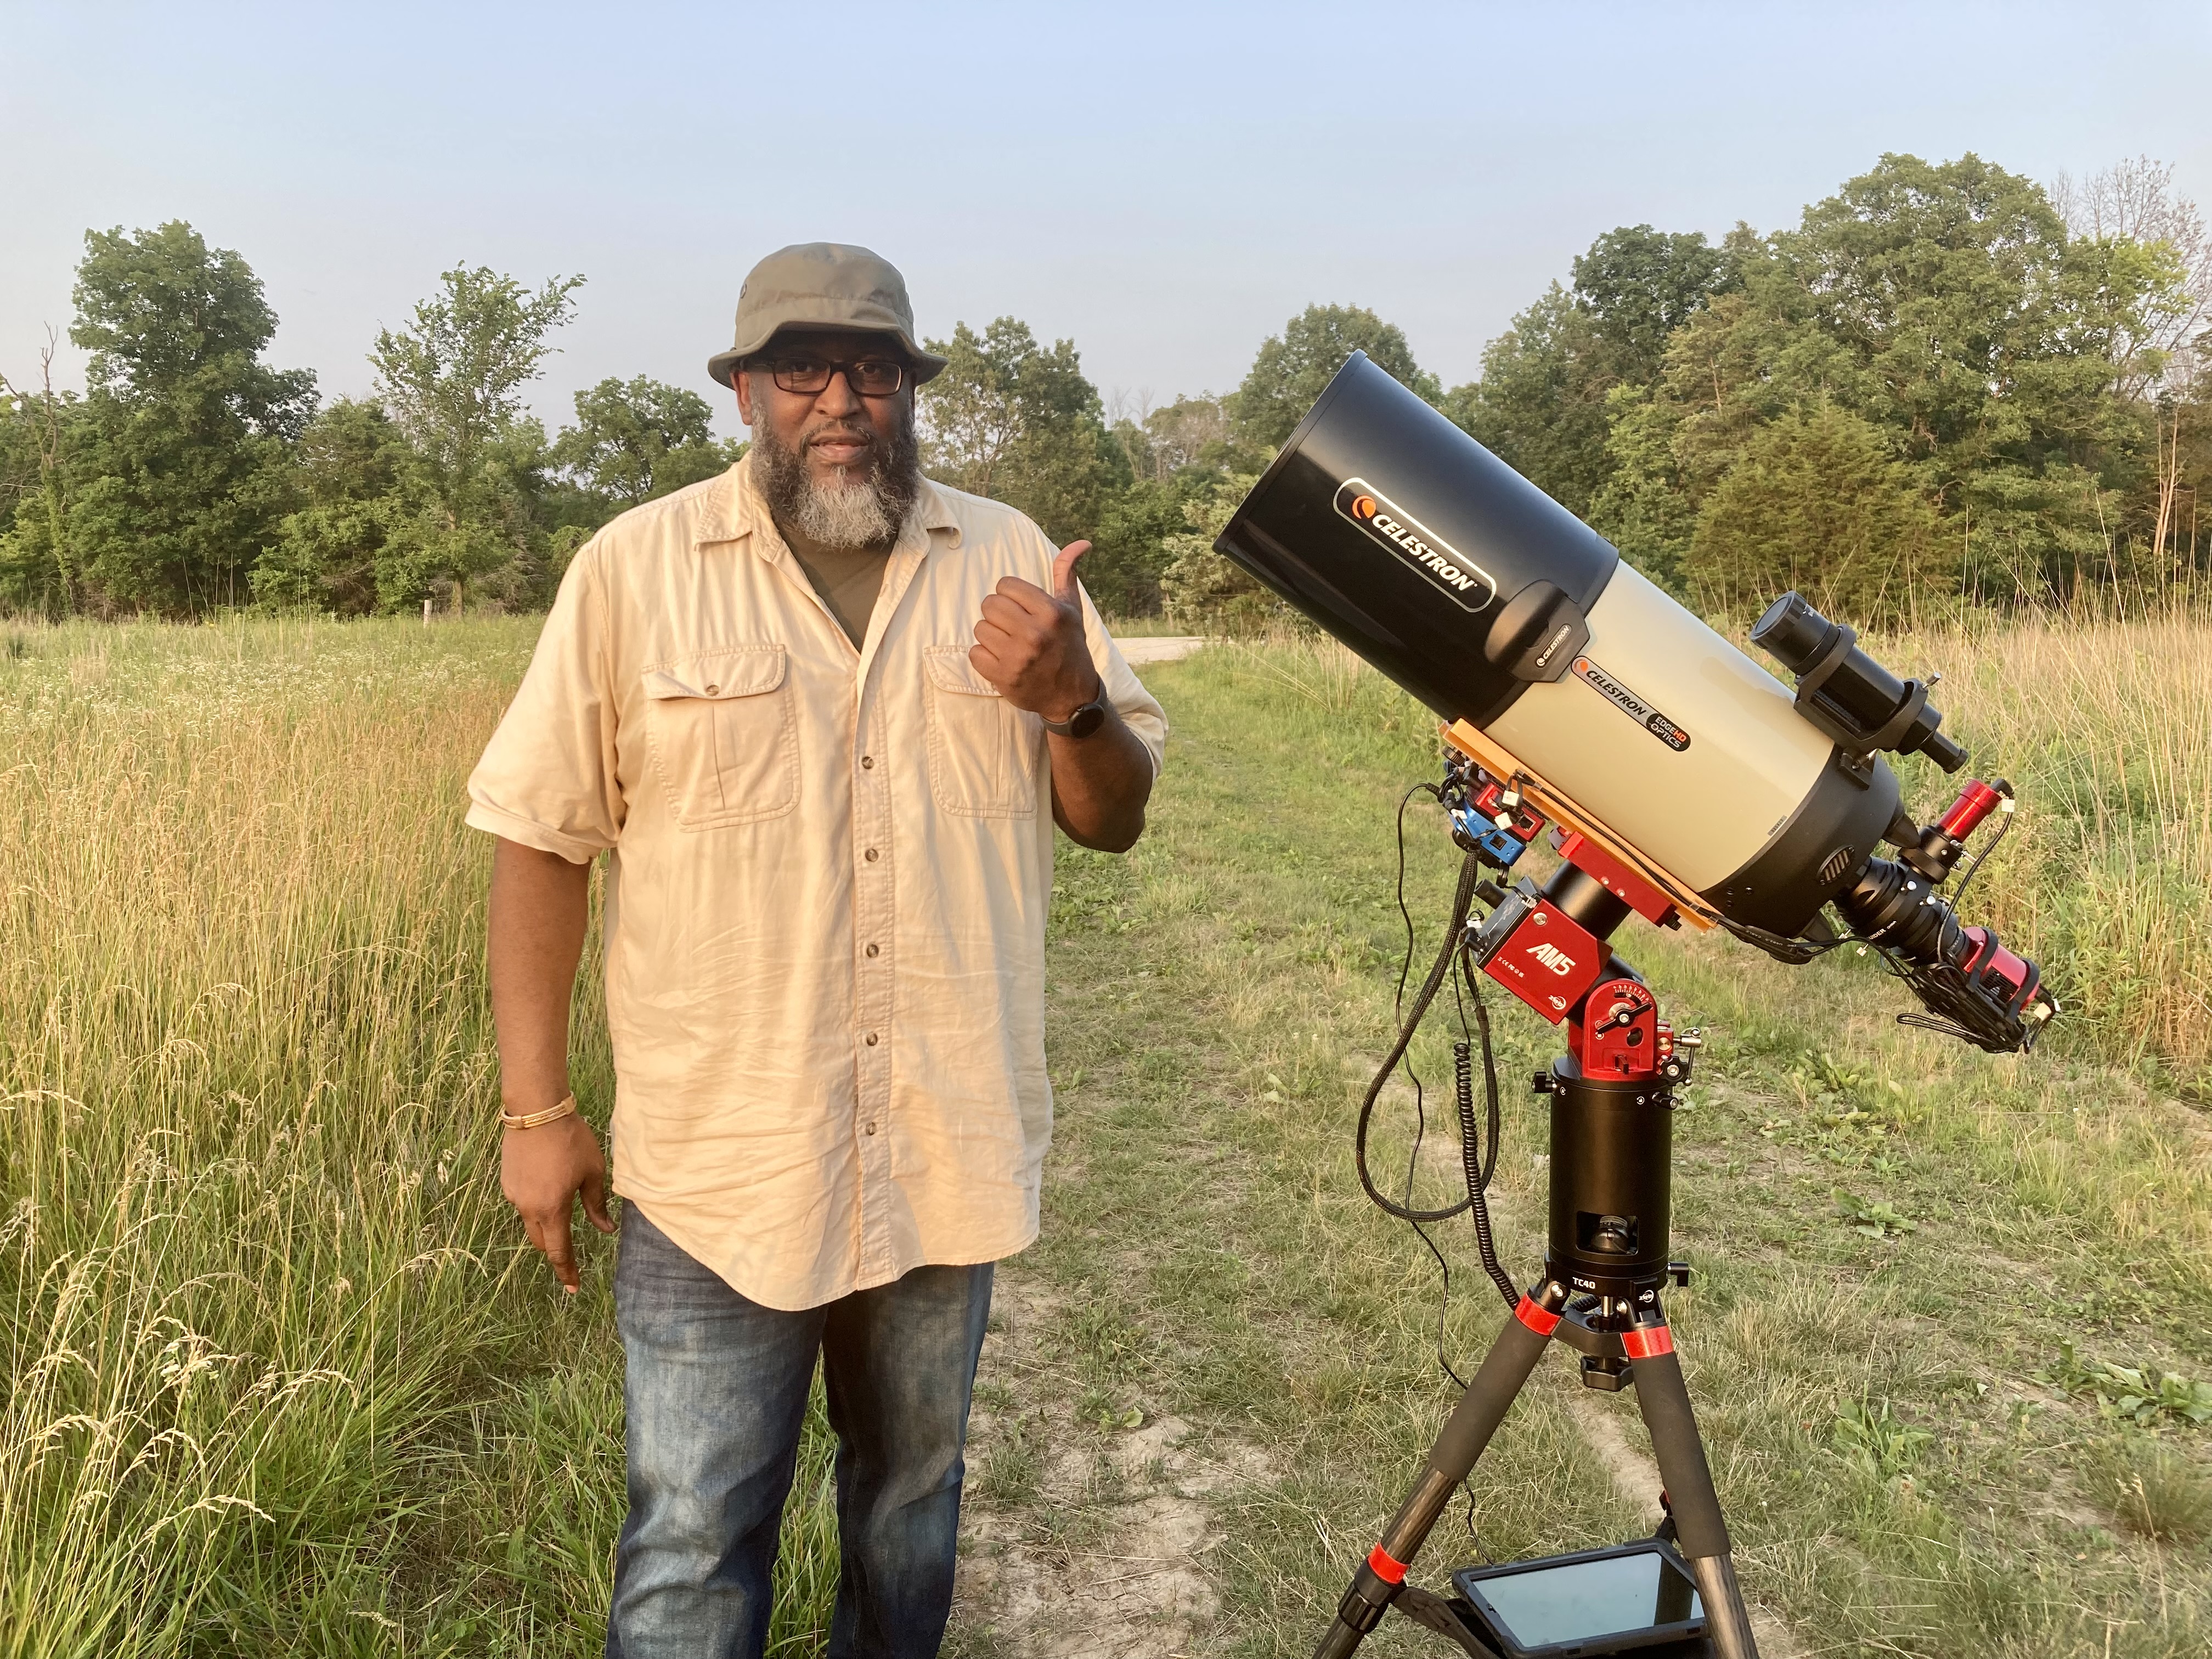
Miguel tried out his big new toy. Say hello to “Brutus the Beefcake” Schmidt–Cassegrain!
Processing RAW files converted to TIF in Canon DPP, stacked in Astro Pixel Processor, GraXpert for gradient removal, Photoshop CS6 for stretching and other cosmetic adjustments.
Problems and learnings In a way, despite the more comfortable temperatures we would be working in, I was dreading the summer months when it came to prospects of astrophotography. I knew the scrambling that would need to be done to take advantage of the dark skies during the shortest nights of the year, but this isn’t what I am referring to. Since I use a non-cooled dSLR for this purpose, I was worried about sensor noise that increases dramatically as the temperatures rise. I knew this could be a significant issue, but wasn’t expecting the problem that it would bring.
I have now become aware of what is known as “Canon banding.” This problem manifests as broad horizontal bands of color noise that alternate in greens and magentas across the frame and is a well known issue with astrophotographers using older model Canon dSLRs. I couldn’t see this on the individual subs, but after stacking and just a slight amount of stretching, they became distinctly obvious and impossible for me to correct with my processing skills.
Up steps Miguel to save the day again. In PixInsight, the AP processing software Miguel uses, there is a script function that can reduce Canon banding dramatically. Miguel ran my unstretched stacked image through this and it made a world of difference. It did not eliminate the problem completely; I was still limited on how much stretch I could apply to this image because of it. But, with a little bit of touch up to the final stretched image, I was able to produce something I am happy to share.
Conclusion Overall I am very pleased with the final image, although it wasn’t exactly what I had in my mind’s eye when planning. Part of the problem was the banding issue, explained above. Additionally, I have come to realize that many summer DSO targets would greatly benefit from being shot on multiple nights. I think this would have come out more to my expectations if I had double or triple the amount of integration time. This simply isn’t possible in a single short night in summer months. I have never given the possibility of multi-night sessions much thought – one night’s sleep a month lost is enough I think. But, to do summertime DSO’s justice, especially nebulas, this might be worth considering when I have the opportunities.
I really do love this target. There are a lot of opportunities here that I look forward to trying in the future. I speak specifically to the different options of focal length. Using a longer lens (200-300mm) will focus in on the different great nebulas, bringing out more of their details, while using a wider lens, will show the dark river nebula flowing into the much brighter core of the milky way to the east.
If you made it this far, thanks for visiting and reading. I hope you liked this month’s AP image!
Markarian’s Chain – An interesting look into the Virgo Galaxy Cluster
Markarian’s Chain (NGC 4406) Since I picked up astrophotography, I knew I wanted to shoot some galaxy clusters. The first that comes to mind is Markarian’s Chain, a nice curved line of galaxies that lies amidst a large cluster of galaxies known as the Virgo Galaxy Cluster. The Virgo Cluster contains up to 2,000 different galaxies and Markarian’s Chain is an asterism-like chain that provides an interesting order to the randomness of the surrounding cluster. Typically, Markarian’s Chain is considered to be comprised of seven galaxies, all of which are moving in the same relative speed and direction with one another. The distance from earth to the galaxies varies from between 50 -80 million light years! Of course this means we are seeing them where they were up to 80 million years ago.
The galaxies comprising NGC 4406 are mostly elliptical and lenticular in type, but there are some fascinating details that can be found by taking a closer look. I’ve left the image above a bit larger than normal and invite the viewer to search within to see some of the different shapes and go galaxy hunting if you would like. I have counted about 35 galaxies in this frame. Most are quite small. Remember, if it’s a little fuzzy, it’s a galaxy. The stars are typically sharp in contrast to the dark background void.
Markarian’s Chain – annotated. Click for larger view.
Let’s take a look at some of the galaxies making up this frame. First, the two larger appearing galaxies that anchor the chain are M84 and M86. Just to the left of these are two interacting galaxies, NGC 4438 and NGC 4435, known collectively as ‘Markarian’s Eyes.’ I was happy to pick up enough detail to show how NGC 4438 is being distorted by the gravitational pull of it’s neighbor, sweeping out a lot of the gas, dust and likely stars from their normal placement.
Another prominent galaxy in this frame is found in the lower left corner. This is the supergiant elliptical galaxy, M87 (Virgo A, NGC 4486). M87 is one of the largest and most massive galaxies in our local universe, containing several trillion stars.
One last galaxy to bring your attention to is NGC 4440. This is an interesting barred spiral galaxy that I was not expecting to see in such detail. This galaxy is located at the intersection of two lines in this frame. Draw a line going directly downward from the eyes and another starting at Virgo A going to the right. Where these two lines intersect you will be close to NGC 4440.
See the accompanying partially-annotated image showing the names of the more prominent galaxies in this frame.
Collecting the data I have made my bed as an astrophotographer that does not use “go-to” technology and I am frustratingly sleeping in it. This one should have been easier to find. It is literally between two mid-magnitude stars – Denebola, in the Leo constellation and Vindemiatrix in the constellation of Virgo. All I had to do is draw a line between the two and the target is in the dead center. Somehow, I did not take this literally enough and spent nearly an hour finding the target and composing the frame. I do have one excuse; this area is filled with galaxies, so every time I took a test shot, there were several galaxies in the frame and it took me some time to see if the pattern I was looking for was there or not. Other than this, the night went pretty easy. We had perfectly clear skies, cold temps and Miguel and I had extra company. We joined with an imaging party from the Astronomical Society of Eastern Missouri, who just happened to be at Danville C.A. the same night we were. It was fun watching the experienced imagers and viewers pulling out all sorts of big, pretty and expensive optics and mounts. Unfortunately, between trying to concentrate on what I was doing and the very cold temperature, I didn’t find the time to do much socializing.
Date and location Imaged on the night of 19/20 March 2023 at Danville Conservation Area in Montgomery County, Missouri (Bortle 4). Dark period: 20:45 – 05:42 Target period: 19:52 – 07:31; Zenith 01:42
Conditions Clear skies over the course of the session. Temperature in the mid 20’s F. Winds below 5 mph.
Equipment Astro-modified Canon 7D mkii camera, Canon 400mm do mkii lens, Skywatcher Star Adventurer tracker without guiding on a William Optics Vixen Wedge Mount. Gitzo CF tripod, Canon shutter release cable, laser pointer to help find Polaris and sky targets, lens warmer to prevent dew and frost on lens, dummy battery to power camera, lithium battery generator to provide power to camera and dew heater, right-angle viewfinder to aid in polar alignment.
Imaging details Lights taken (ISO 6400, f/4.0, 20 second exposure): 1,076 Lights after cull due to tracker error, wind, bumps, etc.: 912 Used best 90% of remaining frames for stack for a total of 821 subs used for integration (4.56 hours) Darks: 36 taken at same exposure time and ISO as lights
Processing RAW files converted to TIF in Canon DPP, stacked in Astro Pixel Processor, GraXpert for gradient removal, Photoshop CS6 for stretching and other cosmetic adjustments.
Problems and learnings Miguel had to save my bacon with this one. This was the “first light” for astrophotography for my Canon 400mm f/4 do mkii lens. I had been eagerly waiting to try this lens for this purpose and, as I feared, this longer focal length did not allow for the 30 second exposures I had gotten used to using the 300mm lens. Even though this combination was a bit lighter than the 300mm f/2.8 lens, the Star Adventurer tracker just wasn’t up to it. So, I was forced to go with 20 second exposures to limit star trailing and, consequentially, had to use ISO 6400 to keep the signal to noise ratio where I needed it. This ISO setting is really pushing it with the camera I use so I wasn’t at all sure that I would even have a final image worth sharing in the end.
Because I pushed the ISO, the noise was pretty awful. Following a very light stretch after stacking, huge bands of green and purple showed up against the dark sky. I was at a loss on what to do about this, having exhausted all of the tools I knew to use in my processing train. I knew Miguel was beginning to become quite proficient in PixInsight processing so I thought I would ask him to try and see what he could do with my stacked image. I was dumbfounded when he was able to fix my problem in about 10 minutes! The final image could still probably be stretched a little more to bring out further details, but considering the ISO I was using, I have to be satisfied with the end result. I can’t get myself to put down the purchase price for PixInsight anytime soon, but that is something I’ll be considering in the future.
Conclusion Spring is known as galaxy season in the astronomy world. Most of the popular nebulas are not as available as they are in the winter and summer. Unfortunately, I really don’t have the equipment to take closeups of the far off and very small galaxies so I will have to settle for a few of the relatively larger ones as well as the clusters like Markarian’s Chain. I am pleased with what I was able to create here. As usual, it was with some considerable struggles and frustrations but I am coming to find that I kind of like overcoming those obstacles despite what I feel at the time.
The Rosette, or Skull Nebula, one of the largest and spectacular star-forming regions in our sky. Can you make out the skull? It is looking downward around 8:00.
The Rosette or Skull Nebula (NGC 2237, Sh2-275) My February target was the fantastic and grand Rosette Nebula, also known as the Skull Nebula for hopefully obvious reasons. This nebula is a gigantic cloud of predominantly ionized atomic hydrogen that lies in the Monoceros constellation, not too far from the Orion Molecular Cloud Complex. This object has a number of different catalogue designations given to different regions of the nebula (NGC 2237, 2238, 2239, 2246) and associated star clusters. The primary star cluster being NGC 2244 – the most central cluster that provides most of the illumination and stellar winds and radiation that illuminate and disperse the gaseous clouds that form the nebula. X-ray imaging has identified approximately 2500 young stars in this star-forming complex.
Space is Big This nebula lies approximately 5,000 light years from earth and is roughly 130 light years in diameter. To get an idea how immense this nebula is, compare this to the Great Orion Nebula (M42), which is only 40 light years in diameter. With all this talk about light years, I wanted to explore this to get a better idea of what we’re talking about and try and wrap our heads around the scale of an object like this. A light year is roughly 5.88 trillion miles – the distance light travels in a year. Since I’m an American, I’ll keep everything in miles so that I can better understand. The diameter of this nebula is roughly 764 trillion miles. The fastest spacecraft ever recorded is the Parker Solar Probe, which reached a top speed of 364,660 mph. This comes to 3,194,421,600 miles this probe can traverse in a single year. Sounds like a lot, right? Well, to cover the 764 trillion miles to reach one end of this nebula to the other, it would take the Parker Probe 239,167 years! We probably don’t need to get into the amount of time it would take the Parker Probe to get to the nebula in the first place.
“Space is big. You just won’t believe how vastly, hugely, mind-bogglingly big it is.” Douglas Adams – A Hitchhiker’s Guide to the Galaxy
Collecting the data I had anticipated this one being a little difficult to find. IT is found roughly on the line between two stars of the winter triangle – Betelgeuse, and Procyon. But, there are really no large magnitude stars in close proximity to help get it in the tight frame of my 300mm lens. I was please that it took me only about 10 minutes to get it in frame. However, because I was hoping to grab some of the much dimmer gases that can make up a sort of stem of this rose, I spent another 30 minutes trying to frame it just so. This turned out to be time wasted. In order to get this dim gas to show, much more integration time would be necessary than what I was able to collect on a single night.
Date and location Imaged on the night of 17/18 February 2023 at Danville Conservation Area in Montgomery County, Missouri (Bortle 4).
Dark period: 19:10 – 05:19
Target period: 15:20 – 02:08; Zenith 20:44
Conditions Clear skies over the course of the session. Temperature: 31° – 27° F. Winds forecasted to be 6-8 mph but seemed lower than this.
Equipment Astro-modified Canon 7D mkii camera, Canon 300mm f/2.8 lens, Skywatcher Star Adventurer tracker without guiding on a William Optics Vixen Wedge Mount. Gitzo CF tripod, Canon shutter release cable, laser pointer to help find Polaris and sky targets, lens warmer to prevent dew and frost on lens, dummy battery to power camera, lithium battery generator to provide power to camera and dew heater, right-angle viewfinder to aid in polar alignment.
Imaging Details Lights taken (ISO 3200, f/2.8, 25 second exposures) 779. 61 frames dropped due to poor focus, 217 frames dropped due to tracker error, 10% frames dropped in stacking instructions. A total of 450 frames used in integration for a total of 3.13 hours. Darks: 39 taken at the exposure time listed above. Bias and Flats: Not taken. Removed most vignetting and some chromatic aberration while converting RAW images to TIF.
Processing RAW files converted to TIF in Canon DPP, stacked in Astro Pixel Processor, GraXpert for gradient removal, StarNet++ for separating stars from nebulosity, Photoshop CS6 for stretching, recombining stars and nebulosity and other cosmetic adjustments.
This one was a bit tougher than I expected, mainly due to the StarNet software not wanting to work the first several times I tried. I captured more of the hydrogen alpha in the surrounding regions than this image depicts but, because it was so faint, nasty artifacts appeared during the stretch. I was forced to leave much of this out of the final image due to this. I think in order to do this properly I would need much more total integration time.
Problems and learnings This one went about how I had expected except for one thing. I was devastated to learn that I had not acquired critical focus for roughly the first 45 minutes of imaging. This was even more of a blow as this time coincided with the object being at or near its zenith, meaning I lost some of the best potential data gathering of the night.
I have also been collecting some data on how many subs I throw away due to errors in tracking. In this case, 35% of the subs I took were thrown away, which seems to be close to my average when using this lens at these exposure times. I dropped the exposure time to 25 seconds in order to help reduce this but I think this issue is mostly due to the tracker being at or above its limit in regards to payload and focal length. For this reason, I am investigating a new tracker that should meet my needs nicely for a 1-2 minute exposure with the above kit and a keeper rate of greater than 90%. Keeping my fingers crossed for that company bonus this year. 😉
Conclusion This is another very popular and relatively easy object that most astrophotographers tackle early on. Overall I’m pleased with the outcome. I like the detail and the colors but I think that better processing might bring these out better even with the data I have here. Always learning. This object is better imaged in December or January, when more time with it can be had in a single night. I look forward to trying this one again someday.
Comet C2022 E3 (ZTF) photographed on 21 January 2023
After M42 had began to drop to low in the western skies, making any further attempts at photographing it futile, I decided to try and find the newly discovered, long period comet, C2022 E3 (ZTF). I was unable to see it with my naked eye at my location, but with careful scanning using binoculars, I was able to find it. At 03:00, I was happy that getting it in the camera viewfinder wasn’t too difficult a task. I knew this wouldn’t be the best image of this comet, but I didn’t want to pass up the opportunity. This is a stack of 77 20-second images. You can make out the green color of the comet’s head, proposed to be due to the presence of diatomic carbon, along with two tails. The broader, warmly colored tail is the dust tail and the fainter tail below is the ion tail.
The comet’s closet distance to earth will appear on February 1st, where it will be close to the north celestial pole. The waxing moon will make it harder to see. So, if you plan on trying to see this one yourself, you should wait until the moon sets.