"What a thousand acres of Silphiums looked like when they tickled the bellies of the buffalo is a question never again to be answered, and perhaps not even asked." -Aldo Leopold
Passiflora incarnata (passionflower, maypops) Image composed of a focus stack of 27 exposures.
Recently, I’ve taken the plunge and given some serious efforts into focus stacking in macro photography. This method allows the photographer to increase the depth of field in a scene by combining multiple exposures, each focused on a separate plane of focus. Afterwards, the different exposures are combined using powerful processing software on the computer. This particular image was built from 27 photos all taken at an aperture of f/8.
I will definitely miss our yard full of native plants when we make our change in residence, including the passionflowers. Maybe I’ll get to harvest this year’s crop of fruit one more time to make my own juice.
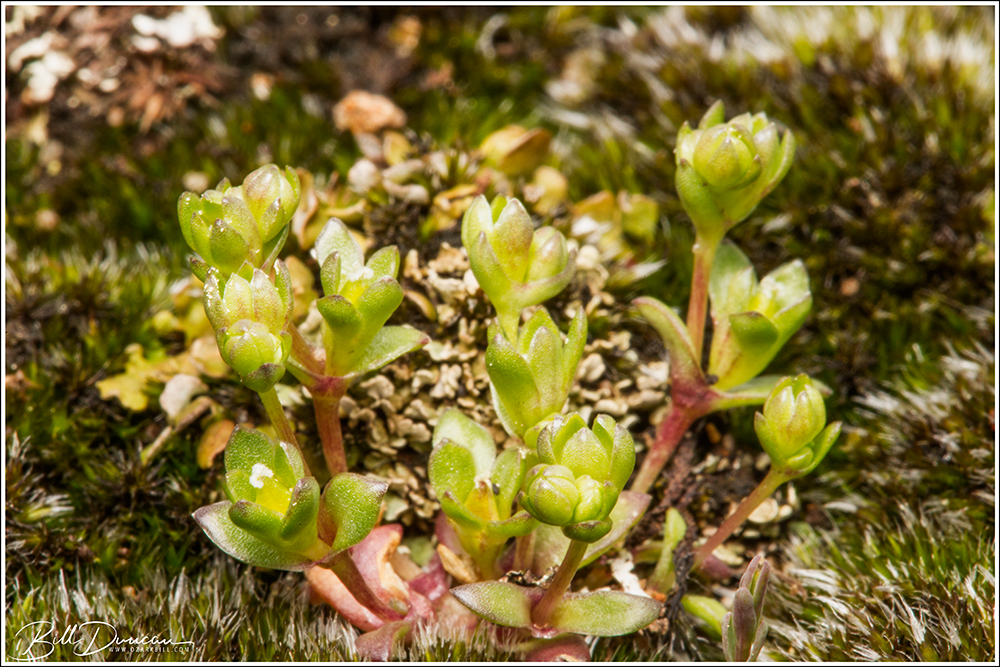
The WGNSS Nature Photography Group headed west early on a lovely day in early April with hopes of finding one of Missouri’s rarest plants – Geocarpon minimum, commonly referred to as tinytim, or earth-fruit. Geocarpon minimum (C=10) is a plant in a monotypic genus known for its diminutive size and rare status. It is listed as federally threatened and as endangered by the state of Missouri. The primary reason for its relative scarcity is its habitat needs; G. minimum requires sandstone glade habitats in Missouri as well as saline “slick spots” where it typically occurs in Arkansas, Louisiana and Texas. A fine balance must be the goal for managers of these areas. Competition and shading by native or exotic competitors is the primary limiting factor of this species and therefore, continuous disturbance is necessary for its continued success.
Geocarpon minimum “tinytim”
This plant’s life cycle is short, lasting only 3-6 weeks. Our objective was finding these plants in flower, but there were no guarantees we would find them flowering, or find them at all. Our first and primary hope for finding these plants was at Bona (pronounced Bonnie) Glade Natural Area. Here, our botany leaders, Casey Galvin, John Oliver, and Steve Turner showed us the microhabitat in which to find the plants and were able to point at the first few plants we found. With search images in mind, the group spread out and found the plants throughout the area. Better yet, we found the population in the early stages of flowering! As you can see in the accompanying photos, these are perfect subjects for the macro/micro lens.
In case you wondered how this species earned its name
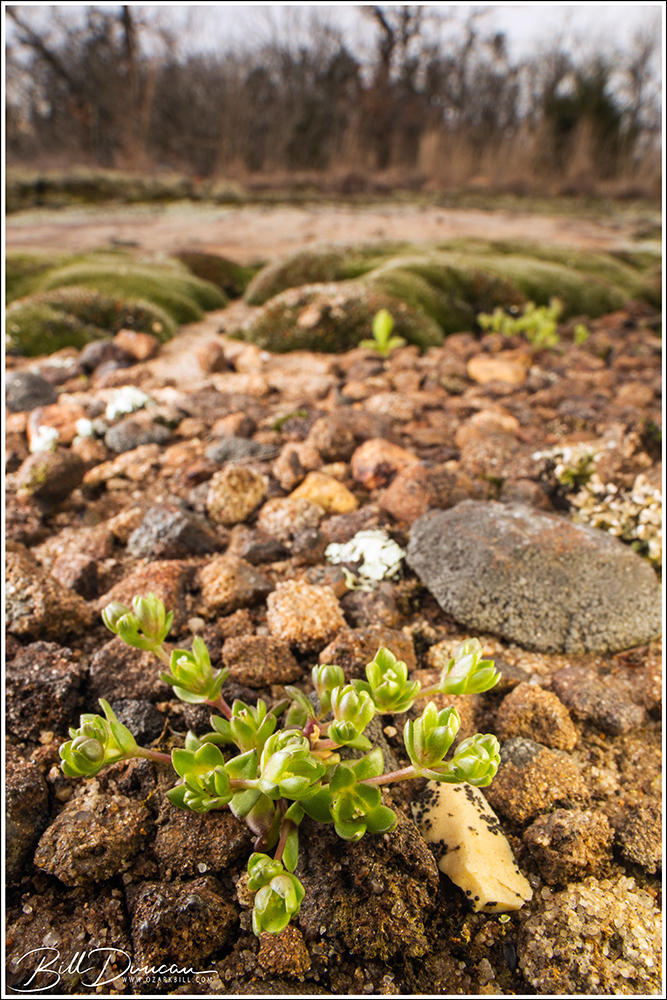
After grabbing a late lunch together, a few of us decided to return to Bona Glade. Ted MacRae and I were unsatisfied with earlier images we had taken with our Laowa 15 mm macro lens and we were eager to improve the photos using this specialty lens that, when used successfully, can showcase the plant within its specific habitat.
Geocarpon minimum growing from rock/sand substrate
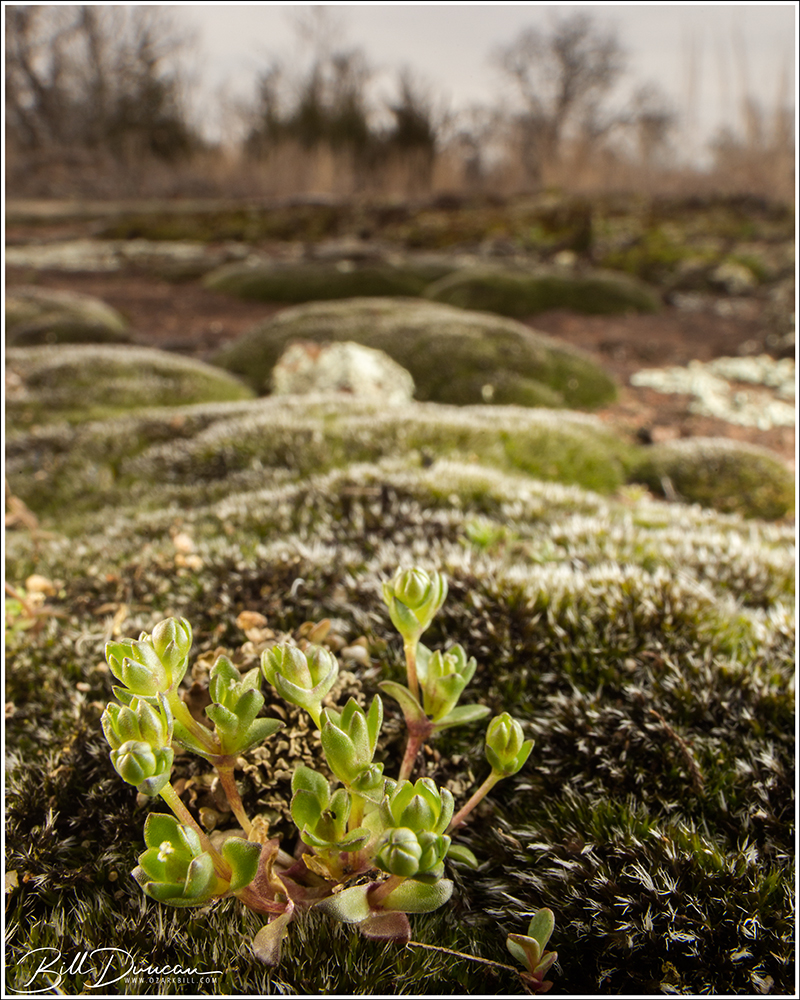
We photographed the plant on the couple of substrates that we found it on and in the various stages of its development.
Geocarpon minimum growing from moss substrateOzark Bill getting low to meet Geocarpon at “eye level”. Photo by Ted MacRae
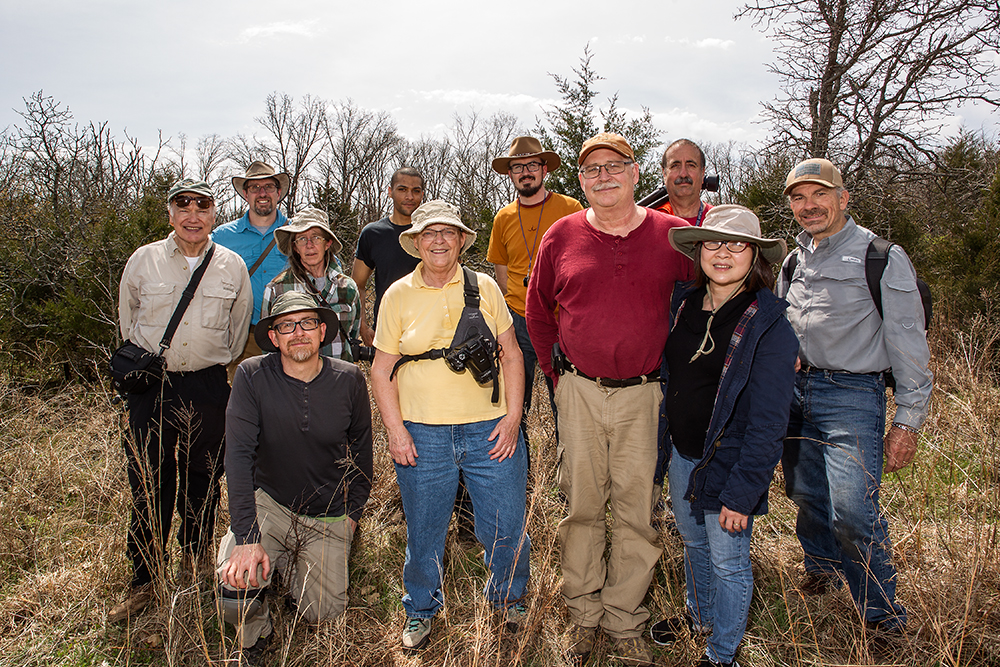
Finding and photographing this plant was a long-held goal of mine. It was a very special day spent with friends and newfound acquaintances. I am thankful for those who helped us find this plant and spent time with us. Hopefully future WGNSS members will continue to find tinytim in its Missouri homes for decades to come.
Tinytim hunters. From back row starting on left: John Oliver, David Seidensticker, Deb Tyler, Adam Rembert, James Faupel, Steve Turner, Front row starting on left: Bill Duncan, Evelyn Luecke, Casey Galvin, Anh do Galvin, Ted MacRae.
It’s been quite some time since I’ve shared a blog post. This has primarily been due to being in a residence move that is seemingly never going to end. But, I have been finding time here and there to make new images and even get some post-processing done. I have switched themes in this blog, picking a theme that should allow me to create a “portfolio” page to showcase my stronger photos. Unfortunately, I haven’t been able to figure out how to do this in WordPress. So I have not gotten far in this endeavor.
My goal is to post more frequently, just to share photos. There may not be a lot of accompanying text, but will depend on the subjects, my amount of free-time and my mood.
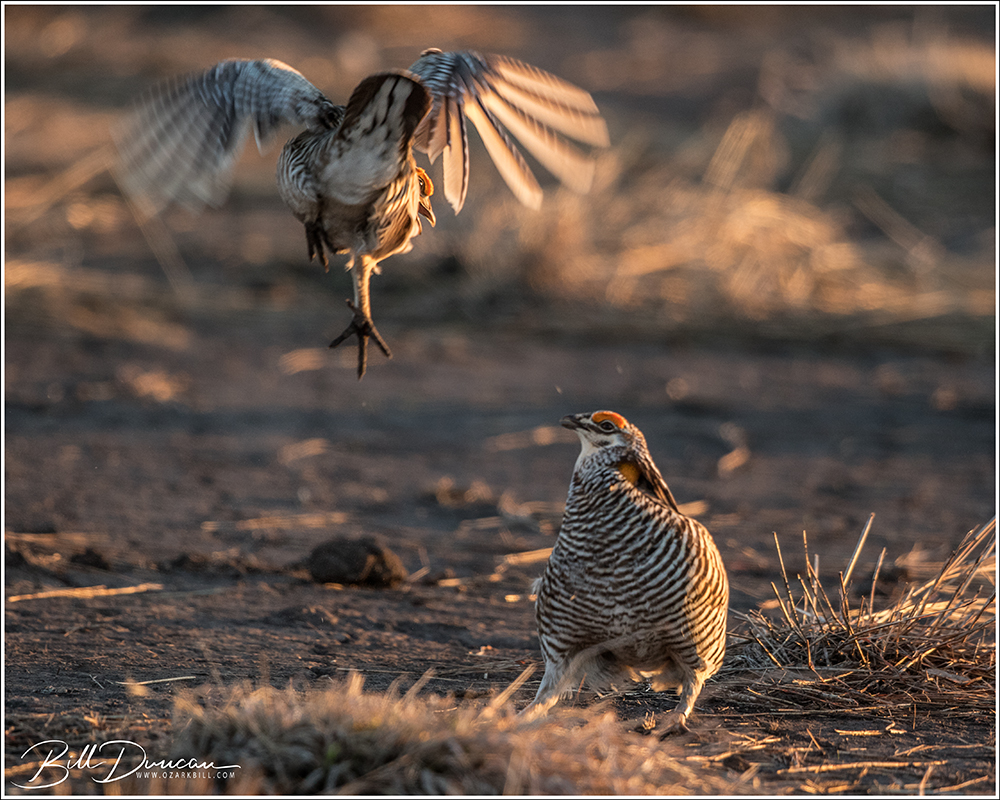
Greater Prairie Chicken in golden light
The images in this post were taken back in April of 2019 during a WGNSS Nature Photo Group outing to Dunn Ranch Prairie. This visit was close to the end of the lekking period and was the latest date that the MDC was keeping the blind open. This was different than our previous visit when we visited in the earlier part of the season and had pros and cons associated.
Boomer
Visiting the lek later in the season created better chances for better light (clear skies) and warmer weather. However, what we didn’t expect was that the females typically choose the dominant males to copulate with in the earlier days of the season and will often be nesting come the later days of the lekking season. This is what we had found during this visit. We did not see a single hen during this visit.
The standoff
Because there were no hens to compete for, the males had no heart for the competition. We had very few opportunities to photograph the action we had witnessed during our first visit to the lek two years prior.
One of the few opportunities to capture a fight between males
The light, however, was spectacular – we had no reason to complain and we all made memorable portrait style photos of these birds booming, dancing and cackling.
Never a disappointment, hopefully this Missouri population somehow continues to hang on so that WGNSS members can continue to enjoy this spectacle in Missouri.
ƒ/8, 1/1250 sec, ISO-320, 1120 mm focal length equivalent
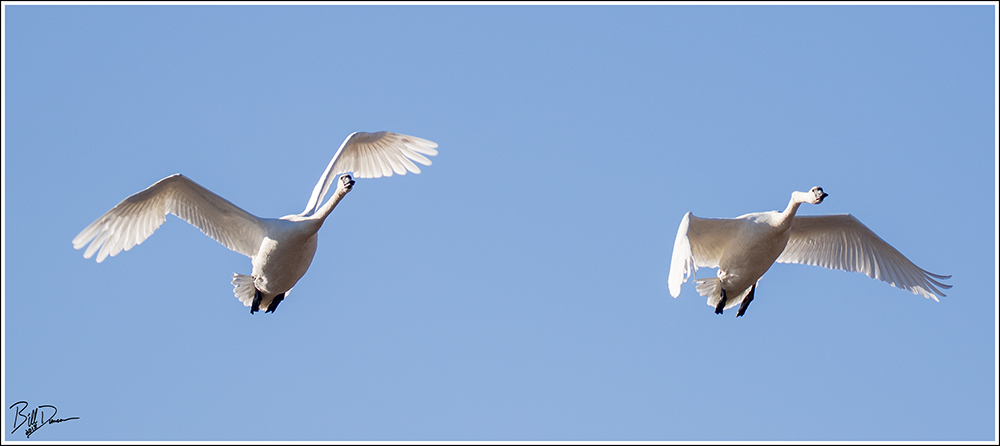
In December, 2018 the WGNSS Nature Photography Group met at Riverlands Migratory Bird Sanctuary with hopes of making some memorable images of our giant white residents that spend their winters here. Trumpeter and Tundra Swans will spend their evenings at roost in the bodies of water at RMBS and will then typically leave to forage in surrounding agricultural fields, picking up the wasted grain from harvest.
A good strategy for placing yourself in the most appropriate position for making photographs of these birds is to pay attention to the direction of the sun. If the birds are found in Ellis Bay during the golden hours of morning light (during winter in St. Louis, this can be up to three hours after sunrise), then getting close to the shore with the sun behind you can produce some satisfactory results. Try getting closer to the ground and shooting the birds from a low angle. This will give your photographs an eye-to-eye perspective that is a much more intimate view into the birds’ world. Shooting at low angles will also tend to provide a more pleasing, out-of-focus background to your subject that will cause the bird to appear to be larger than life. We photographed both species of swan as they lounged in Ellis Bay for the first couple hours of the morning. Can you pick which is the Tundra and which is the Trumpeter Swan in these first two images?
ƒ/8, 1/800 sec, ISO-250, 1120 mm focal length equivalent
We then moved on to another place within the refuge that the Swans can often be found on winter mornings. At Heron Pond, these birds are typically too far away from the observation areas to get closeup photographs while roosting. However, the patient photographer on the ready can often be rewarded by standing and waiting around. During this morning, the Swans were a tad tardy in lifting out of Heron Pond, so our group was in the right place at the right time. Getting proper positioning with the angle of the sun is a bit more difficult here in the morning but is still critical. We placed ourselves in the best places available on this busy morning and took advantage of the swans as they left the pond, which often flew right over our heads.
Photographing these mostly bright-white birds on a bright sunny day is not necessarily simple. While on the ground or the waters of the bay, it is common to have the camera’s light meter expose for the darker and more prominent background. This will often lead to the white feathers of the birds being overexposed. Remember to check the histogram of your camera and use the “blinkies” while reviewing your images to ensure you are not clipping your whites. If this is the case, make the proper adjustments to your exposure. Saving your whites may result in your blacks and shadows being bunched up at the other end of the histogram. Since the big white bird is your subject of concern, this should be nothing to worry about.
ƒ/5.6, 1/1600 sec, ISO-160, 594 mm focal length equivalent
Changing directions and the angle of sunlight are challenging for proper exposure. Get as close as you can in the field – much can be recovered in post-processing.
Shooting these large birds in flight presents a different set of challenges. Although these birds move relatively slower than most other birds during flight, the photographer will still want a relatively fast shutter speed. This is particularly true the closer you are to your subject. I recommend no slower than 1/1000 of a second. Start at this setting and increase shutter speed if you notice blurring or softness to your image due to subject movement. As these birds get closer during flight, they will naturally fill more of your frame, thereby increasing the number of pixels seeing the bright white values. This can often lead to a case of the camera’s meter overcompensating, thereby causing an underexposed image. In this case, the birds may come out looking grey instead of white and the black colorations of their feet and faces will be much too dark and lack sufficient details.
ƒ/5, 1600 sec, ISO-200, 272 mm focal length equivalent
In the above image, a swan can be seen with a significantly crooked neck. I typically see one or two birds with this condition every season. I do not know how it affects the birds or what their ultimate fates may be.
In the case of constant sunny skies, fully manual exposure settings are most called for. Here I will present a good starting point for setting the exposure for capturing swans in flight. Shutter speed – As I mentioned earlier, start with a minimum of 1/1000 sec. This may likely be too slow to capture a sharp image, depending on what position the bird’s wings were captured. Often, shutter speeds of up to 1/2500 sec or higher might be necessary. Aperture – This will depend on how close you are to the swan. Remember, these are large birds and when shooting at a profile there is a lot of distance from wingtip to wingtip. If the bird is significantly close, or if you have multiple birds in the frame, you will be unlikely to capture the entire subject(s) in critical focus if shooting wide open. I recommend no wider than ƒ/5.6 – you may need to stop down significantly smaller. However, always remember that getting the animal’s eye in sharp focus is critical. Many images will work fine if other parts of the bird are not in critical focus. ISO – Remembering that photography is a compromise, shooting at a fast shutter speed and smaller apertures might require that a higher ISO value be needed to obtain the proper exposure. Several latest digital camera models have a useful “auto ISO” setting. I know, technically this is not fully manual, but ISO does not necessarily have the input it once did. Know the highest ISO setting for your camera that you are comfortable with and don’t be afraid to shoot there. This will vary by camera model and by the photographer’s taste.
Here is a photo of “crooked neck” as it flew directly over my head. In cases like this a telephoto-zoom lens is really beneficial for capturing birds in flight.
ƒ/5, 1/1600 sec, ISO-400, 216 mm focal length equivalent
The majority of this material was originally published in Nature Notes (The Journal of the Webster Groves Nature Study Society) February 2019, Vol. 91, No. 2.
Eastern skunk cabbage (Symplocarpus foetidus) in bloom at Bennett’s Terraqueous Garden (Peoria County, IL)
Many thanks to Casey Galvin who turned me on to the closest places to find and photograph a plant species that had been a target of mine for some time now. Eastern skunk cabbage (Symplocarpus foetidus) is a fascinating plant that is typically found in eastern North America and the upper midwest. The nearest populations to St. Louis that I am aware of are near Peoria, Illinois, which is about a three hour drive from my front door.
These are one of several early blooming plants that start the spring botanical season. These members of the Araceae family, known as the aroids, bloom from February through April. Like several plants in this family, this species produces odors reminiscent of rotting meet in order to attract pollinators that are predominantly dipterans (flies), hymenopterans (bees) and other, more terrestrial arthropods. I did not find the odor too overpowering and I also thought I picked up a slightly sweet, syrupy smell.
Eastern skunk cabbage (S. foetidus) in its seep-spring habitat at Miller-Anderson Woods Nature Preserve (Bureau/Putnam counties, IL)
Another remarkable aspect to this species pollination biology is that the spadex and surrounding tissues are thermogenic – meaning they produce their own heat. This thermogenesis, produced via enzymatic reactions not too dissimilar to the reactions that occur in mammals, may serve to assist the inflorescence and leaves of the plant to break through frozen grounds. It also likely serves as to further the ploy that the plant is a rotting carcass, hopefully attracting flies and other insects interested in such things.
A honeybee (Apis mellifera) visiting the inflorescence of an eastern skunk cabbage (S. foetidus)
Other than a few very small flies and a couple of small native bees, the only pollinator I found during my visit was the honey bee. These were quite abundant.
Spathe and associated carpels of eastern skunk cabbage (S. foetidus)
To show the moisture associated with the seep habitat I was in, here is a skunk cabbage spathe surrounded by snakeskin liverwort (Conocephalum salebrosum).
That’s all I have for now. Most of the information in this post and much more can be found in the following source:
A big thanks to the Duncan’s for inviting me to their home, to photography winter songbirds at their bird feeder.
A cold winter day is perfect for curling up by your living room or you can stock your bird feeder, get your camera, a turkey chair and check out the activity at the feeder.
Here’s a quick rundown of the most common backyard birds, I saw while spending an afternoon at my friend’s bird feeder.
House Finch (Haemorhous mexicanus)
House finch – love Nyjer seed, often mistakenly called thistle seed. Offer it in tube feeders or net bags, and watch these colorful birds swoop in for a visit.
Downy Woodpecker (Picoides pubescens)
Woodpeckers – In the winter, beef suet is an energy-rich substitute for the insect fare that downy, hairy, and red-bellied woodpeckers feed on during the summer. Other bird species such as jays will also eat suet, but it’s…
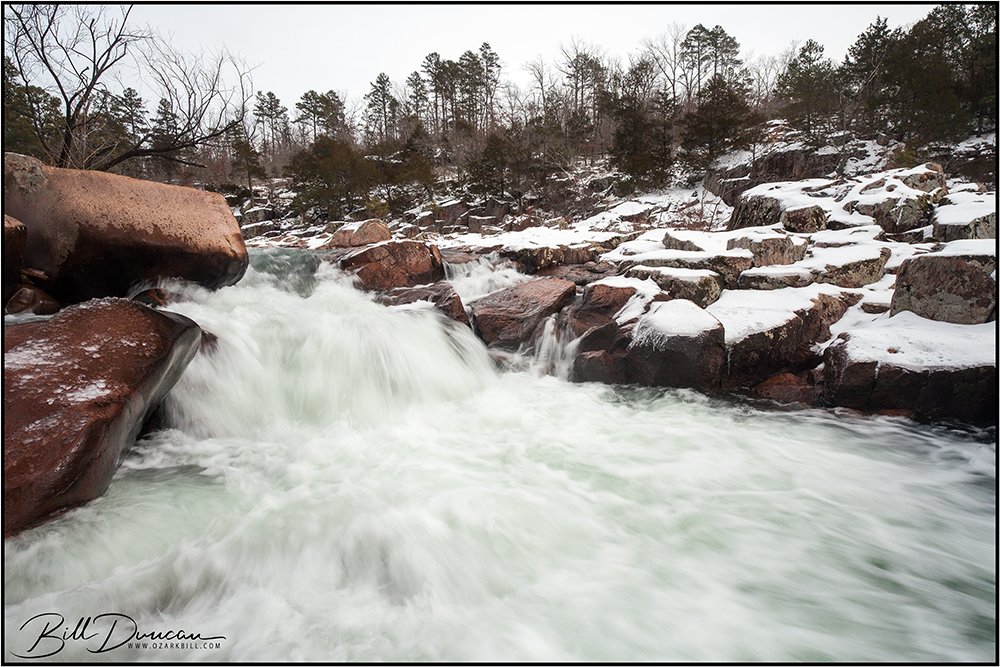
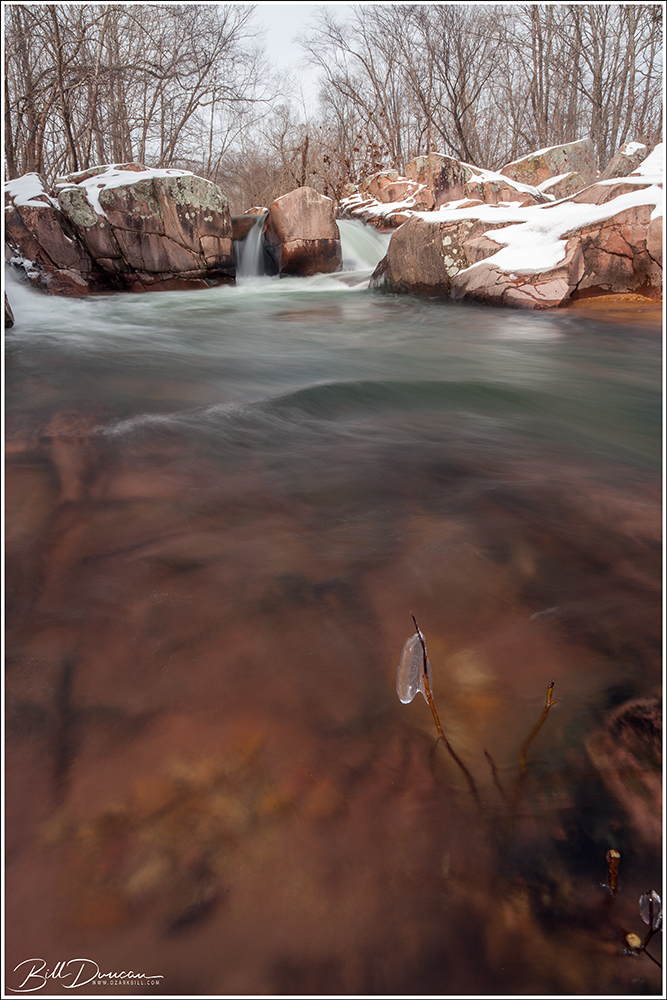
Miguel and I headed south early on Saturday morning. We arrived at Amidon Memorial Conservation Area in Madison County, MO long after first light, but early enough to get some good from what would turn out to be a very dynamic sky over most of the day. Castor River Shut-ins was our main target, as I knew we weren’t too far following some significant rainfall in the area and there was a fresh snowfall from the day before. Unfortunately, the total snow fall was nowhere near the forecast 3″-5″ that was supposed to blanket the Fredericktown/Farmington area. However, as a nature photographer knows, you take what you find.
What turned out to be a very nice day of hiking and photography was nearly the complete opposite. On our way down to the river to make the above image, yours truly, normally as sure-footed as an Ozark billy goat, got one leg caught between two narrowly separated boulders while slipping with his other foot. As I went down, nearly landing on my face, I twisted my leg at just the right time and likely narrowly avoided snapping both my tibia and fibula in the caught leg. I also lost control of the tripod with the camera attached. Thankfully, most of the impact was to a small spot on the camera’s L-bracket, avoiding disaster again. Very-slight damage to the equipment and some bruising and scrapes to my leg – I will live with that when I think about the potential alternatives.
Castor River Shut-ins, February 2019
For whatever reason, I find myself drawn to vertical compositions at this location. We had nice and light cloud clover which typically provides the perfect scenario for capturing water and can make it easier to include the sky in a composition.
Miguel Acosta at Work
Here you can see Miguel hard at work nailing his composition.
Rhyolite? More like RhyoLIGHT!
I think the light yesterday was perfect in helping me avoid a problem I often have at this location, getting the color balance perfect for capturing the real colors of the rocks that make up this geological feature. Of course, those colors don’t show up the same as they do in direct sunlight.
After we had our fill at this location, still having the entire place to ourselves, we headed to Silvermines Recreation Area. Here we were primarily focused on the large defunct dam that is one of the famous features for which this location is known. We were faced with a more broken sky, but I noticed the thin cirrus/cirrostratus clouds were moving with extreme speed. Always on the lookout for a reason to use my neutral density filters, I pulled out my heaviest one and made the image below with a 30 second exposure.
Silver Mines Dam
Unfortunately, we weren’t in a good place and time to take advantage of a fantastic sunset. But, we made some nice images, memories and left a few calories behind on the trails.
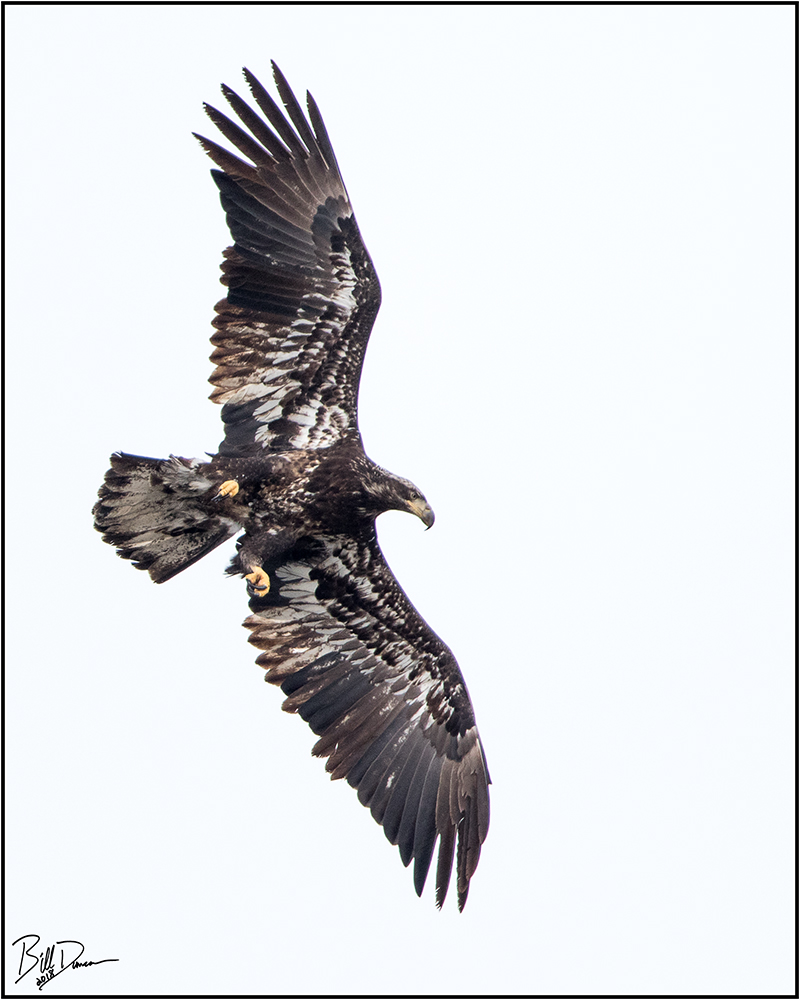
The WGNSS Natural History Photo Group had a fun field trip in January, when we headed north up the Mississippi to the riverside town of Clarksville. Here at lock and dam #24, we were fortunate to be alongside ~75 eagles of various ages that took turns in catching the stunned shad that is their primary winter food source along the great river. We arrived early in the morning and made a day of it, experiencing wide shifts in weather from grey and snowy to partly sunny skies. I’m not an expert in aging these eagles, but I believe the bird picture above is a subadult II, which means it is 2.5 – 3 years old. In this photo you can see several retained juvenile secondaries on each wing.
Bald Eagle subadult “2nd year”
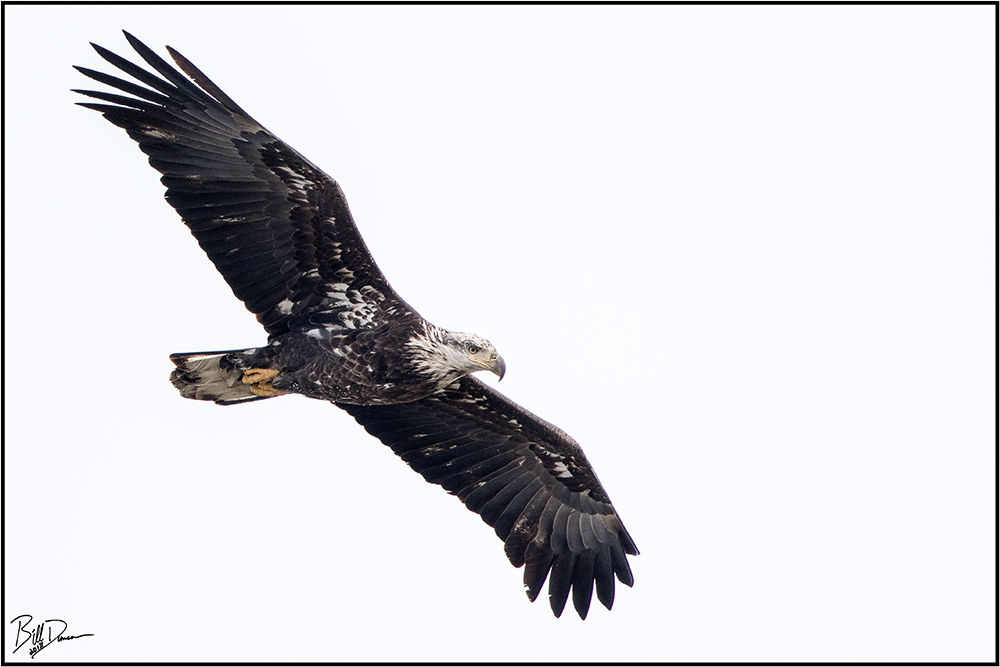
The long and pointed secondaries make me think this bird is probably a year younger than the bird in the previous photo. I would guess this bird is 1.5 – 2 years old. The temperatures on this day were cold, but not too severe. We arrived with the car’s thermometer reading 16°F. There was a light wind most of the day, but not nearly as bad as there could have been.
Bald Eagle Adult
With patience, there were some opportunities to capture a bird’s profile as it came to pick up a poor stunned fish.
The successful fisher
The majority of prey captured in this way is small enough to be eaten immediately on the wing in a single “bite”. Sometimes, however, the bird is forced to retreat with its groceries and eat in seclusion.
Bald Eagle subadult “4th year”
The bird pictured above is much closer to looking like an adult bird, showing the mostly white head and tail. I estimate this bird as being 3.5 to 4 years old.
Bald Eagle – juvenile fishing
I noticed this in previous years, that it seems like the juveniles spend more time fishing than the adults. In the photo above, you can see a juvenile with an already full crop is pulling another fish from the river.
This is just a few I have processed so far. We have something in the works that may produce something much more in terms of eagle photography. Until next time.
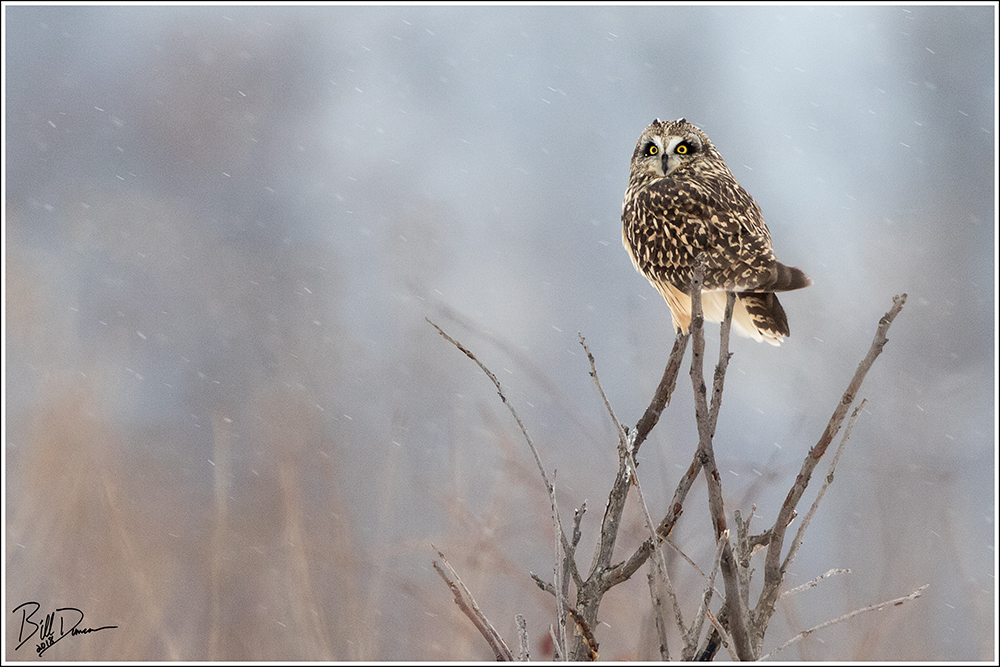
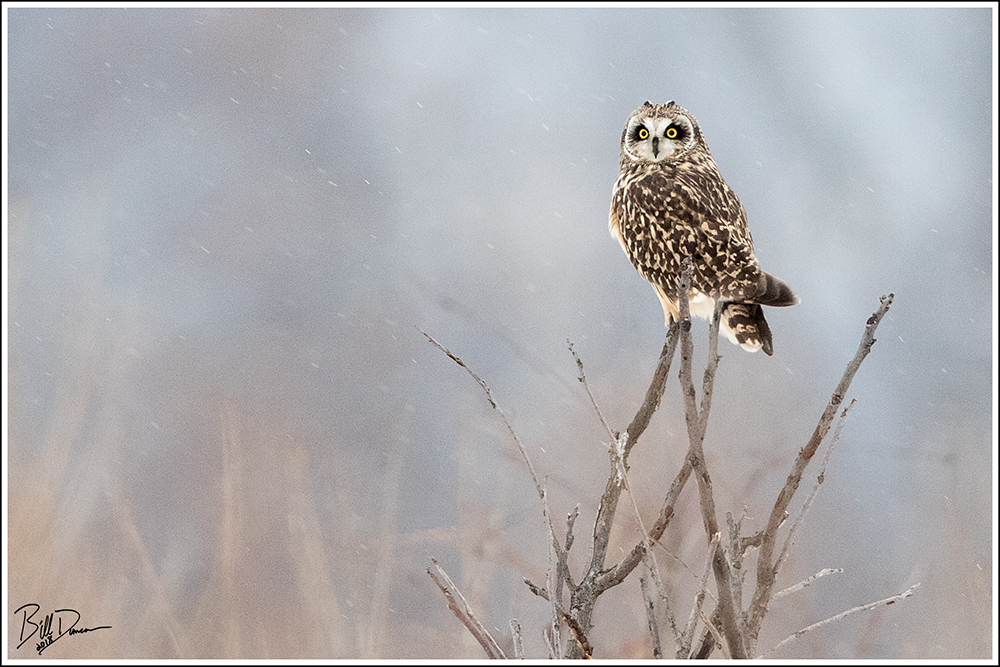
Short-eared Owl Image made with Canon 7d mkii, Canon EF 500mm f/4L IS II USM Lens and Canon Extender EF 2X III
I don’t usually like to discuss gear on this blog, but once in a while I think there are some things new or interesting enough to talk about, particularly when I think they may be critical for producing the best possible results. I have been wanting to test and compare the 2 latest Canon teleconverters (Canon Extender EF 1.4X III, Canon Extender EF 2X III) in a head to head test for sometime and this past weekend found me with an opportunity to do so. To be clear, this was not the optimal situation to make this test. The light was poor and the subject was probably too far away and not covering enough pixels to make a relevant comparison. But, I thought I’d give it a try.
These tests were setup as equally, but not scientifically, as possible. For these first two images, I processed as normal and tried my best to be equal in all capture and processing steps. I cropped to make the bird approximately the same size in both images, so obviously, the photo made with the 1.4X tc was enlarged more than the one made with the 2X tc. I then resized each to make them 1000 pixels on the horizontal. The purpose here was to see if there is a discernible difference in sharpness and image quality between the two. The 2X tc often gets poor reviews, but just as often gets raves by those who claim to know what they’re doing. Many claim that the better results are made by using a 1.4X tc, or native lens and cropping in post to obtain better results than those obtained by using the 2X tc for an optical zoom.
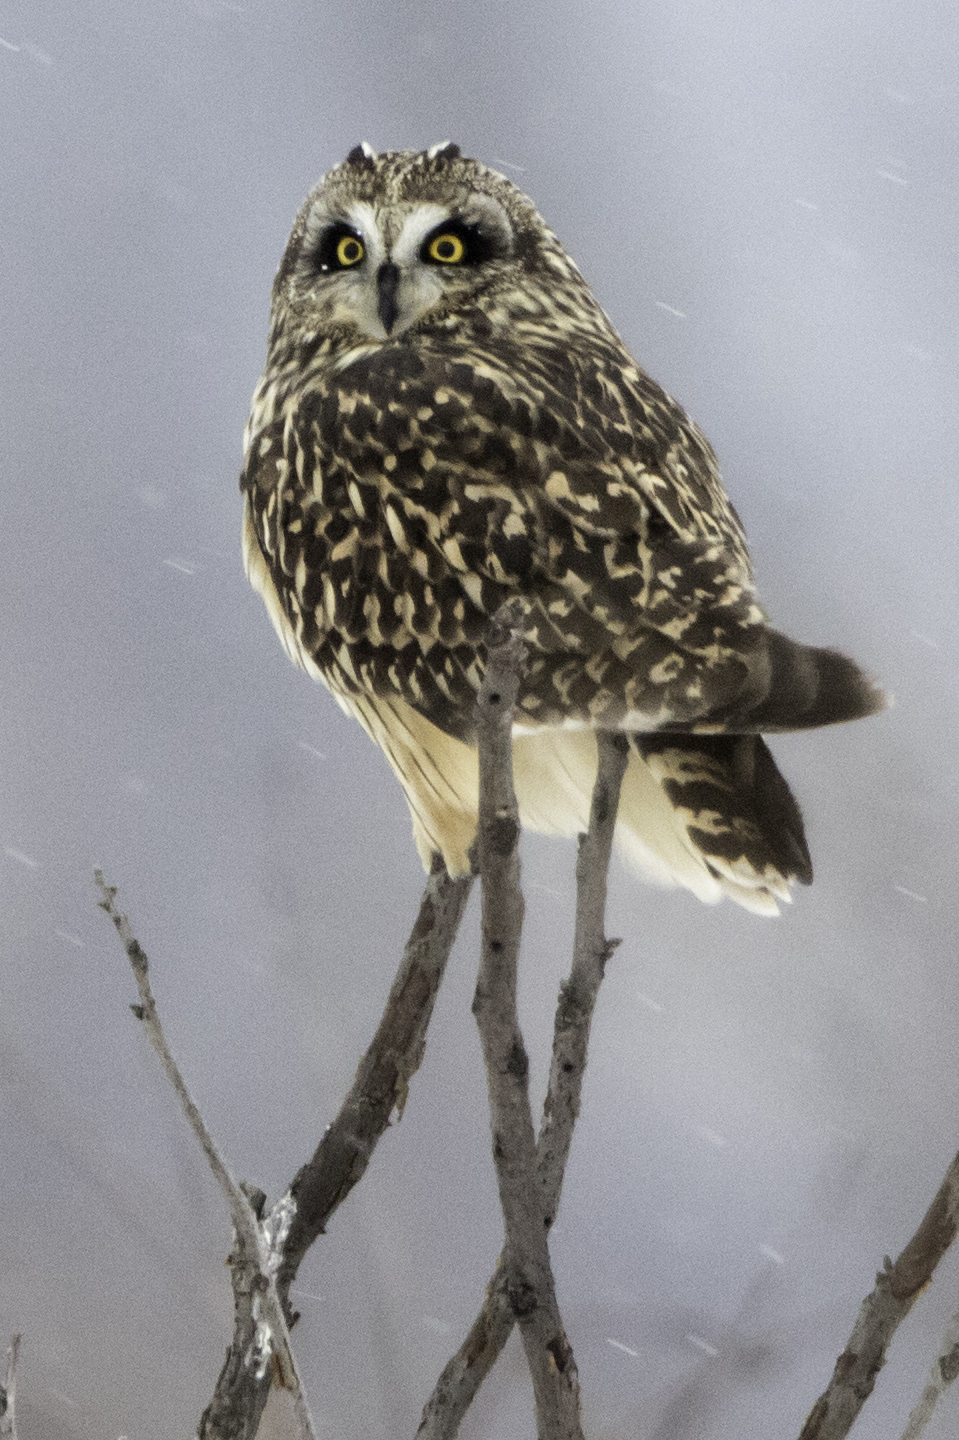
Short-eared Owl Image made with Canon 7d mkii, Canon EF 500mm f/4L IS II USM Lens and Canon Extender EF 1.4X III
Open the two images above in separate tabs to see a roughly equal comparison. In my opinion, I was pretty pleased with the results of the 2X tc in sub-optimal conditions. Both photos are fine for sharing on the web, although the IQ would limit print size. Like I said, the conditions were poor and the bird at a great distance. However, I think I would give a slight edge to the photo made with the 2X converter. This edge might just as well be due to differences in how I processed or with changing conditions within the few minutes between captured images.
Let’s look next at the “100% crops” of both photos. This simply means that these photos were both cropped at the same dimensions (4″ x 6″) and not resized. These examples were NOT sharpened.
Focal length equivalent = 500 x 1.6 x 2.0 = 1,600mm
Focal length equivalent = 500 x 1.6 x 1.4 = 1,120mm
Again, with this comparison, I find the two very close. Either one would work well enough, but if your goal was to maximize print/display size, I would probably go with the 2X tc. I guess this has surprised me a bit. I was expecting that, under these sub-optimal conditions, the 2x tc would fall behind the supposedly sharper combination of the 500mm + 1.4X tc.
What do you think? Did I make any major blunders in my comparison or analysis? Please let me know. I do hope to make this comparison again under perfect light and optimally placed subject sometime in the future.
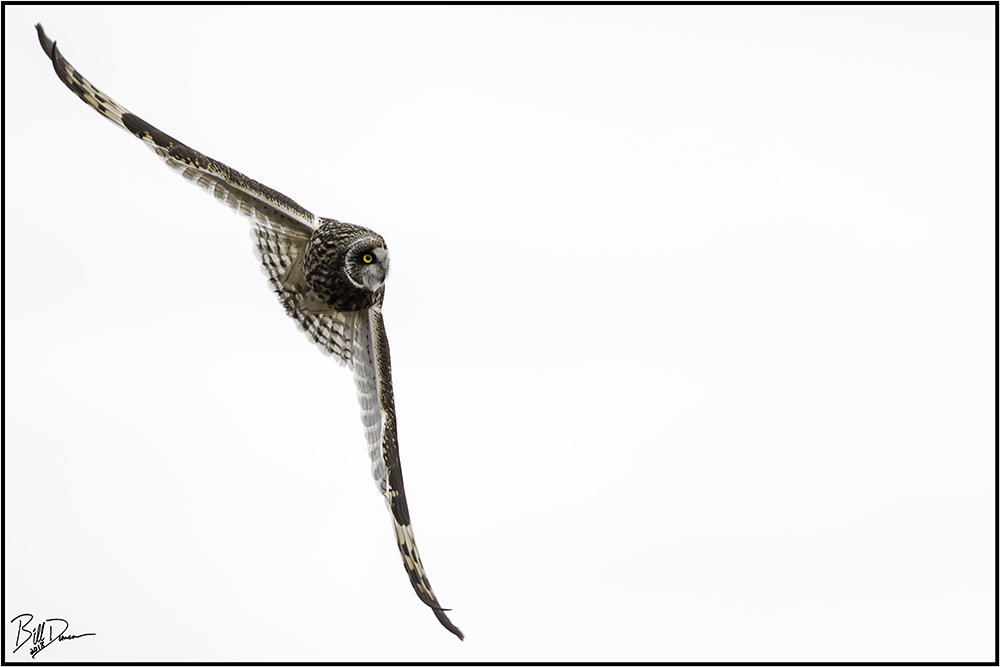
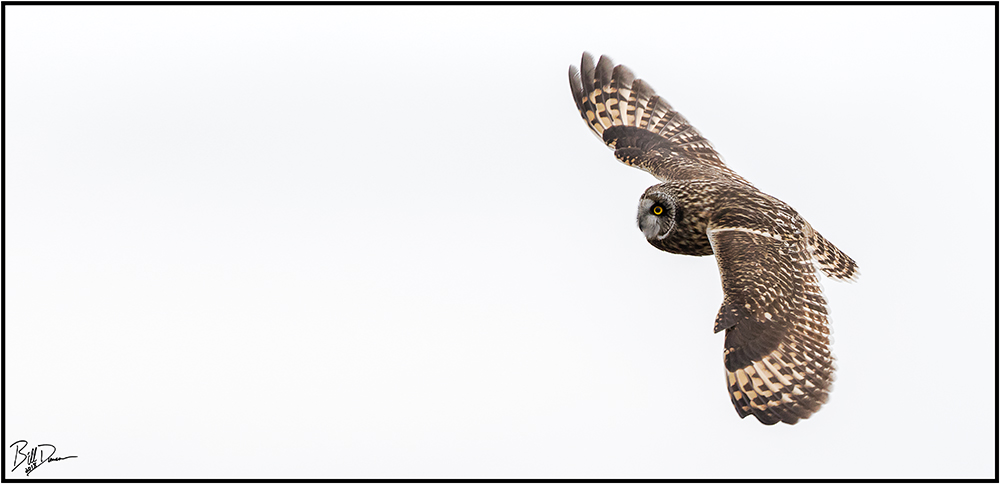
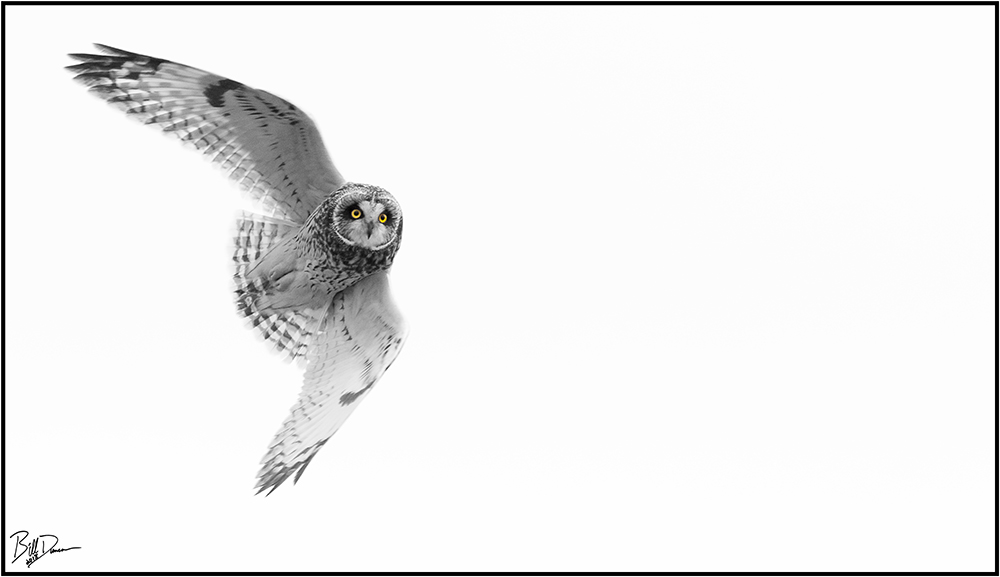
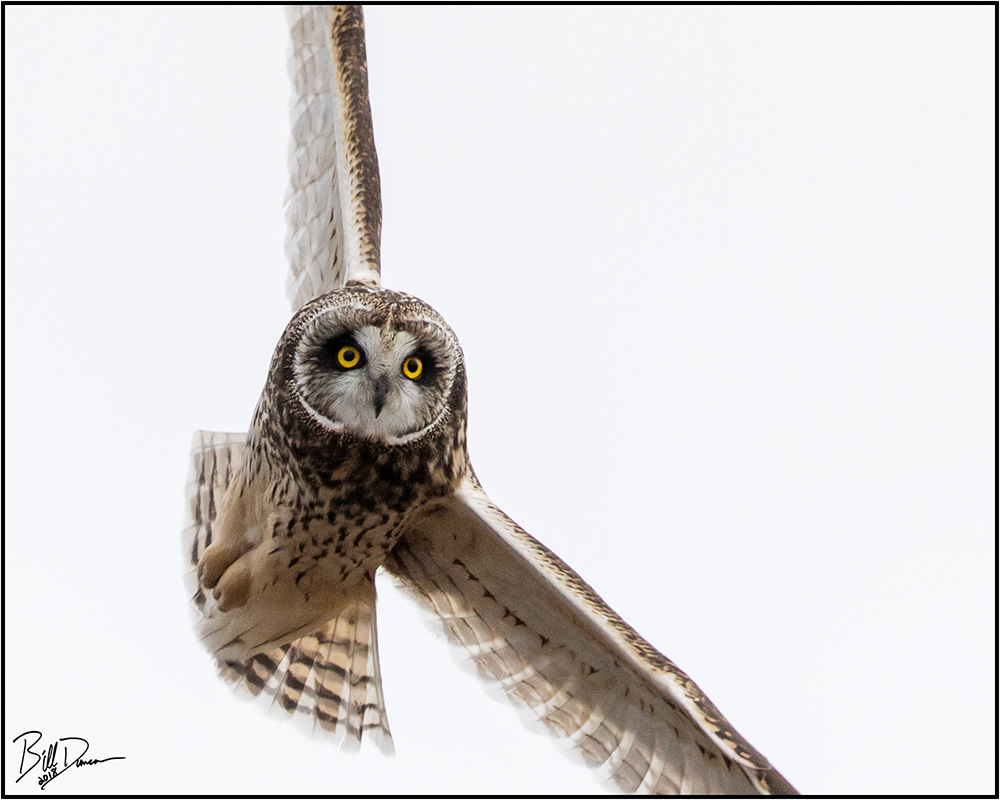
Miguel and I have been trying to get some better in-flight shots of the Short-eared Owls that use the wet prairies at BK Leach CA for their winter homes. Tonight, preparations and fortune came together and we wound up with a few that we can be satisfied with. The lighting wasn’t great, as the nice sunlight was blocked by heavier and heavier clouds as soon as the action began, but sometimes you take what you can get.