"What a thousand acres of Silphiums looked like when they tickled the bellies of the buffalo is a question never again to be answered, and perhaps not even asked." -Aldo Leopold
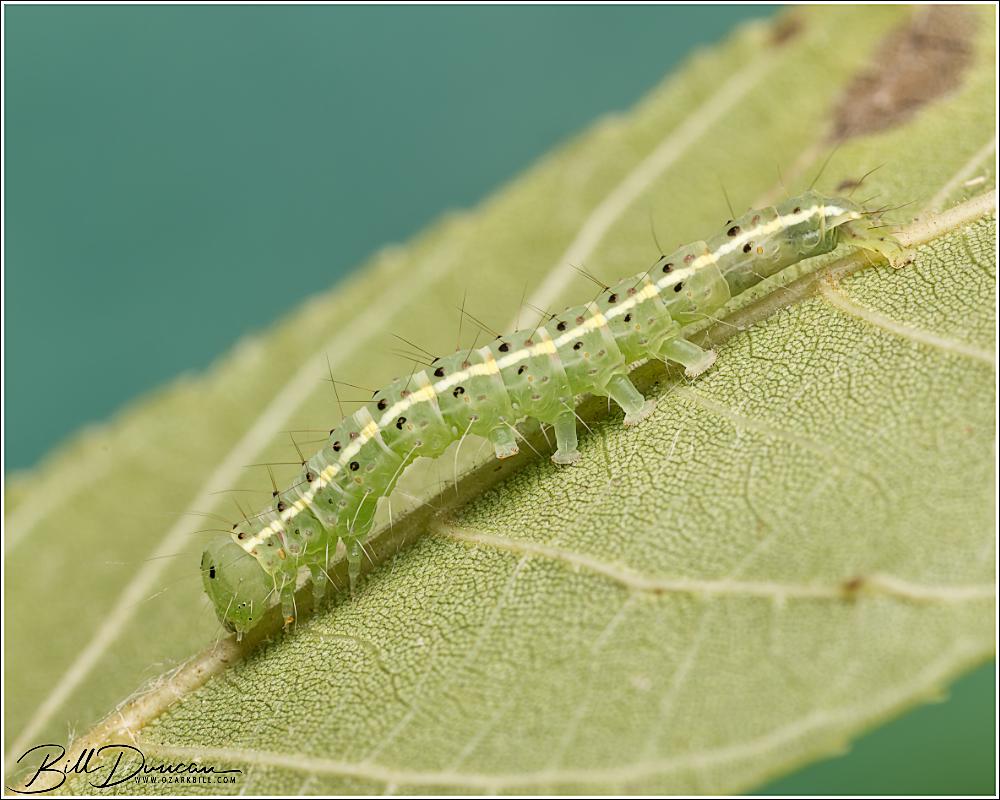
Gray-edged Hypena Hypena madefactalis fam. Erebidae (Hodges#8447) Host plant: Found on black walnut (Juglans nigra) Date found: 09, September, 2025 Location found: Tyson Research Center, St. Louis County, MO Notes: A specialist on black walnut, this species has also been reared on shagbark hickory (Carya ovata).
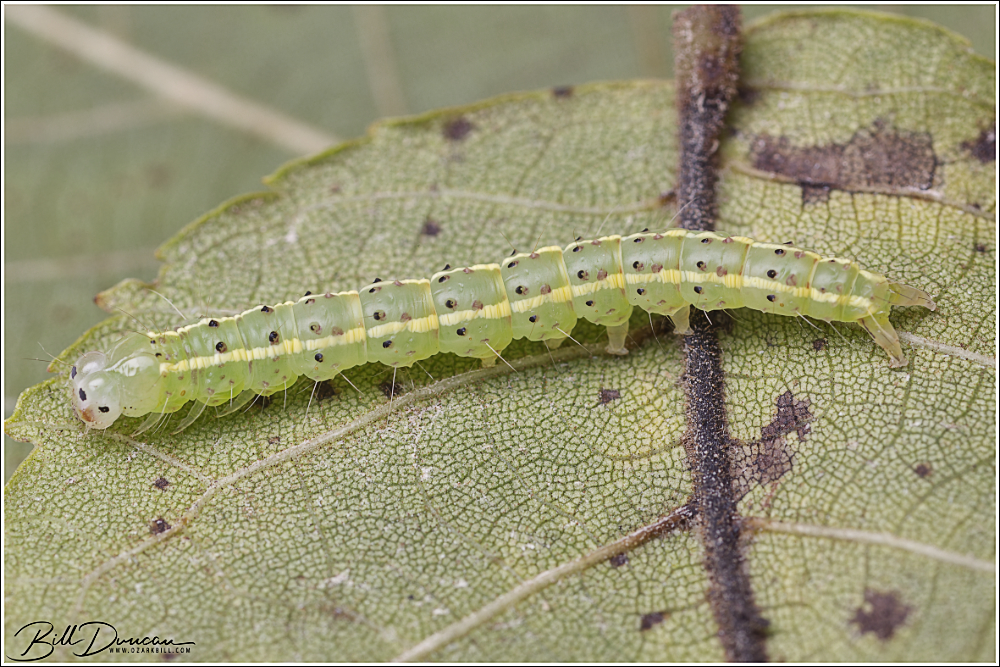
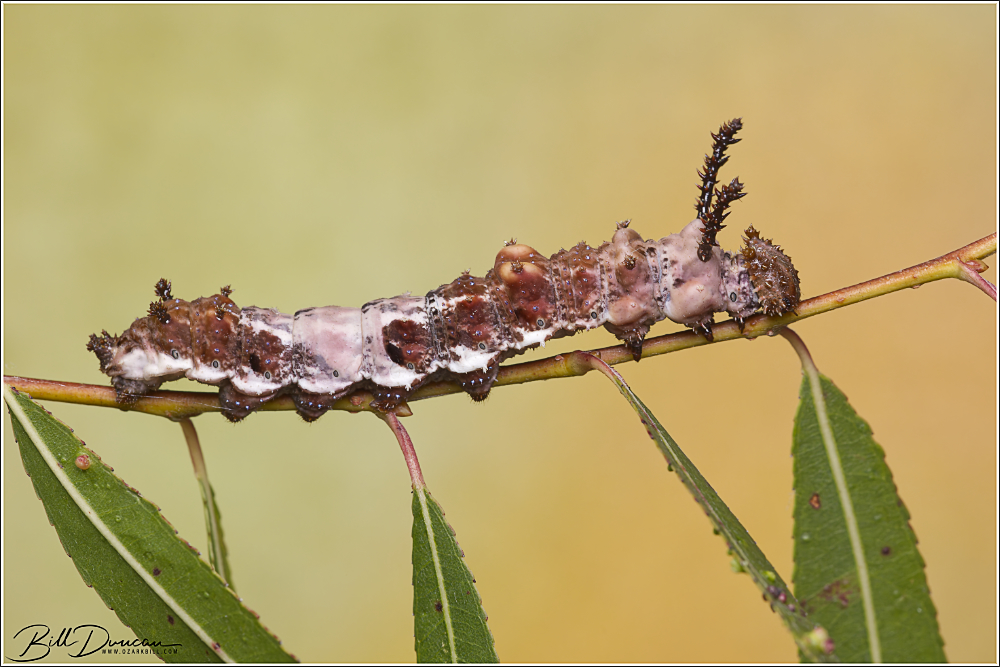
Harvey’s Prominent Litodonta hydromeli fam. Notodontidae (Hodges#7968) Host plant(s): Found on gum bumelia (Sideroxylon lanuginosum) Date(s) and location(s): 30 August, 2025 – Tyson Research Center, St. Louis County Notes: Found primarily in Texas and Oklahoma, this species northeastern range limit appears to be the St. Louis area.
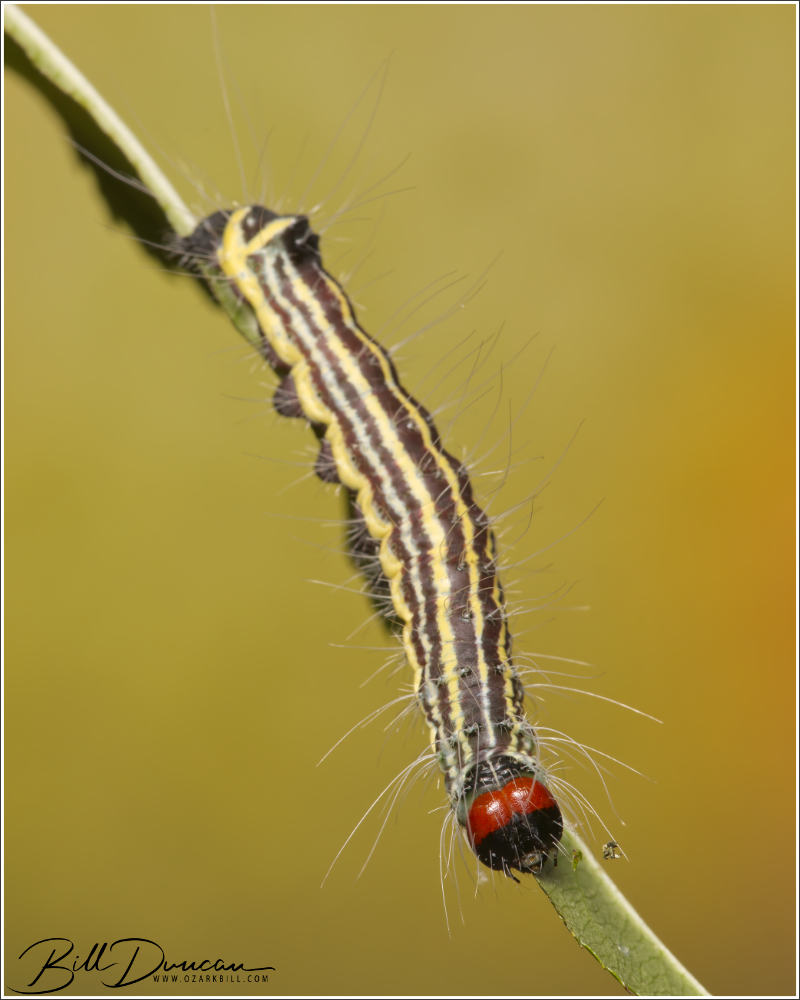
Viceroy Limenitis archippus fam. Nymphalidae (Hodges#4523) Host plant(s): Found on willow (Salix sp.) Date(s) and location(s): 15 September, 2025 – Creve Coeur Lake Park, St. Louis County, MO; 16 September, 2025 – Johnson’s Shut-ins State Park, Reynolds County, MO Notes: This species is visually similar to another bird dropping mimic, the closely related red-spotted purple (Limenitis arthemis). Although phenotypic characteristics can be used to verify, host plants should be the primary resource used. In Missouri, the viceroy will almost always be found on willow, while the red-spotted purple is most likely to be the caterpillar on black cherry.
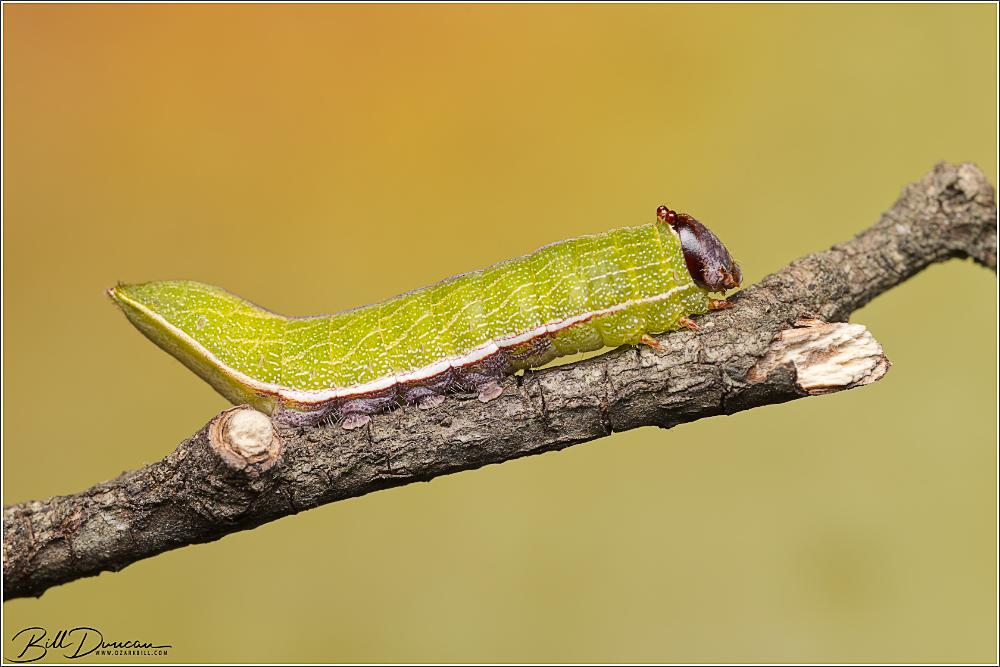
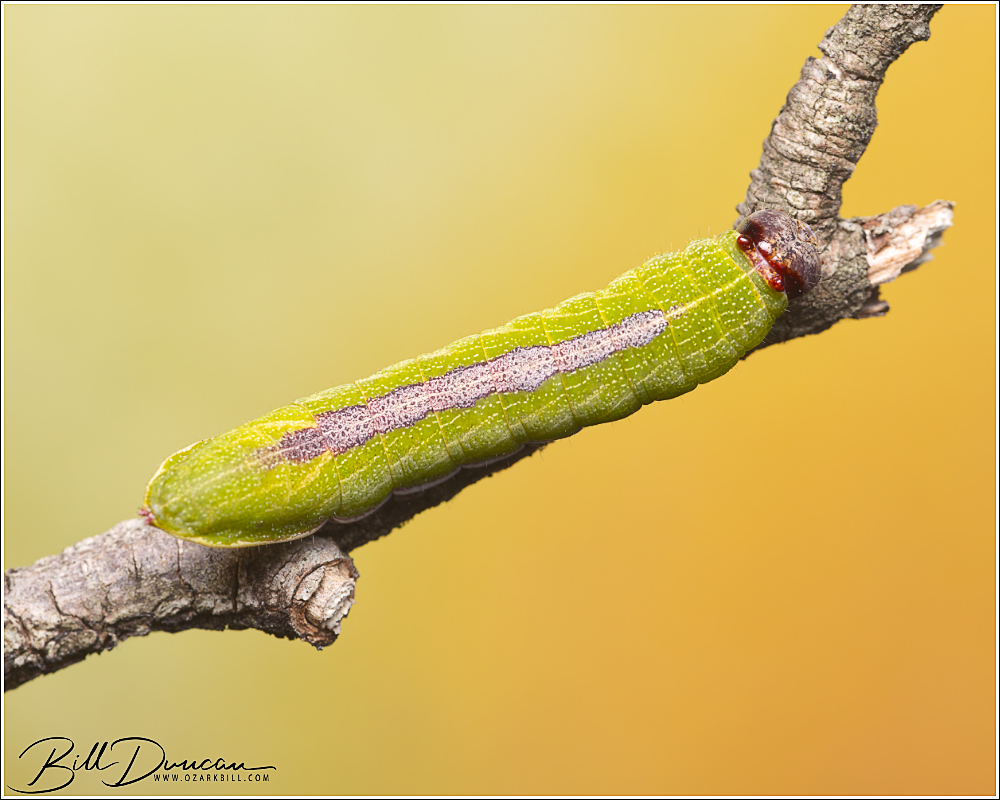
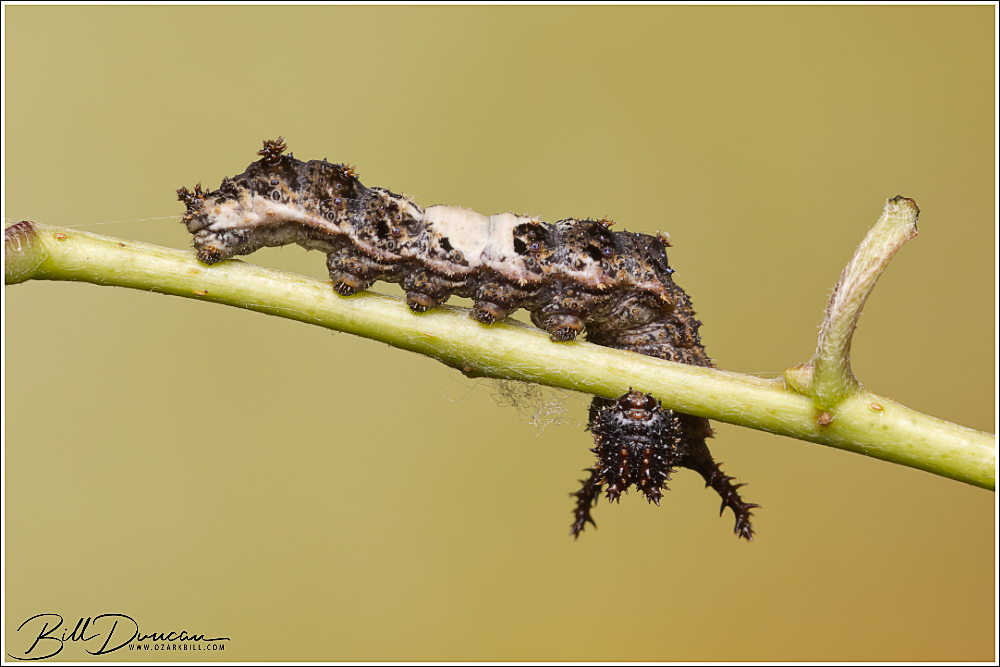
Radcliffe’s Dagger Acronicta radcliffei fam. Noctuidae (Hodges#9209) Host plant: black cherry (Prunus serotina) Date found: 16, 25, Aug, 2025 Location found: Cuivre River State Park, Lincoln County, MO; Council Bluff Lake, Iron County, MO Notes: The final instar pictured here is dramatically different than earlier instars.
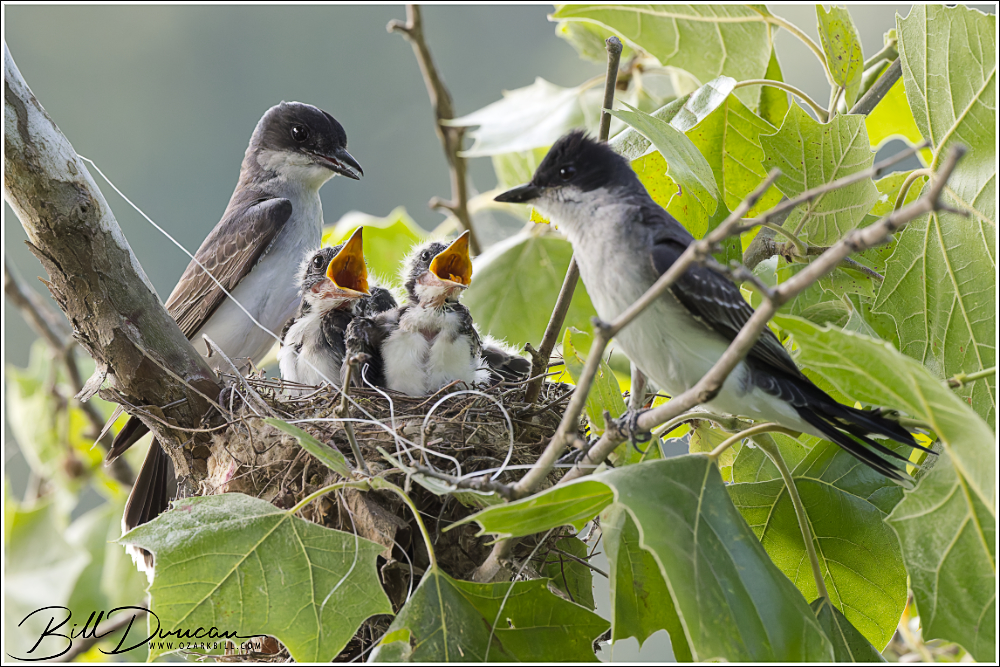
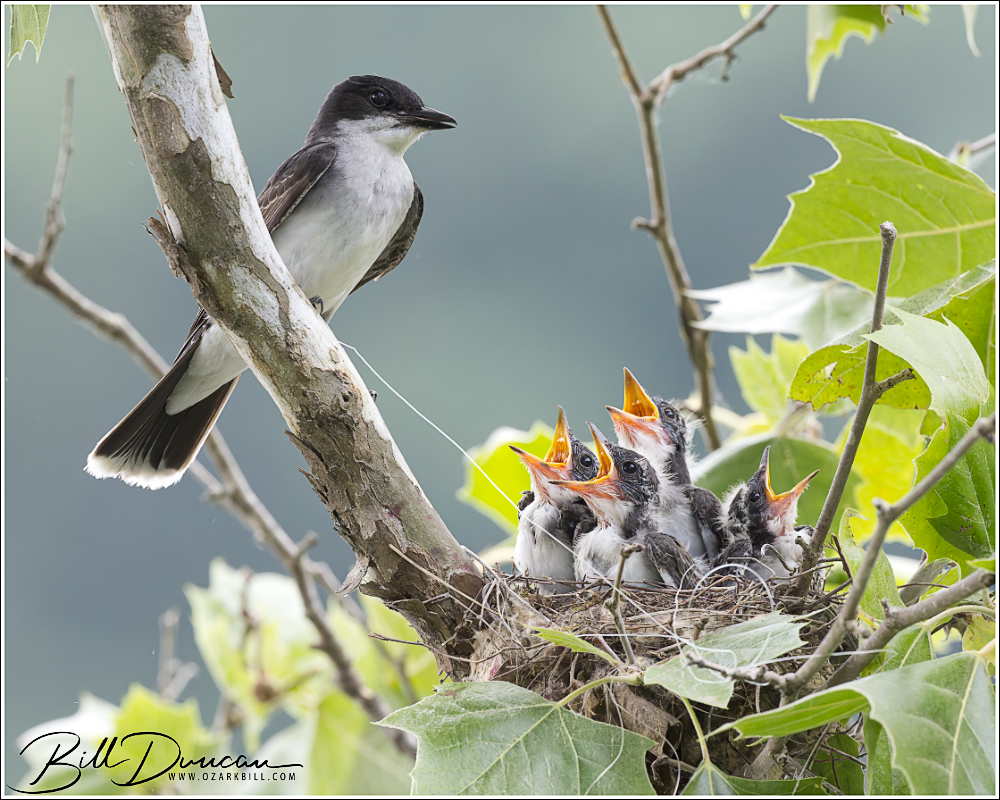
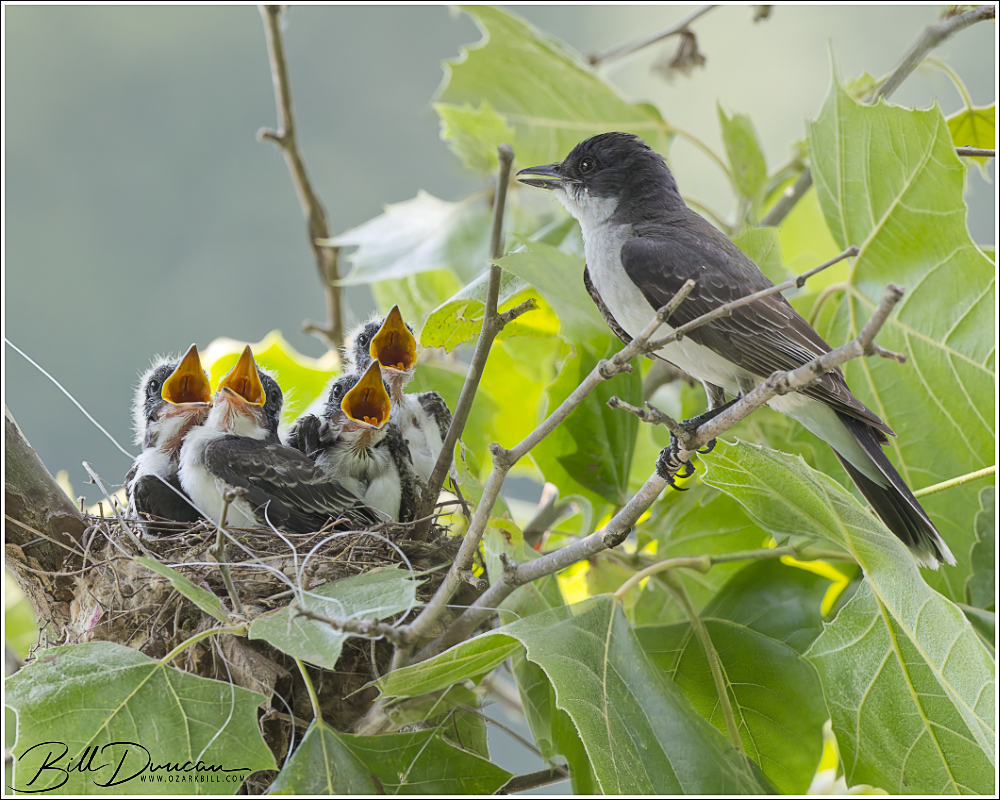
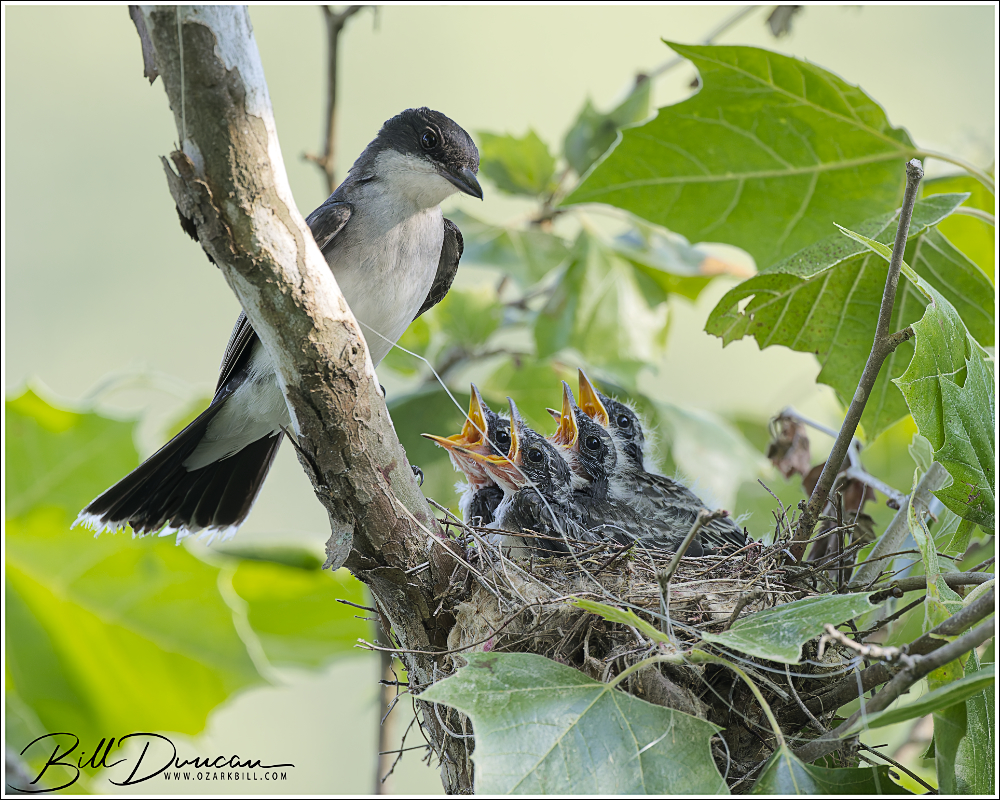
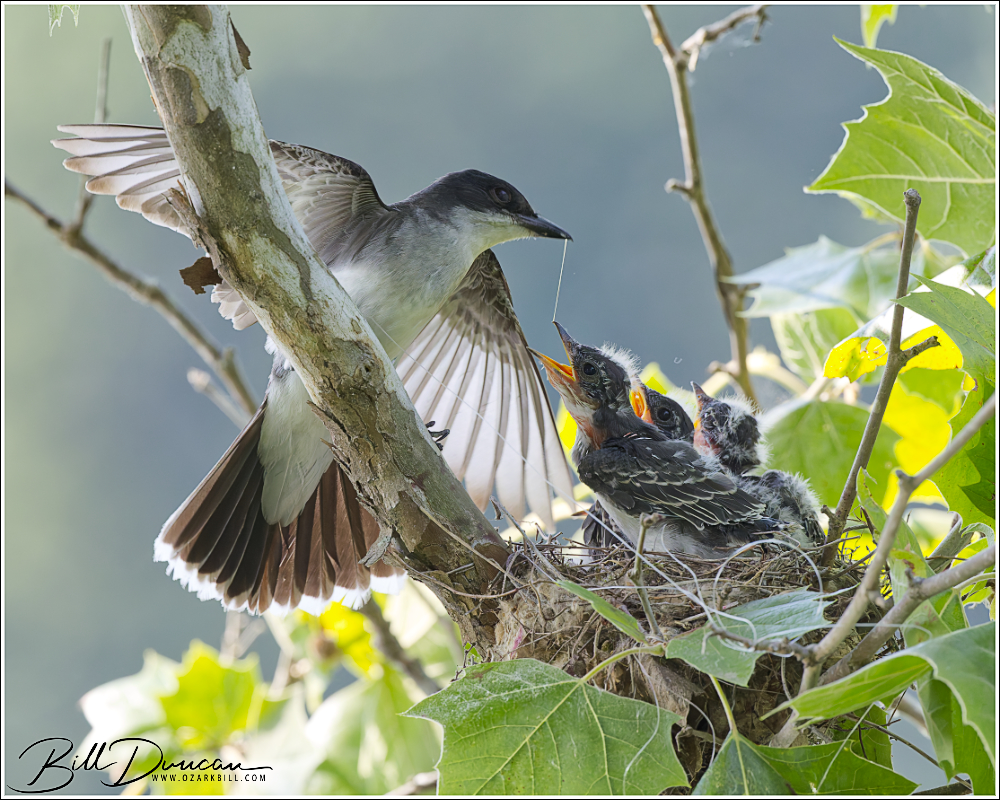
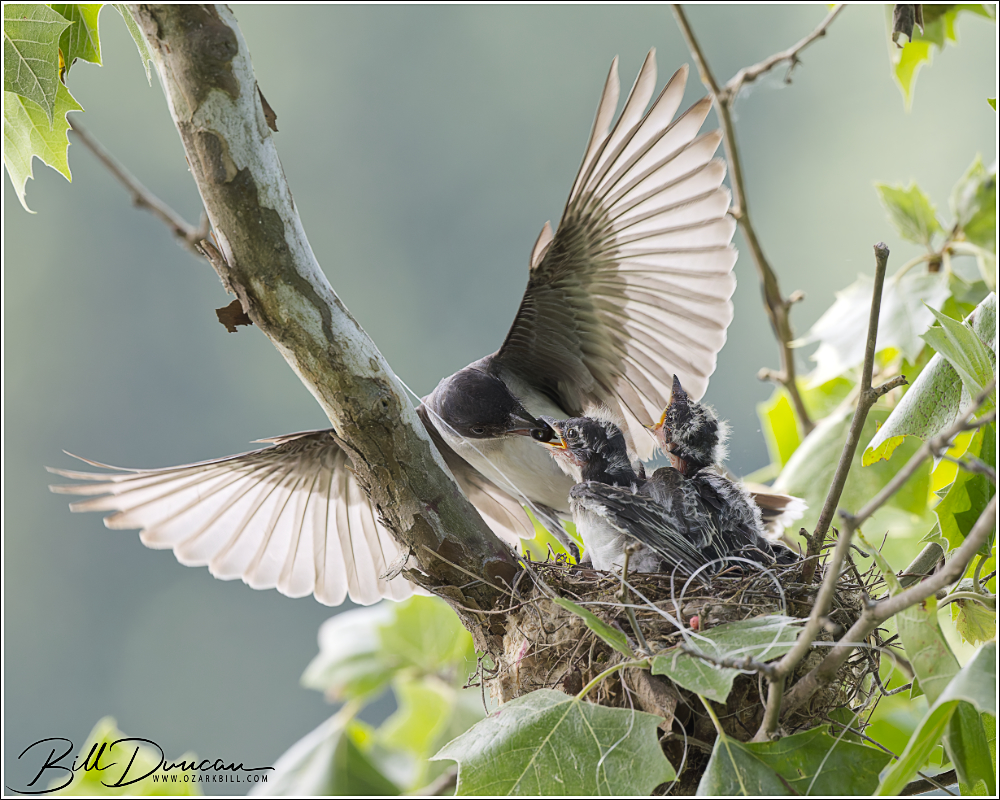
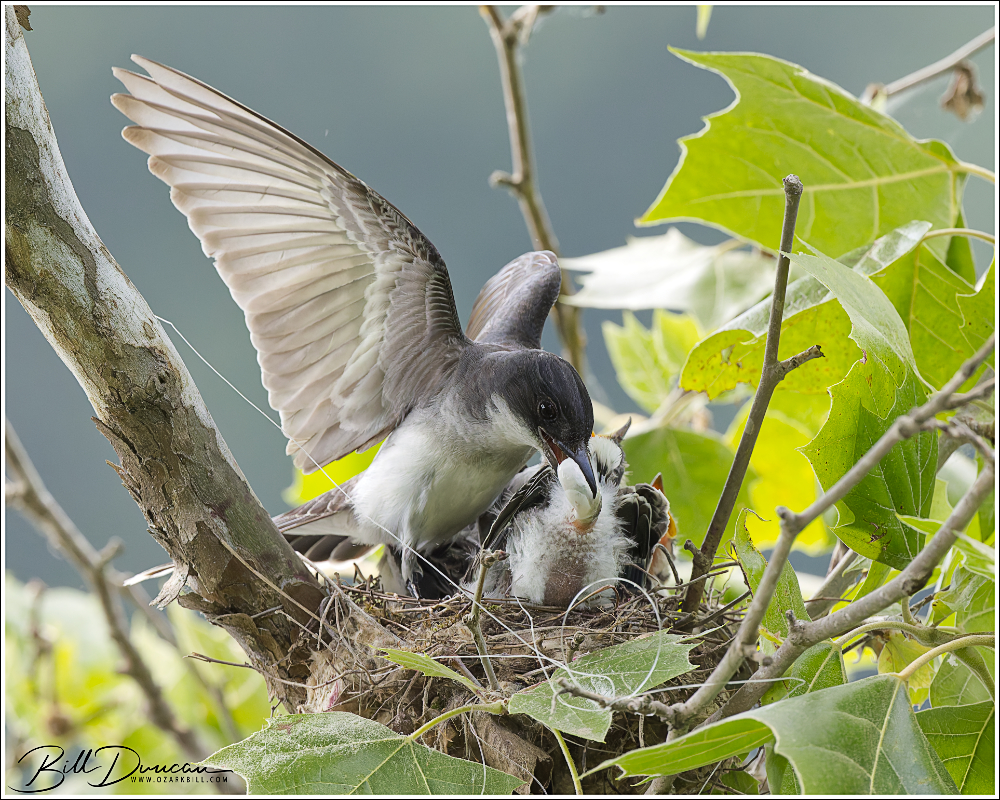
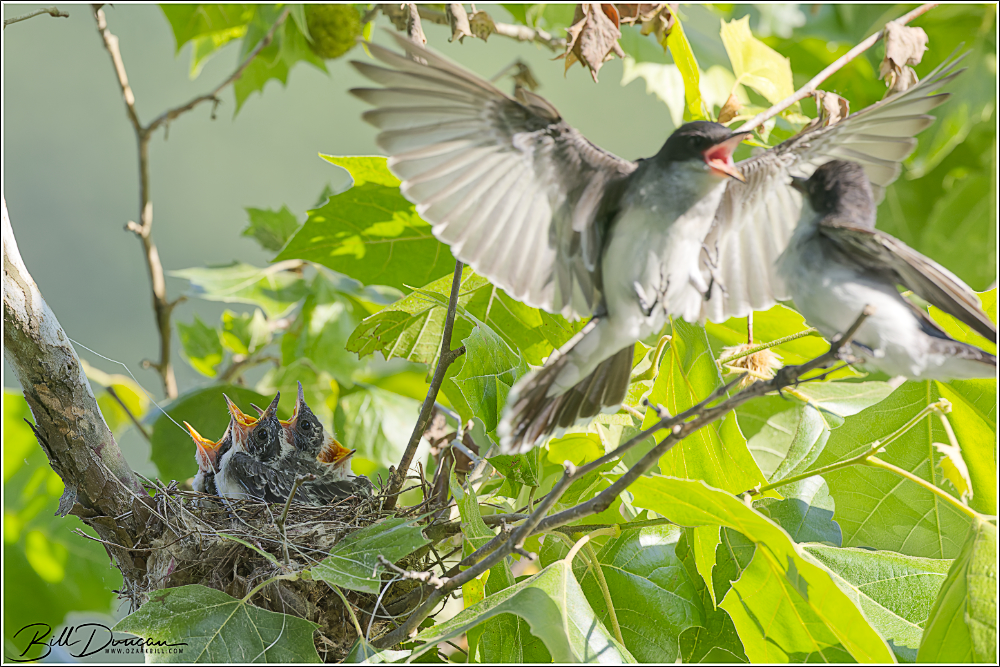
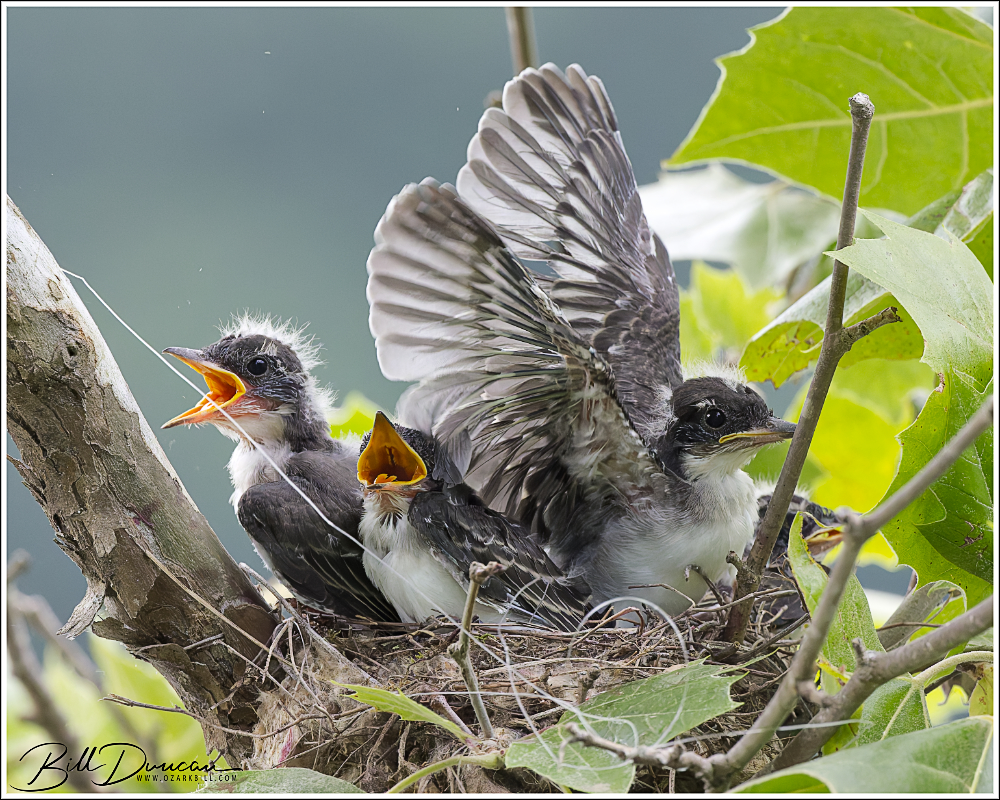
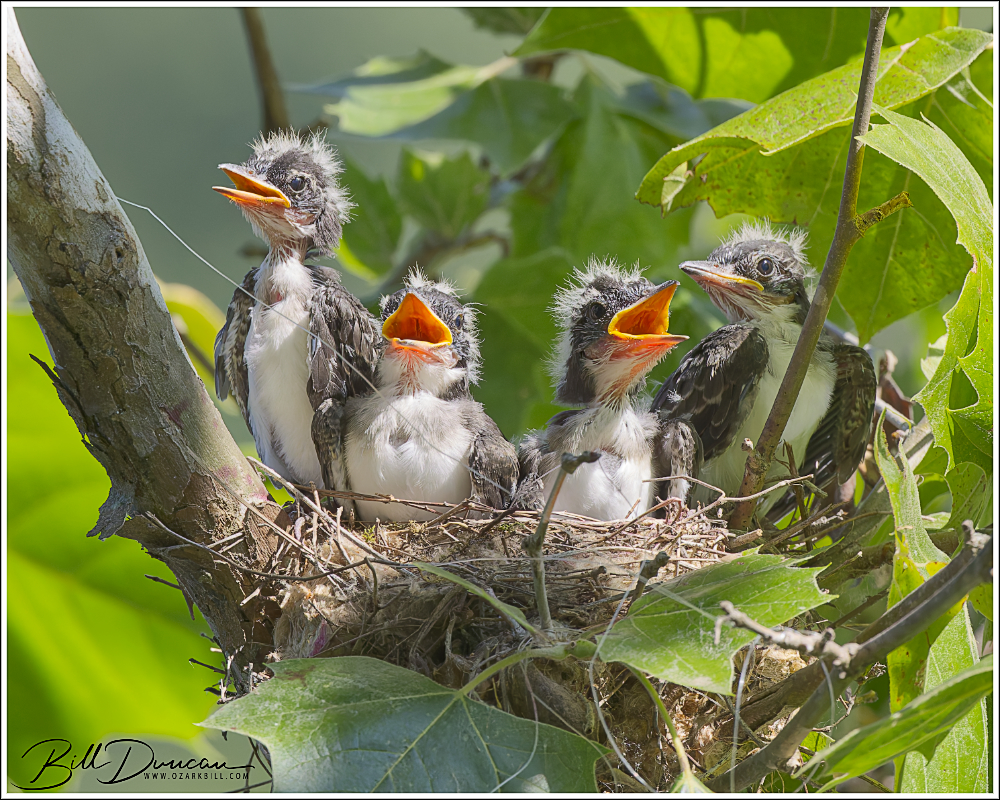
A few of my favorites of the Eastern Kingbird nest photographed at Logger’s Lake.
This first batch consists of the begging brood with a parent sitting nearby, usually just after delivering an insect. These guys never stopped their food response. If a parent was in sight, they were begging.
Immediately after dropping off a meal.
I was surprised to find that the parents would sometimes bring in berries to feed the brood. I do not know which species the berries came from.
Just as automatic as the begging response, nearly every instance of a parent bringing a food item, one of the young would present the adult with a fecal pellet. The parent would usually wait and watch for this event and be ready to grab it as it was being eliminated. It then would take it away from the nest to be disposed, assumedly as part of a predator defense strategy.
A parent decided to meet the other parent on its perch to take the prey item back to the nest itself.
One of the chicks exercising its wings.
Here the chicks are gaping, not as a begging response to a parent bringing in food, but as a cooling method as the sun is in position to shine down directly on the nest.
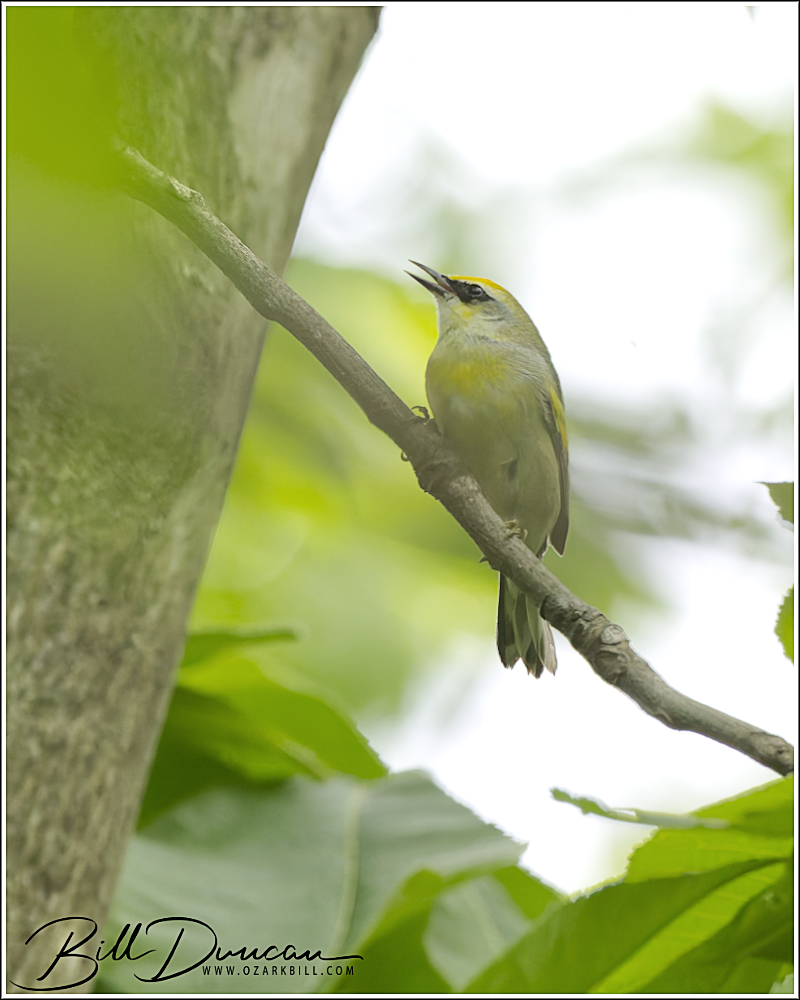
One of my goals this spring has been to get a better photograph of the Golden-winged Warbler (GWWA), a species that passes through Missouri during migration to nest in the upper Midwest, Ohio valley and northern Appalachia. Although I have been lucky in finding at least ten of these birds so far this spring, they are primarily treetop dwellers and I have struck out in getting one near enough and in good light.
While birding at Babler State Park in St. Louis County last weekend, I heard the familiar “bzzzzzzz buzz buzz buzz” vocalization of the GWWA. My birding companions and I began our search and I grabbed a few mediocre images before the bird quickly departed. Because I knew the lighting was poor and the distance was long, I didn’t spend much time reviewing the photos in the field. Arriving home later that evening, I reviewed the photos I collected that day and realized I captured something I was not expecting.
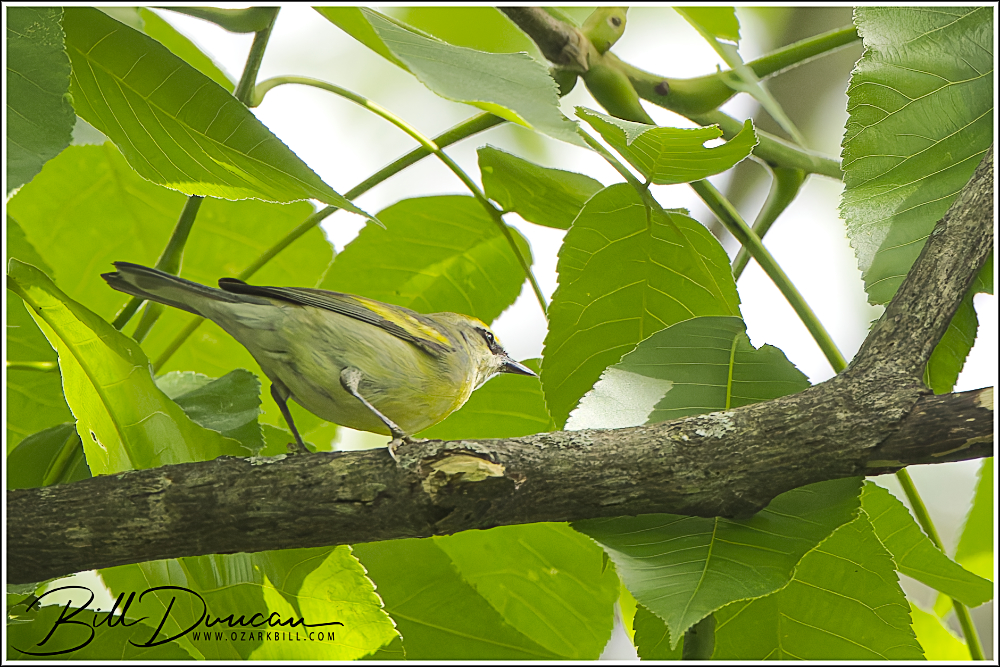
Brewster’s Warbler showing the lack of a dark throat patch and a mostly white breast.
It is well known in the birding community that the Golden-winged Warbler is closely related to it’s more southerly cousin, the Blue-winged Warbler (BWWA). Despite completely different physical appearances and different vocalizations, it has now been shown that the two species are 99.97% genetically alike. Where the nesting range of these two species overlap, hybridization occurs. There are two primary forms of this interspecies union. The first is what is known as the Brewster’s Warbler pictured here. The Brewster’s Warbler looks pretty much like a GWWA but lacks the dark throat patch and has an eye stripe more similar to the BWWA. This is the more common of the two hybrid forms between the BWWA and GWWA. The other hybrid form is known as the Lawrence’s Warbler. The Lawrence’s Warbler keeps the yellow belly coloration of the BWWA and has the black throat of the GWWA that is the recessive version of this trait.
Another angle on the Brewster’s Warbler
Little did I know I’d be getting a “lifer” so close to home this weekend!
At the time I am writing this, a cool new app I have, EclipseOne, tells me the next Great American Eclipse will occur in 12 days, 13 hours, 22 minutes, and 2 seconds at my primary viewing location. There is not much time left to do your planning and practicing!
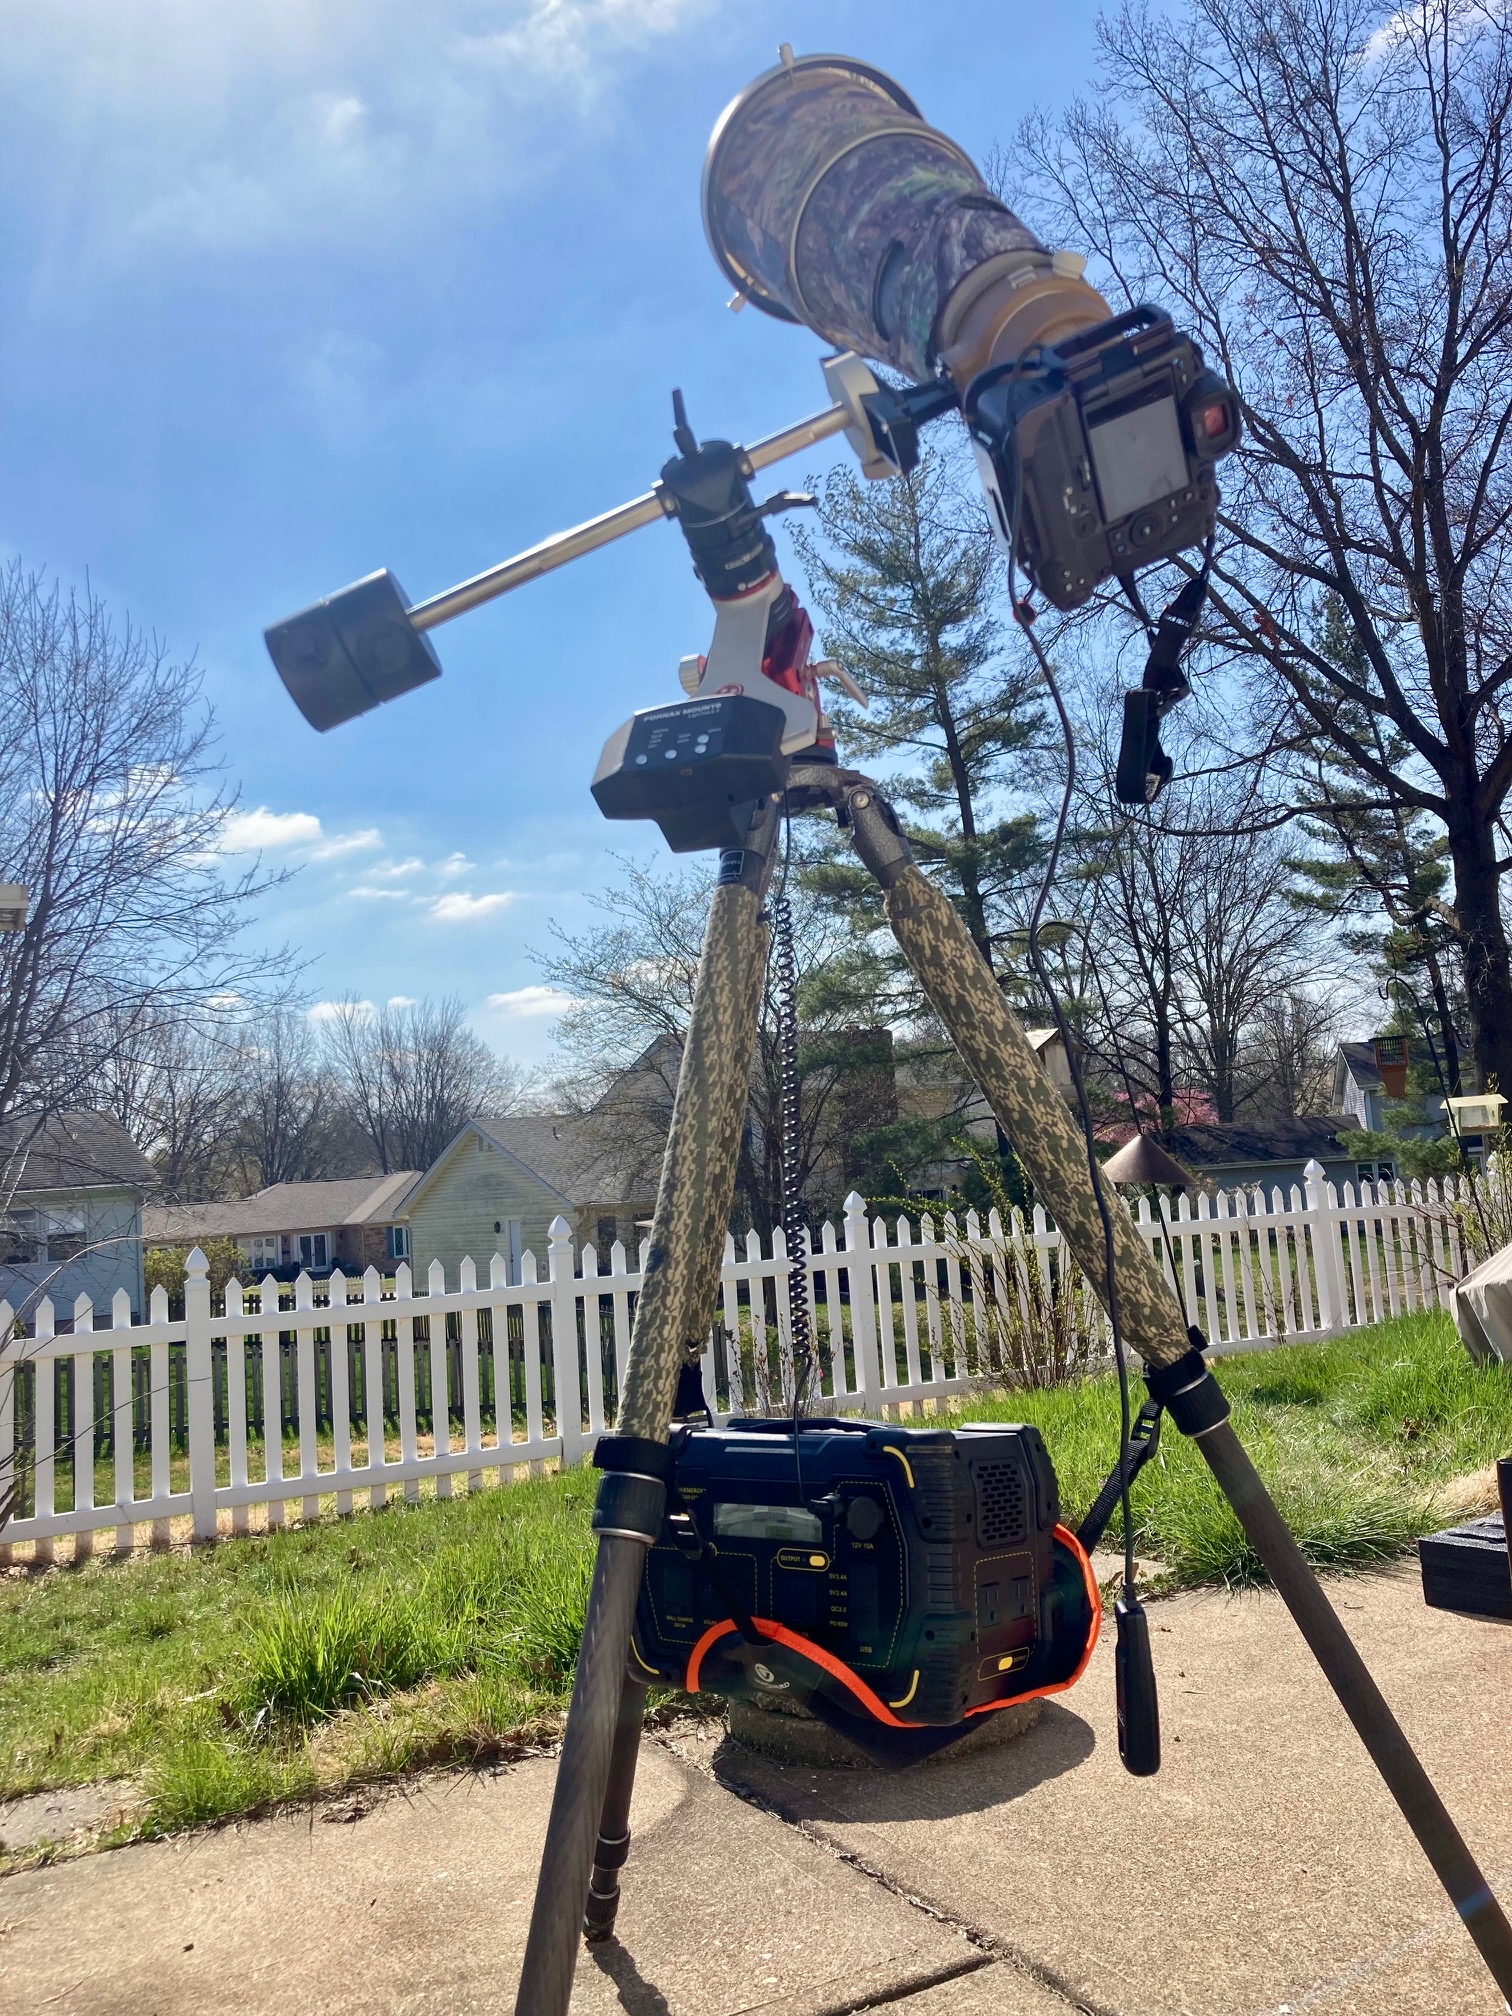
This past weekend, I put in a practice session – testing out the lens and camera combination, the solar finder and solar filter that will be going over my lens, and most importantly, using my tracker to track the sun as it moves across the sky. If you have an astro-tracking device that you might use for applications like deep-sky imaging or astro landscapes, I highly recommend you consider using this for the upcoming eclipse.
I know the question you might have before you even ask it. But how do we polar align in the daytime? True, you won’t be able to get precise polar alignment without the nighttime stars to guide your efforts, or at least without a lot of extra work. However, precise P.A. is not necessary to enjoy the benefits. I simply did my best to align the tracker facing north using a compass. I then tested the amount of time it took for the sun to move one of its diameter with and without using the tracker. This was easy because in my particular lens/camera combination, the circle that represents the spot-metering option was almost precisely the same size as the sun. Without the tracker it took only one minute and 22 seconds to move one of its diameter across my frame. With the tracker engaged (don’t forget to put your tracker in solar-tracking mode!), it took 22 minutes and seven seconds to move the same distance. Yes, there is a bit of drift due to imperfect PA, but this means I need only reposition the sun to the center of my frame once or twice an hour while using the tracker as opposed to doing this step 10 times or more an hour. Saving this kind of time during the big event will be a great benefit!
My imaging rig as it will look like on April 8th. I had to use both counterweights to balance this!
If you are planning to photograph the eclipse on April 8th, hopefully you have gotten your planning done, dusted off your solar filter and gotten some practice. If not, there’s still time, assuming we have some clear skies between now and then.
Wishing you all the best of luck on the big day and that the only rain we’ll see are Sol’s golden rays coming down from the clearest of skies!
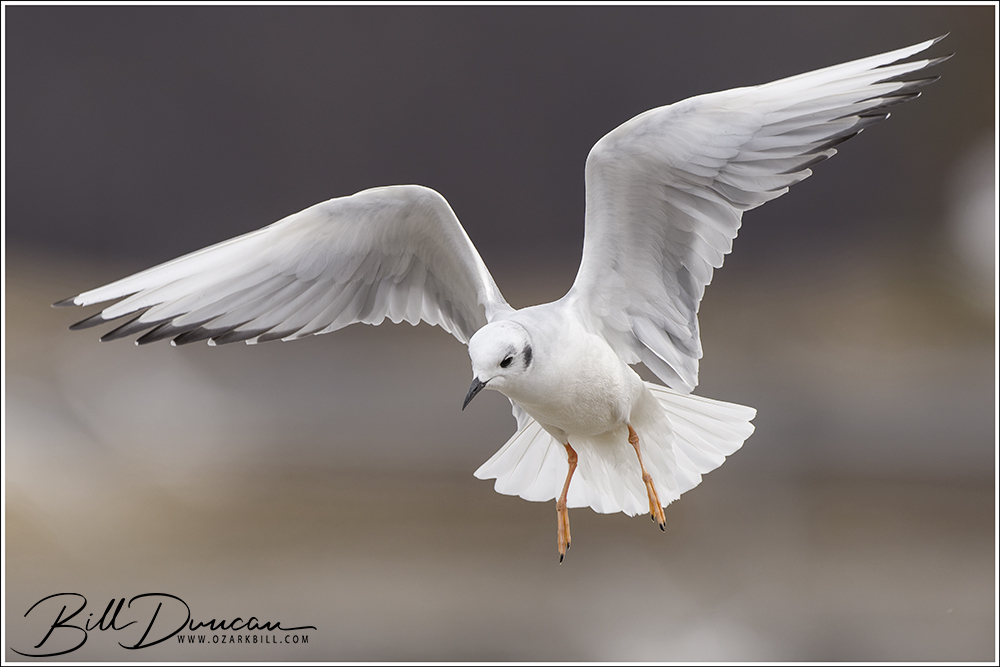
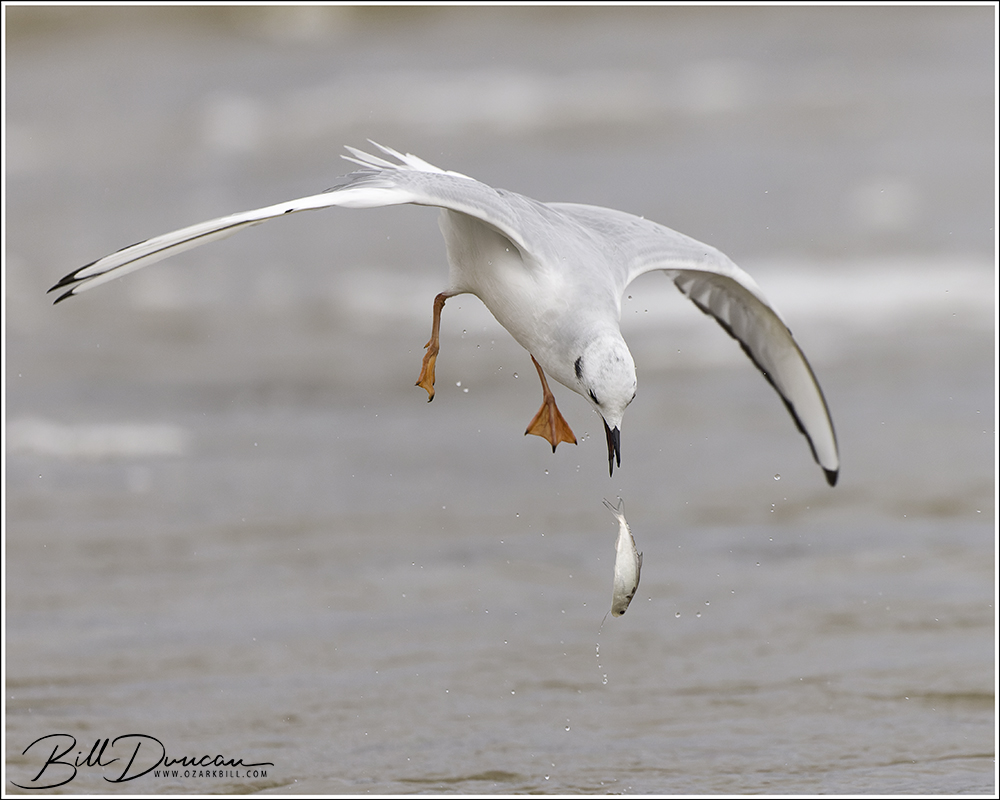
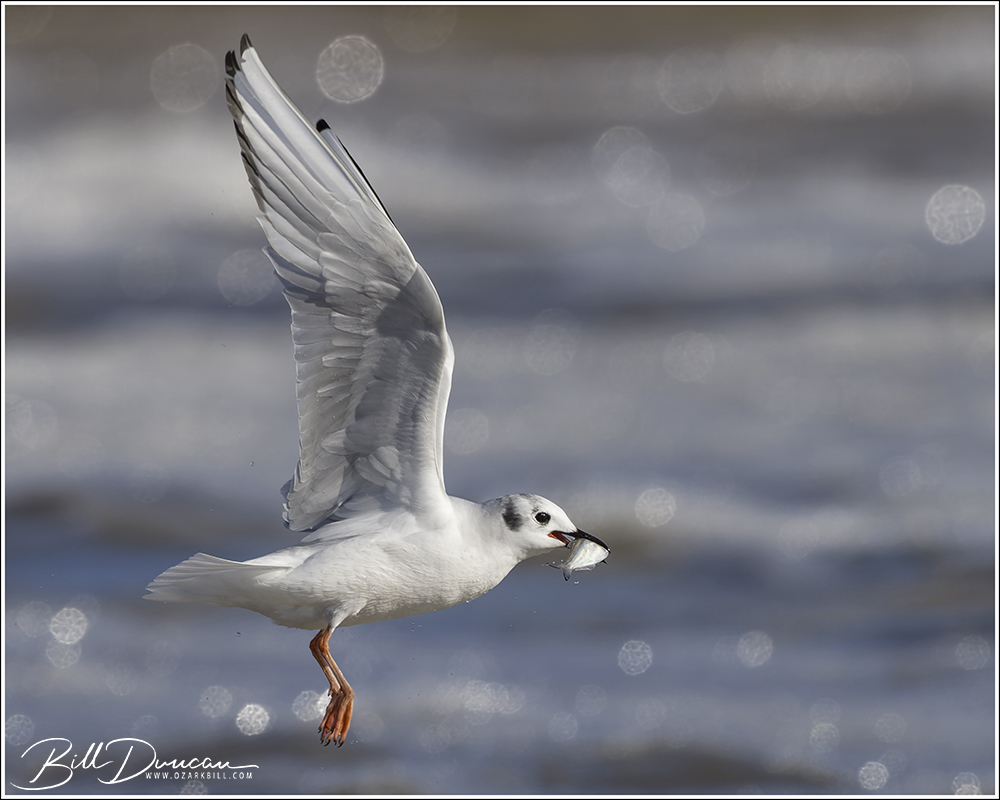
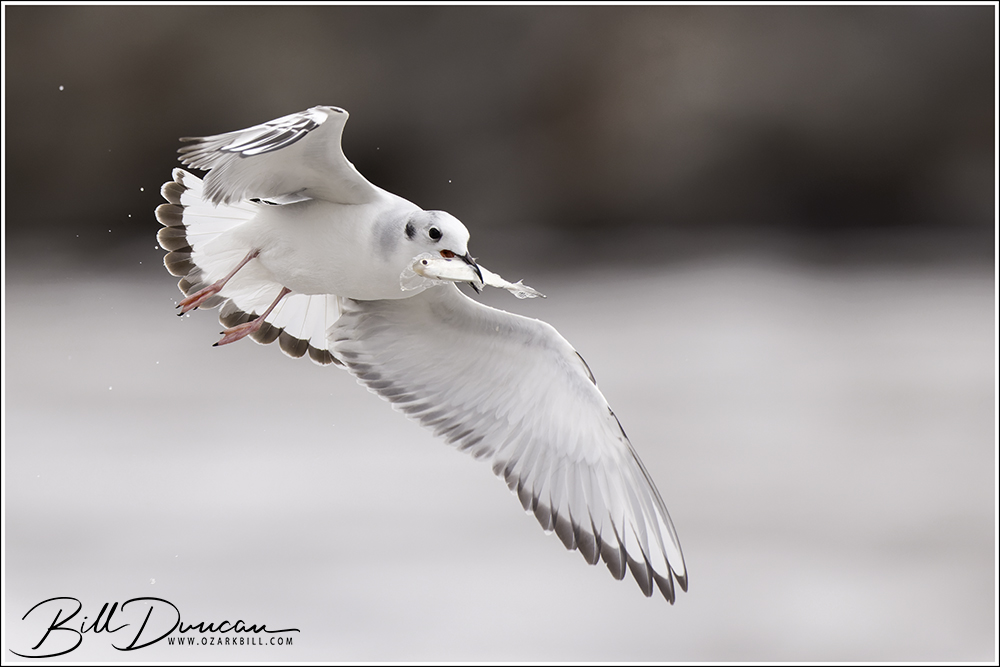
On a couple of successive Saturdays in mid-February, I had the pleasure to find myself at an old favorite spot to practice my high-speed action photography on some of the cutest little predators that I can imagine. In a spot more popular with fisher folk, I setup immediately behind the spillway of the Carlyle Lake damn with high hopes of shooting the Bonaparte’s Gulls that winter in this area.
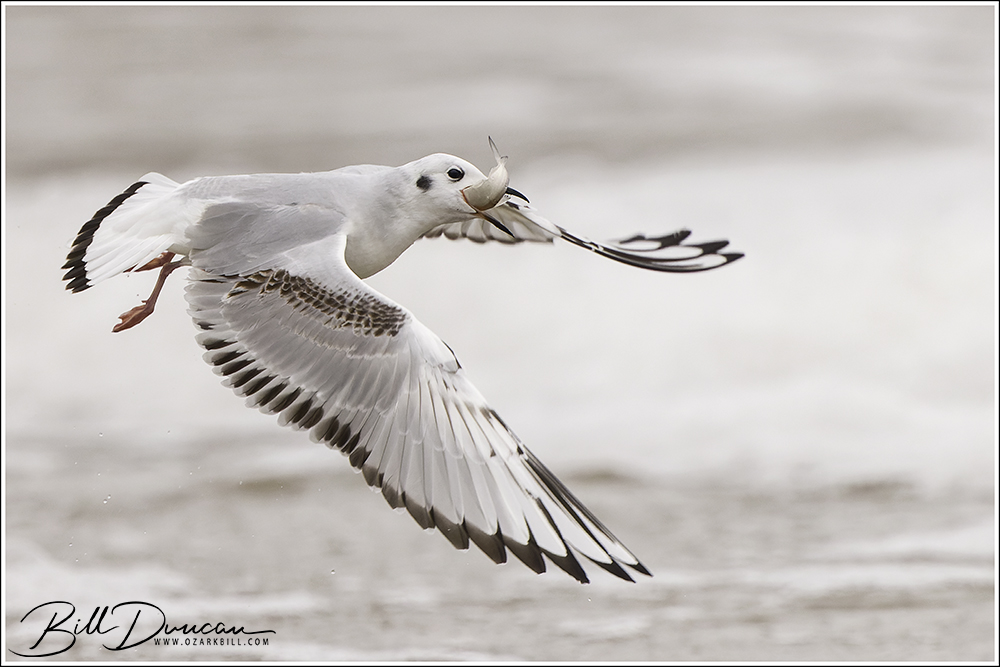
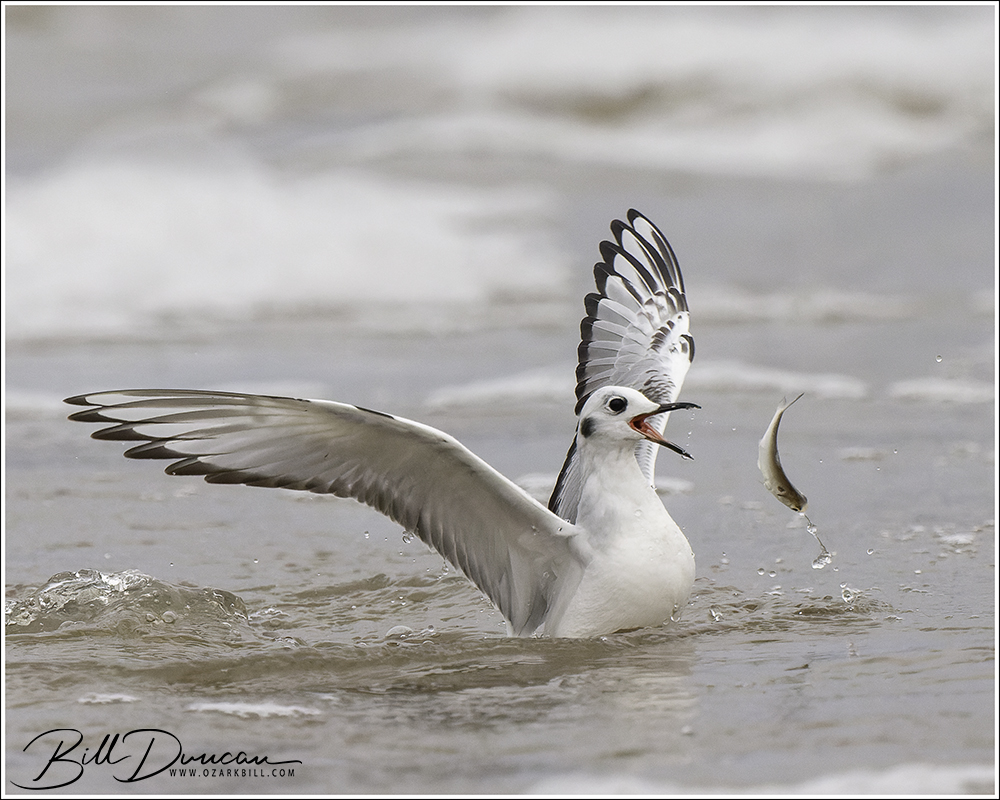
Faster than greased lightingLooking for shadBonnies everywhere!Adjusting for an easier swallow
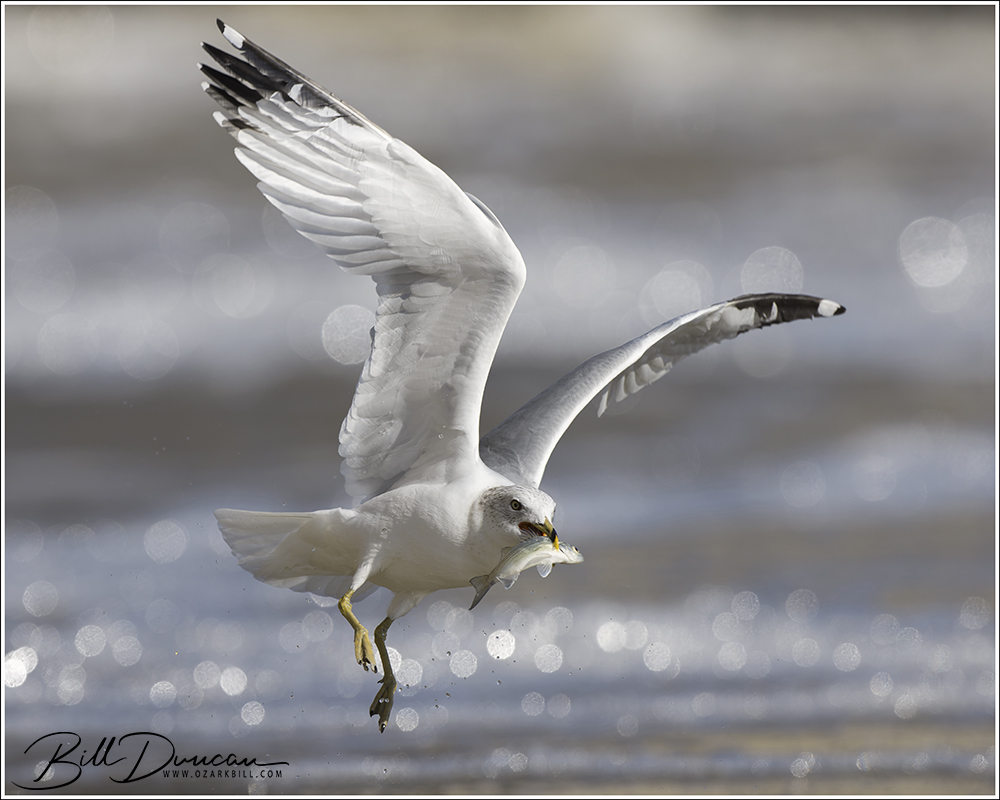
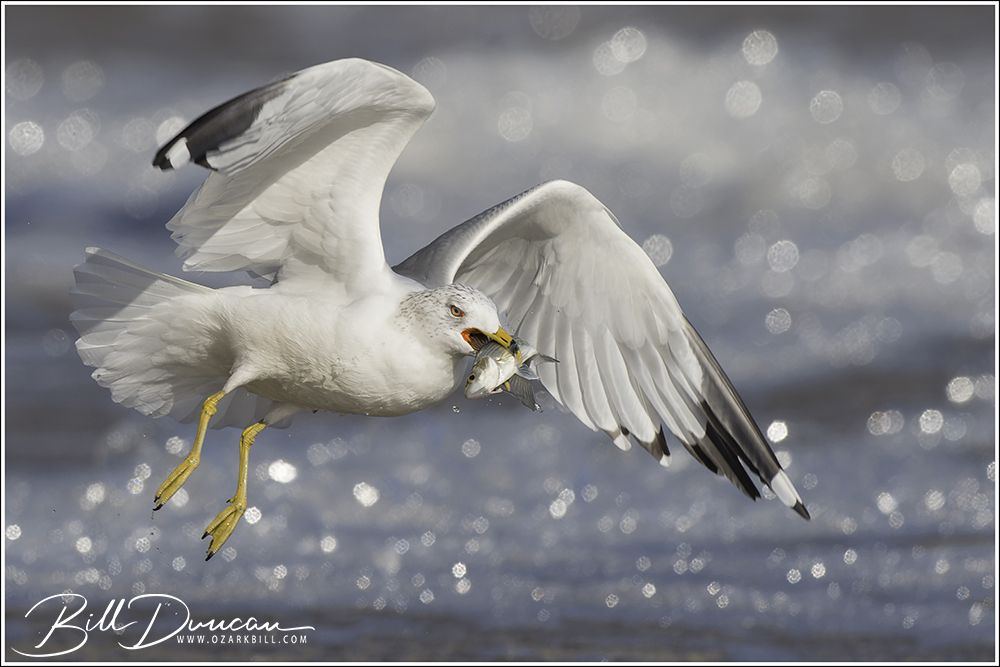
On my first Saturday visit, these cute little “Bonnies” represented at least 75% of the gull species taking advantage of the stunned gizzard and threadfin shad that come pouring through the spillway. This was great! Although photographing Ring-billed Gulls is always good for practice, they don’t excite me very much at all. What wasn’t great on this first day was the light, which I would describe as something like the sloppy end of a morning’s constitutional. Thank goodness for modern cameras with much improved high ISO performance and autofocus systems!
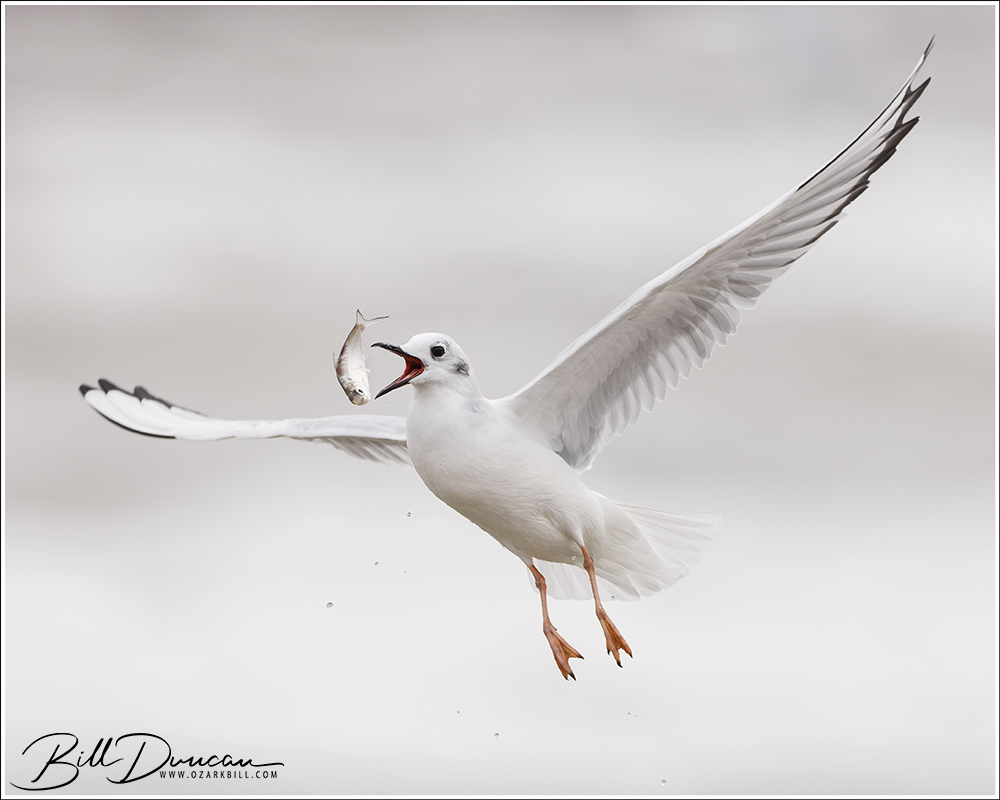
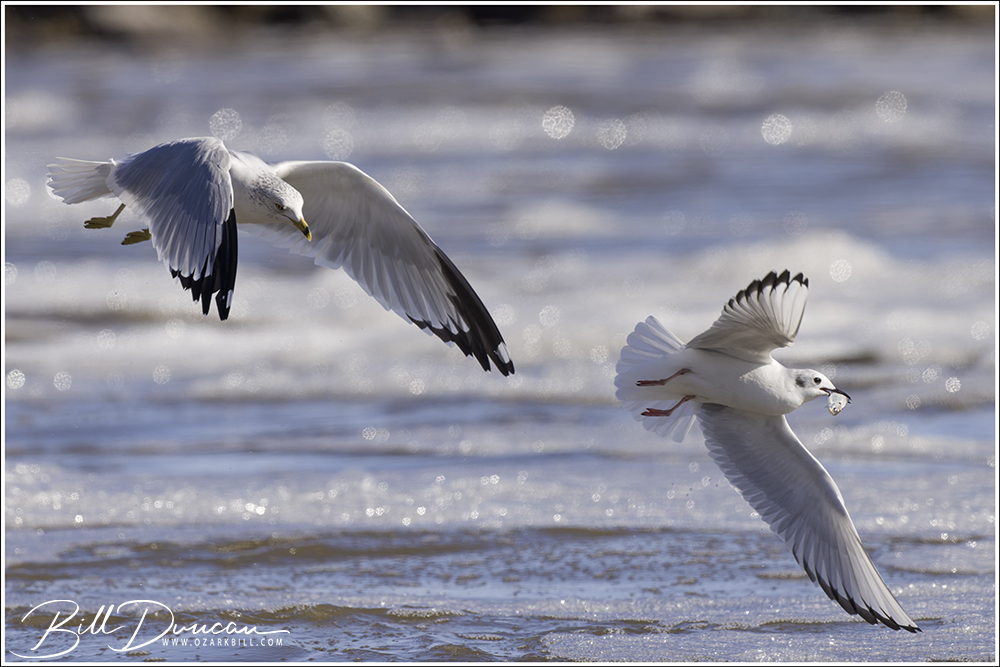
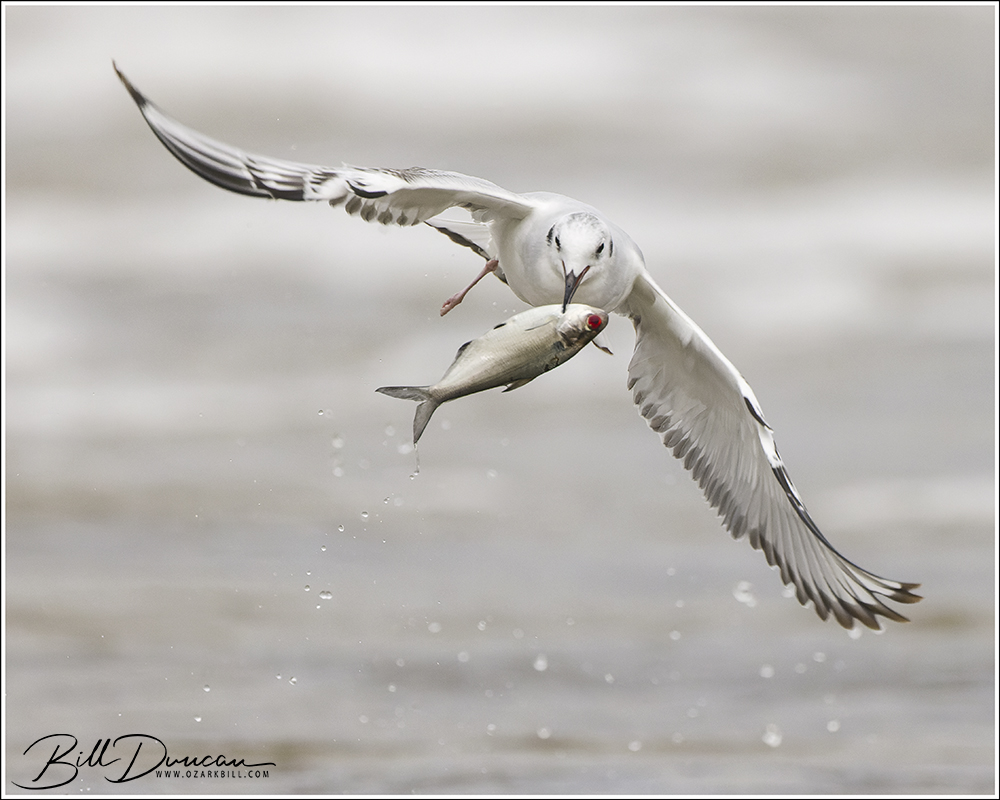
Photographing Bonnies while hunting like this is a real test of a photographer’s skills and their photographic gear. These guys are faster than a prairie fire with a tailwind. They have to be with the ever present Ring-billed Gulls nearby waiting to steal an easy meal.
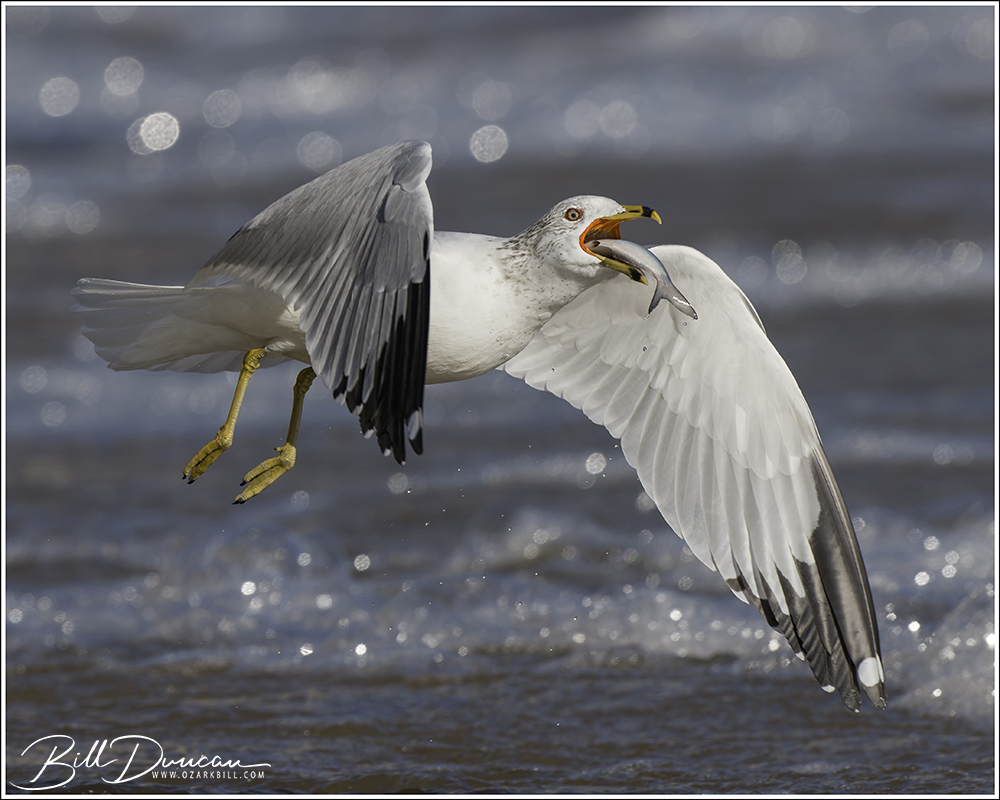
A Ring-Billed Gull attempting to take the Bonaparte’s Gull’s fish. Typically the Ring-billed are much too slow once the Bonnie has their catch.
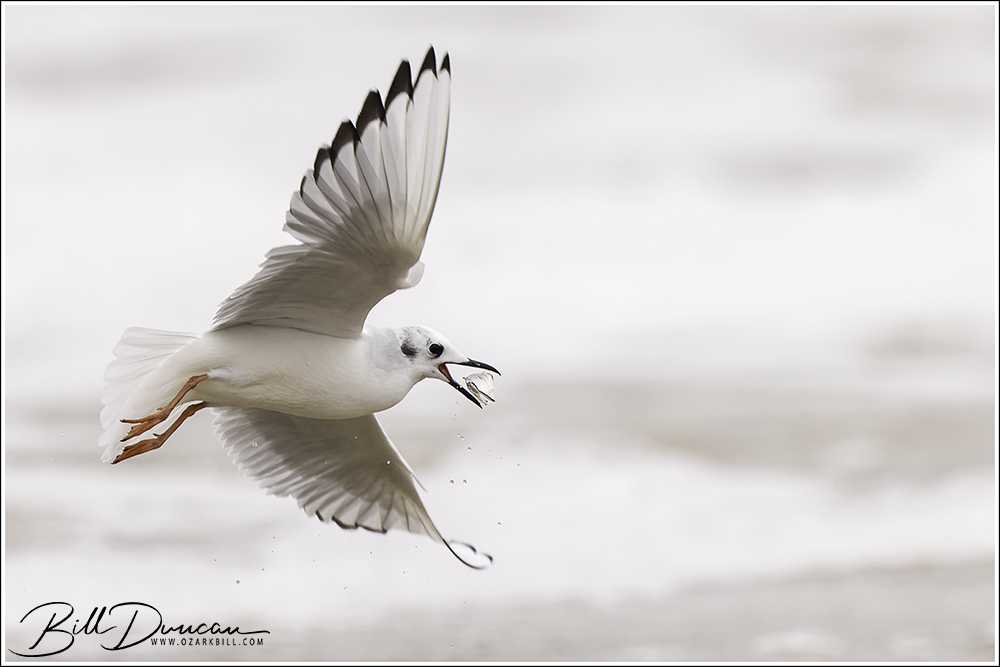
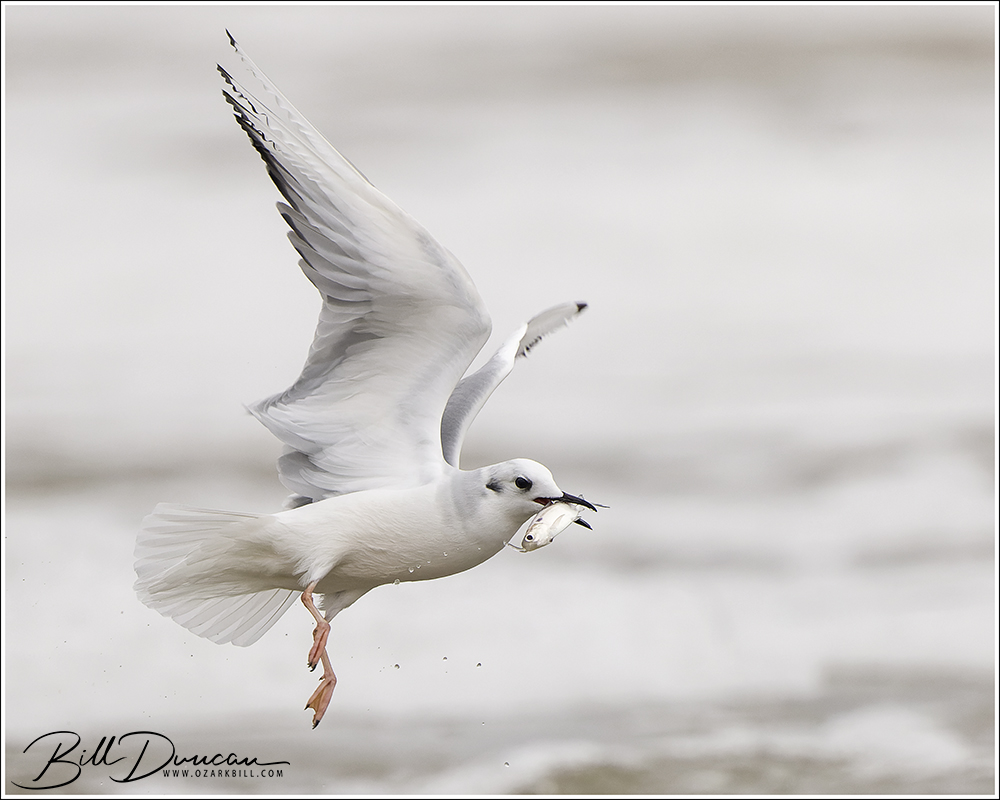
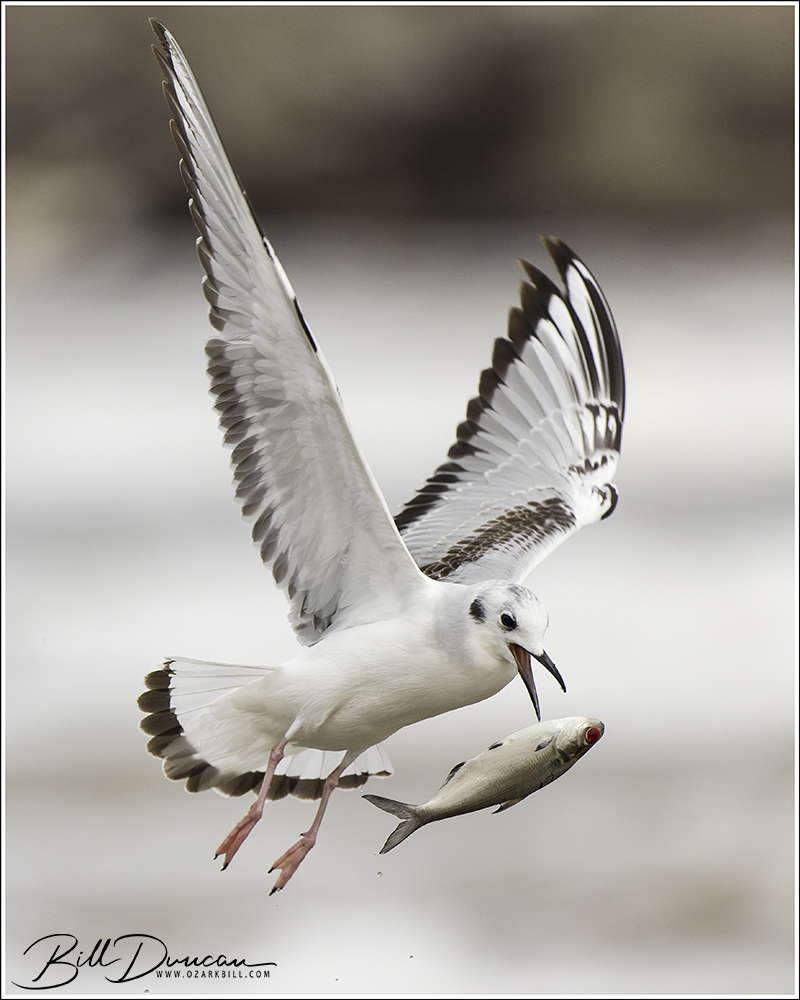
The photos I’ve shared so far all showed adult winter-plumaged Bonaparte’s Gulls. First-year winter birds are east to distinguish from the adults with their black tail bands and “M”-shaped black markings on their wing tops. These first year birds are every bit the skilled fishers that the adults are as you can see below.
On my next visit a week later, the skies were clear and I was now challenged with a pretty strong mid-day light coming into the spillway. I felt that this still should afford more speed and a bit better image quality than I had on my previous visit. Unfortunately, the Bonnies must have moved elsewhere. Most of the gulls present were Ring-billed and I only counted four Bonnies during the hour or so I was there.
Wildlife photographers looking for a fun and fast-paced challenge that has no chance of interfering with their photographic subjects should really consider visiting this location.