
M42, B33 and friends
The Orion molecular cloud complex is one of the most active regions of star formation and contains the brightest emission nebulas from our vantage point. The complex is between 1,000 and 1,400 light years from earth and is hundreds of light years across. This frame is just a small but significant portion of the whole complex and is one of four compositions I plan on making of this portion of the sky over the next couple of years.
Let’s discuss the objects. Even those with a small familiarity with the night sky should be able to determine where these objects are located once explained. Let’s start at the bright star in the upper left-hand corner of this image. This is Mintaka, the brightest (double) star in the asterism of Orion’s Belt within the Orion constellation. Going down and to the right, we reach the next star in Orion’s belt – Alnilam. The final star in Orion’s belt, Alnitak, is to the lower right of Alnilam. All three of these stars are tens of thousands to hundreds of thousands more luminous than our Sun. Alnitak is the primary reason we can see the reddish nebulosity known as the Horsehead nebula (IC434, B33). It’s strong ultraviolet radiation excites the hydrogen gas making up this nebula and releases hydrogen-alpha wavelengths that we can pick up on earth. Just a little to the lower left of the Horsehead is one of my favorite pieces in this composition. This is a very young star, still condensing and making its way out of the nebula.
To the left of the Horsehead is the Flame nebula (NGC 2024 and Sh2-277). This emission nebula is another birthplace of stars. It contains hundreds of young stars but specialized X-ray and infrared imaging is needed to resolve these.
To the right hand side of the image we first come to the comparatively smaller nebula known as Running Man (Sh2-279) and to the right of it lies The Great Orion Nebula (M42). M42 makes up a portion of the Orion’s Sword asterism and is the brightest nebula in the night sky. It is so bright it can be seen with binoculars or a low power telescope from dark skies. It is also the target of the first deep sky image ever taken – by Henry Draper in 1882. Within the star nursery that is M42 are approximately 700 young stars in various stages of formation. Throughout the image is a lot of darker nebulosity that is quite dim, requiring ample amounts of exposure time to resolve.
Collecting the data
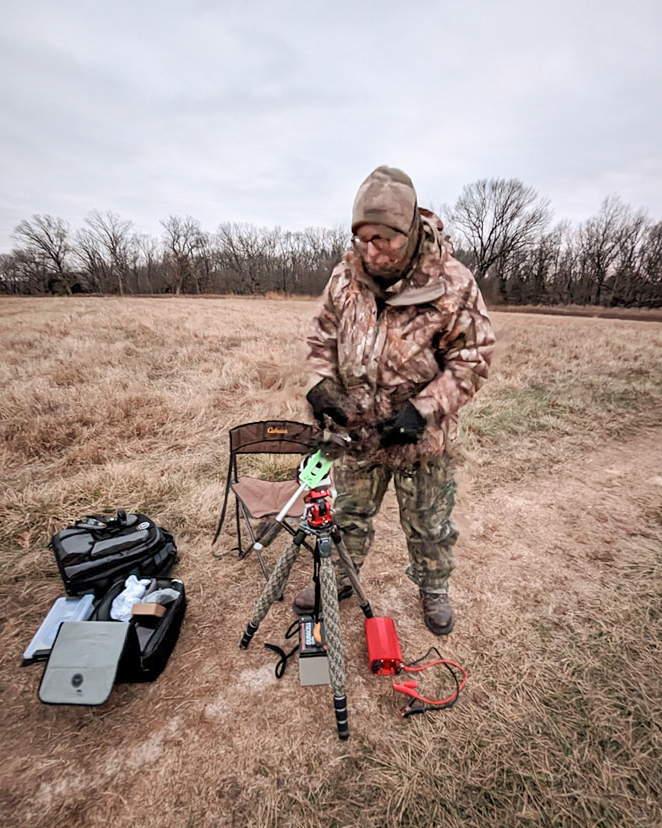
My original intent for this session was to image the usually paired group of Running Man and Orion. However, we were fighting to find a good night’s sky in December. The night we chose was forecast to be pretty clear but with 7-10 mph winds, gusting to 20mph. Because of the forecasted winds, I decided it wasn’t prudent to use the large and heavy 300mm lens that would be required to make these two the primary target. So, I decided to go with another composition that I had planned to do later. I used the much smaller and lighter 200mm lens that wouldn’t catch nearly as much of the wind and make getting accurate tracking of 30 second subexposures much easier. This image comprises a section of sky approximately 4 degrees by 6 degrees.
As I explained in last month’s image, M42 has a very wide dynamic range in intensity of its brightness. Due to this, I needed to take several sets of subexposures at different exposure lengths. Ultimately, I took seven different exposure length sets but only wound up using four of these in the final image.
Miguel and I imaged at our usual locale of Danville Conservation Area. On this night we ran into our first Conservation Officer who asked us what we could possibly be doing on such a cold and windy night. At first I was worried we would be shut down for the night as he mentioned that all conservation areas in the state were closed between 10:00pm and 4:00am. But, after some explaining and discussion he decided we were OK doing what we were doing and where we were doing it.
The sky forecasts were a little variable between the different apps we use. Some suggested that the skies would be mostly clear around sunset while others had clouds lingering until midnight. Thankfully, the skies cleared like magic a little after 9:00pm. We lost a couple hours of imaging time but in December you have to take advantage of what you can get. Temps were cold as you might expect ranging between -3 and -7 degrees C over the course of our session. I guess the temperature swing wasn’t as drastic as the last time I used the 200mm lens back in September because the focus of the lens wasn’t changing nearly as much as it had while imaging Andromeda.
Equipment
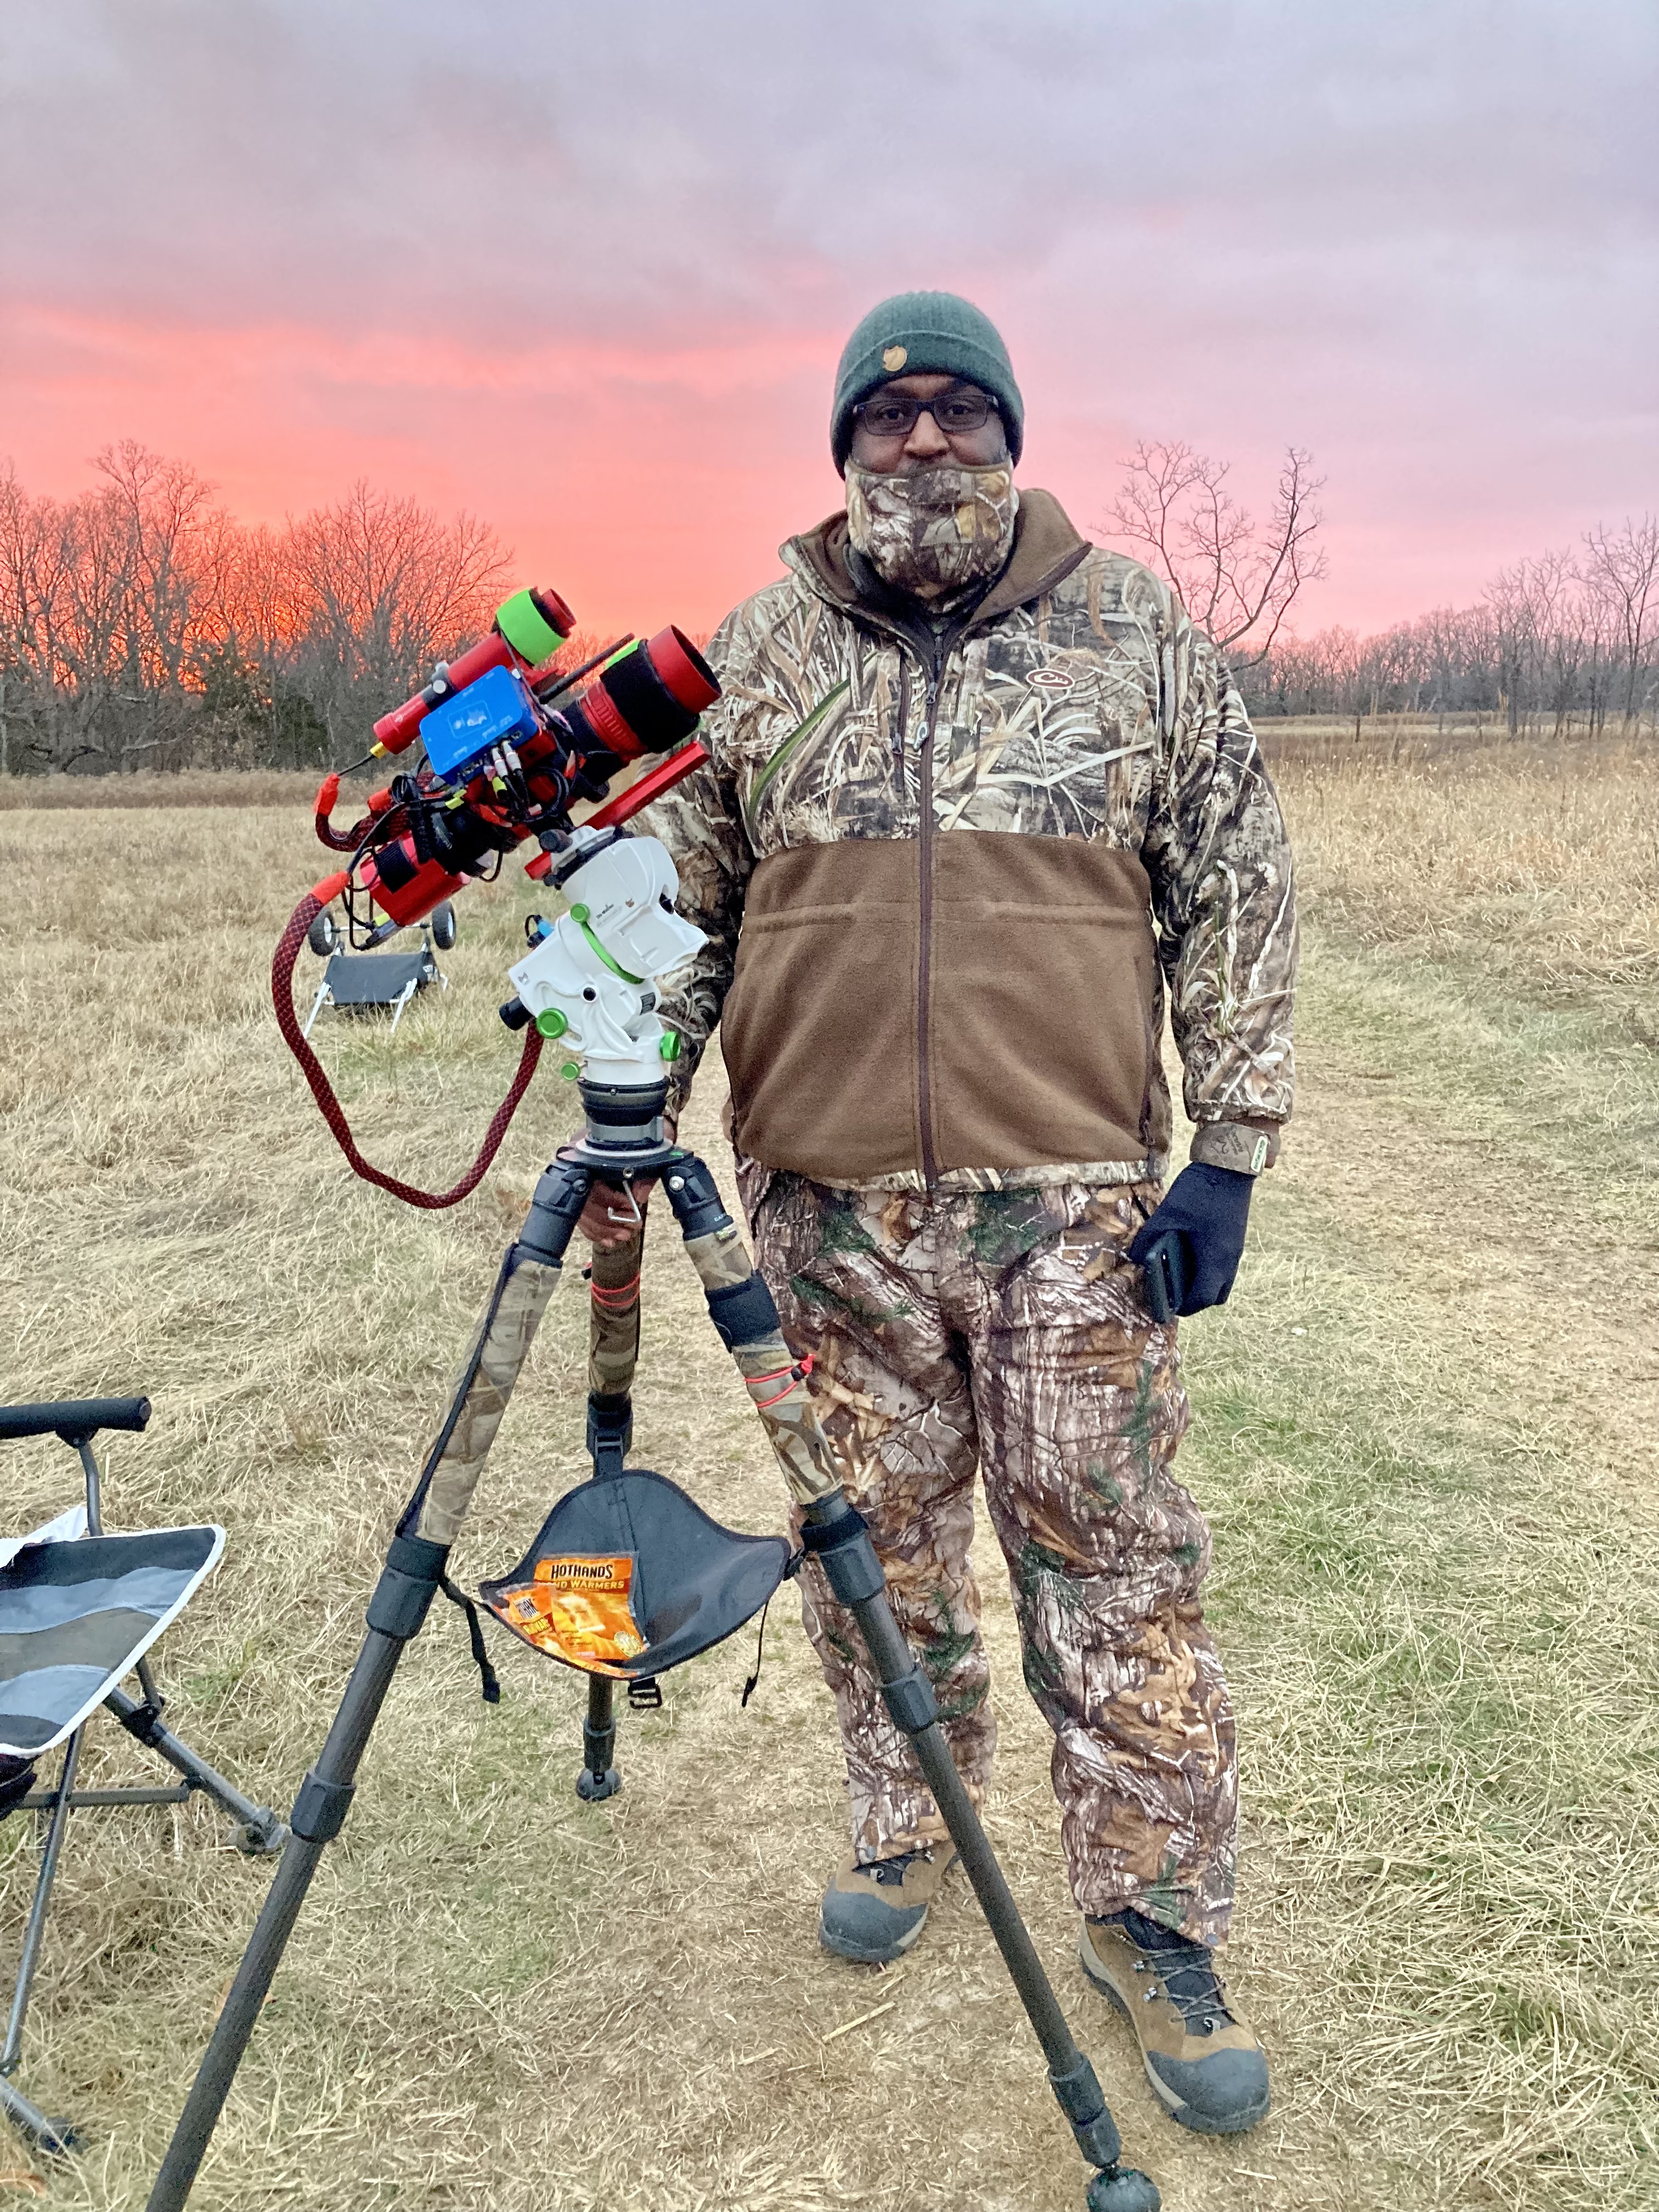
For this image, I broke in a few new pieces of equipment. First, this was the maiden voyage of my astro-modified Canon 7D mkii. This camera has its IR-cut filter removed. This modification allows for much more of the Hydrogen-alpha light to hit the sensor that is mostly blocked from stock dSLR camera bodies. In order to get as much of that warm coloration seen in the Horsehead and Orion nebulas with a stock body would have required much more integration time. As mentioned above, I used the Canon 200mm f/2 lens. When used with this crop-body camera, this gives an equivalent focal length of 320mm.
Another new piece of gear allowed for less hassle over the course of the night. I purchased a “dummy” battery that allows me to power the camera over the course of the entire night with my “little” cart battery and an inverter that I typically use for attracting moths at night. I love finding new uses for stuff I already have! The $20 cost of the dummy battery was a most welcome addition to my kit.
I also picked up a really nice right-angle viewfinder that attaches to the end of the polar scope of the tracking mount. To make the rig as sturdy as possible, I like to set it up low to the ground. Doing this requires me to often crouch low or even lie on my belly while wrenching my neck to be able to see through the polar scope. This is not a comfortable position to be in while doing the fine tuning of the controls on the wedge mount to get precise polar alignment. This new piece of kit allows me to simply look down and much more comfortably make these fine adjustments with both hands.
Finally, I picked up a lens heater that will prevent the formation of dew and frost on the lens objective. This was also run from the main battery and inverter and seemed to do the job. Previously, I used chemical heat packs for hand warming that I attached to the end of the lens with a velcro strap. This new powered dew heater should be able to be used with all the potential lenses I use for astrophotography.
I guess I’m getting a little more tech involved but nearly as much as my astro imaging partner, Miguel. See discussion below.
Thanks a lot to my patient wife Sarah for the early Christmas gifts!
Other equipment: Skywatcher Star Adventurer tracker without guiding on a William Optics Vixen Wedge Mount. Gitzo CF tripod, Canon shutter release cable. Laser pointer to help find Polaris and sky targets. Lots of layers to protect me from the cold!
Imaging details
Lights taken (ISO 3200): 30 seconds (389 taken, 284 used in integration); 15 seconds (108 taken, 90 used in integration); 8 seconds (209 taken, 194 used in integration) 1 second (195 taken and used in integration).
Darks: 30 taken at each of the 4 exposure times listed above.
Bias and Flats: Not taken. Removed most vignetting and some chromatic aberration while converting RAW images to TIF.
Processing
I knew this one was going to be a challenge, due to using the new astro-modified camera and handling different exposure lengths to capture the dynamic range within M42 that I would need to show the details in the core of the nebula. I believe I have the data needed to do a better job on this part of the nebula but after nearly ten hours spent on the computer, I was happy enough with what I got.
What really came as a surprise was the amount of satellites that crossed this portion of sky. I estimate that 90% of my 30 second sub frames had at least one, if not several, satellite and/or plane trails. This technically isn’t a problem because in the stacking software I use (Deep Sky Stacker), you can handle the satellites by using Kappa-Sigma Clipping stacking within DSS. However, when using the high dynamic range (entropy weighted average) stacking mode, which will blend the different exposures automatically, you cannot use Kappa-Sigma-Clipping to remove the trails! Or at least not that I have been able to figure out. Therefore, I had to stack each of the sub-exposure sets separately and then blend using layers in Photoshop. This wasn’t too terrible but it did require a lot more time on the computer.
Problems and learnings
I guess I didn’t learn my lesson the first time. Again, I walked away from the rig for 45 minutes without making sure the camera was taking pictures! I guess I was too interested in getting back to the car to read my book (Hail Mary by Andy Weir) and didn’t do my final check. It didn’t ruin the night but man was I pissed that I lost nearly an hour’s worth of potential integration when the targets were near their zenith. Never again!
I was also pleased to see that the output from DSS was relatively color balanced, requiring me to do very little to get accurate colors. Colors in these objects are subjective and free to change, but I strive to be as “accurate” as I can be. I was concerned by this because in the astro-modified cameras, naturally the red light is most abundant and many images taken with these cameras, when not color corrected, show way too much gaudy reds. I did not want my final product to look like that.
Probably my biggest regret is with the framing of this one. If I could do it again, I would have moved the frame more diagonally, allowing Orion and the Running Man to drift more towards the upper right-hand corner. This would have made a much better composition. But, I was primarily focused on keeping Mintaka in the upper left-hand corner as an anchor point for me to be able to see how much drift from the tracker was occurring. I’m going to try and think through the framing and composition better in the future.
Conclusion
Overall, it was another fun night and I am pleased with the final outcome. Miguel and I enjoyed ourselves as usual and we keep finding new things to learn and experience with each outing. I’m looking forward to seeing Miguel’s image. He focused on Orion and Running Man – my original target for the night.
Aside
I have mentioned numerous times previously that Miguel and I work together, typically imaging the same targets. However, we go about doing this in very different methods. Whereas I go about things in more of a manual, craft-like manner, Miguel is using state-of-the-art consumer level equipment. I realize that nobody cares (nor should they!) about what it took for the photographer to make their final image, but I thought it would be good to explain our differences in how we go about our image making processes.
Bill
I use dSLR cameras much like the cameras anyone uses for daytime photography and typical fast (f/1.4 – f/2.8) camera lenses that allow me to capture as much light as I can. I use a standard consumer tracking mount that is considered portable. All it does is work by using gears and belts to point the rig at the same portion of the sky to match the change in position of the stars due to the rotation of the earth. I need to do the process of polar alignment manually, which is a PITA! I also must find and position my target by myself, using my eyes or a laser pointer to help me find that night’s target. I must also manually change the camera’s settings to what I need them to be and must acquire proper focus, which is not easy to do with a camera lens at these wide open apertures.
Miguel
By comparison, Miguel lives on easy street! His imaging rig is composed of a temperature-controlled dedicated astronomy camera attached to a William Optics Redcat 51 apochromatic refractor AP scope. He uses a similar tracker but his is connected to a computer that is also connected to his camera and lens via a focus adjuster. This gives him three significant advantages. First, after pointing his polarscope towards the north, the computer polar aligns for him. He also has “go-to” capabilities. He simply tells the computer which object he wishes to target and the rig moves there! Even better, he can tell the computer the specifics on how he wants the target framed! Once on target in the framing he indicated, his rig now provides autoguiding. This means that the computer makes fine repositions during the imaging session, correcting for errors in the tracking that my rig suffers from. This means he can obtain much longer sub-exposure times. Where I am kept at 30-60 second exposures without significant star trailing, Miguel can get exposures in the 3-5 minute range. A distinct advantage indeed! To top it off, the computer in Miguel’s rig will obtain perfect focus for his scope and keep it there throughout the imaging session.
Miguel has spent a lot of money and time learning the components and how to control the different aspects of his computer software. I am not trying to sound the holier here, but I thought it would be interesting to describe the vast differences in our techniques and imaging rigs. I’m not hating, Miguel! 😉
To see Miguel’s astro images and much more of his nature photography interests, visit his blog.

Love it, wow a very accurate report of the night and all of the processes. This should be in the Nature Notes. Well done, Bill.
Thanks a lot, Miguel. I think I will rewrite this a bit and submit to NN. Thanks for the idea.